
Ultimate guide to get the meltan box pokemon go For Asus ROG Phone 8 Pro | Dr.fone
Ultimate guide to get the meltan box pokemon go For Asus ROG Phone 8 Pro
If you are a huge Pokemon fan and loves to play pokemon go, you will definitely be aware of the latest addition to this family- meltan. It’s the only 8th generation pokemon. The first appearance of this pokemon was via Pokemon Go, as a mysterious silhouette. There are a huge hue and cry among the pokemon lovers about this mystery box pokemon. With its unannounced entry, it has sent the internet raving mad. It’s not an easy task to catch this pokemon, though. Let us take you through an ultimate guide regarding how you can get the meltan box pokemon go in 2020. Stay tuned and keep reading!


Part 1: What is the meltan box and how does it work?
Meltan, the mythical Pokemon is also described as a Hex Nut Pokemon. A major part of its body is built from liquid metal and its shape is fluid. It generates electricity using the metal that it absorbs from the outside sources. The pokemon uses its arms and legs to corrode metal and absorb it into its own body.

The meltan box is actually a mystery box that you cannot receive through the traditional method. It requires you to make an unconventional move to get this box and catch this different pokemon. The process involved to get the meltan box pokemon go include the following:
- The first and foremost thing you need to do is deport a Pokemon from Pokemon Go to Pokemon Let’s Go. You don’t have to transfer it to your own copy of Let’s Go. A friend’s copy would come in great help here.
- For making the transfer, you will get a mystery box in Pokemon Go. This box will allow the meltan to run into the wild for about 30 minutes. It gives you the chance to latch the pokemon.
- If you cannot catch meltan in 30 minutes, you will have to wait and repeat the above process again. As the mystery box will close after 30 minutes, and meltan will vanish from the wild.
Part 2: How to connect pokemon go to pokemon switch
The trainers with Pokemon let can send Pokemon from Pokemon Go to Nintendo switch. Like transferring the pokemon to Professor Willow, the trainers will earn candy to send their Pokemon to the switch. These pokemons will appear in the Go Park complex of your Pokemon Let’s Go.
Rewarding you for sending Pokemon to the switch, you will receive the meltan box pokemon go. This mystery box will allow you to catch the mythical pokemon.
The steps to connect Pokemon Go to Switch is clearly defined in the following points:
Step 1: The first step you need to take to connect the Pokemon Go to Switch is to launch the Pokemon Let’s Go from the Home Menu.
Step 2: During the game, press the “X” button to access the in-game menu, followed by the “Y” button to open the Options Menu.
Step 3: Choose the option “Open Pokemon GO Settings”.


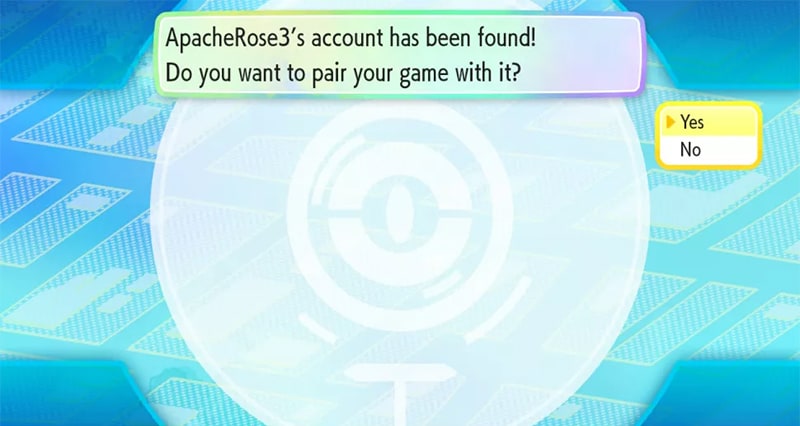
Step 4: When asked, select the option “YES”. This will allow the game to begin the search for a Pokemon Go account that you can pair with.
Step 5: The next step will require you to set up your Pokemon Go account to pair with the Nintendo Switch game.
Step 6: For pairing up, you will need to tap the Poke Ball icon on your screen and then select the “Settings” option.
Step 7: Scroll down to the option “Nintendo Switch” and select it.
Step 8: Then choose the “Connect to Nintendo Switch”.
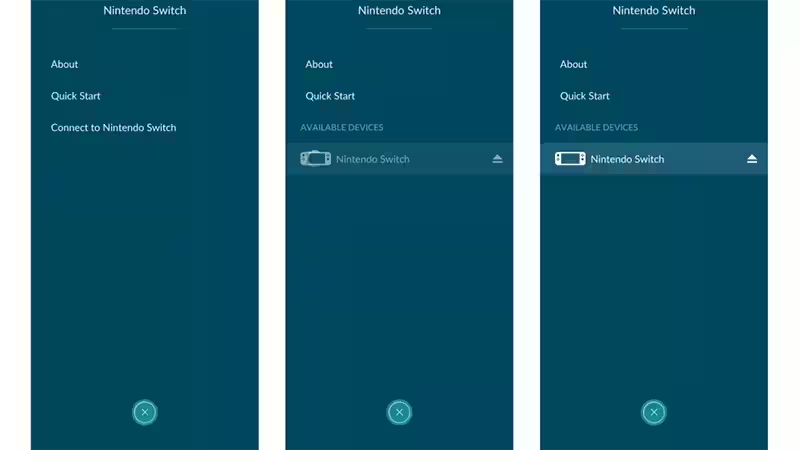
Step 9: This will allow Pokemon Go to search for a Nintendo Switch game to connect with.
Step 10: When you finally see that the Nintendo Switch console is locating the Pokemon Go account, select the “Yes” button on the console to establish the pairing.
Step 11: Once the pairing is done, you can now transfer the Pokemon from the Pokemon Go smoothly. Let’s get to know that too.
After the pairing is complete, you are now ready to send your Pokemon to the Go complex Park in Pokemon Let’s Go. This can be done by following the process:
Step 1: Open the Pokemon Let’s Go app.
Step 2: In Fuschia City, talk to the Go Park Complex Attendant and select the “Bring Pokemon” option.
 Project Manager - Asset Browser for 3Ds Max

Step 3: Open Pokemon Go.
Step 4: In the map view, tap on the button “Main menu”.
Step 5: Then, tap the “Pokemon” Button.
Step 6: At the top-right section of your screen, you will find the “Nintendo Switch”, tap on that.
Step 7: Now select the Pokemon you want to transfer. Please note that you can only send the Pokemon you have originally discovered in the Kanto Region.
Step 8: Now, click on the “Send to Nintendo Switch”, when you have finally decided which Pokemon you want to send.
 CollageIt Pro
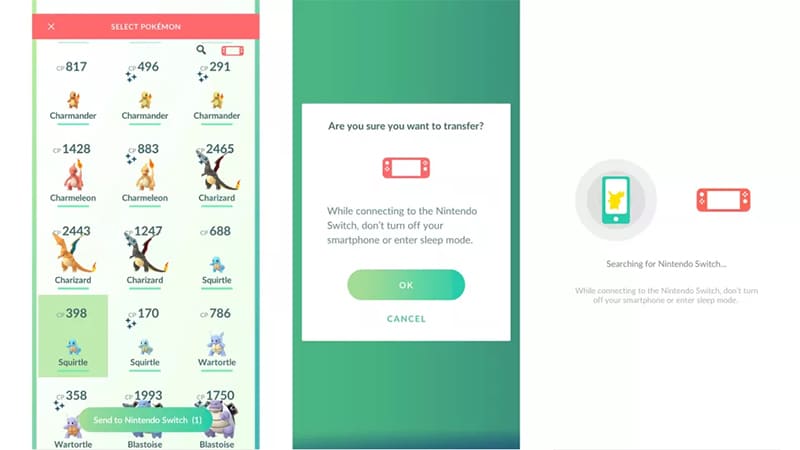
Following the aforementioned steps will allow you to get the pokemon go mystery box.
 NeoDownloader - Fast and fully automatic image/video/music downloader.
Part 3: Tips to get more meltan boxes
There is a lot of confusion among the Pokemon trainers regarding how to get meltan in pokemon go. Here, we share a few tips for doing the same and reducing your confusion to zero.
Tip No.1: Transfer Pokemon to Win a Mystery Box
With the help of pairing and connecting your Pokemon Go to the Nintendo Switch, you can actually get the opportunity to transfer the Pokemon and win a mystery box for yourself.
Tip No.2: Transfer Pokemon to Friend’s Switch
If you cannot establish a pair with your Nintendo Switch, you can always look for your friends. In case you don’t have a Nintendo Switch with a copy of Let’s Go Pikachu, do not worry. You can still obtain a shiny meltan pokemon go mystery box. You can send Pokemon to your friend’s Nintendo switch and bang… you get the chance to catch the mythical pokemon.
Tip No.3: Use Dr. Fone Virtual Location Service
You can catch not just one but several Meltans through the mystery box. All you need to do is move around in your area and discover the meltan available near you. But not every time, you can get this lucky to obtain the opportunity to maximize your mystery box. If this is what you are thinking, then we are happy to say that you are wrong!
With the help of Dr.Fone- Virtual Location service that is developed and designed for iOS devices, you can change your GPS location with just one click.
It is well-known that Pokemon Go is a location-based game that offers several services only according to your location. You might find it difficult to maximize your pokemon go meltan box without moving or looking for services out of your region. Dr.Fone Virtual Location is here to help. With this service provider’s help, you can change your location and enjoy the unlimited fun that you had always desired. It will also be a great rescue for you if you cannot catch a meltan in your region. Try it and get the Hex Nut Pokemon.
Conclusion
Resolving your query about getting meltan box and offering you a detailed guide and assistance, we aim to help you continue your fun-experience with the game. Play, look for and find all the meltan! You can then evolve your meltan into a formidable Melmetal. You will need around 400 meltan candy to evolve into Melmetal, so be sure to catch as many as possible and enjoy!
4 solution to get rid of pokemon fail to detect location On Asus ROG Phone 8 Pro
Pokémon go failed to detect location is an error that is frequently faced by the players and there are several reasons for it. From device to server-based all the reasons amount to the error and therefore the right solution must be applied to get the work done with ease and perfection. The location-based attribute of the game is something that has been one of the best features. It is the sole reason for which the game is not only popular but also one of the most downloaded games of all time. It is therefore important to overcome fail to detect location error in this game.
Part 1: Why does Pokémon fail to detect location?
The two main and frequent errors that are related to the Pokémon are error 11 and error 12. These not only frustrate the users but also hamper the game experience. Failed to detect location Pokémon go is the result. This part of the article will make sure that you get all the information that is needed to overcome the issue. The GPS joystick failed to detect location error will also be overcome and you will also be able to guide others.
Causes of Error 11
- If the game failed to detect location Pokémon go fake GPS then the most common reason is the fact that the GPS has been disabled. The internet and GPS are the two important aspects of this game. If anyone is not available then it is a must that the game will not work at all.
- Once the game has been installed it requires certain permissions that should be granted for proper working. All the permissions must be accepted for the game to work fine. If the GPS access has not been granted then it should be so that the GPS joystick Pokémon go failed to detect location error is resolved and you can enjoy the game.
- To install some applications and to enhance the features of the phone it is at times rooted in the case of android or jailbroken in the case of iPhone. In both cases, you will get the Pokémon to go failed to detect location fake GPS error. It is therefore important that the issue is resolved by getting the Asus ROG Phone 8 Pro device back to its original shape. It can be done by unrooting the Asus ROG Phone 8 Pro devices so that the issue is resolved.
Causes of Error 12
- The Mock location on the Asus ROG Phone 8 Pro device is enabled can lead to failed to detect location GPS joystick or error 12 on the Asus ROG Phone 8 Pro device. It is therefore advised to make sure that the location in question is disabled to get the gaming experience back on track.
- The other and the most common reason for the error 12 is the fact that the GPS signals are not received by the Asus ROG Phone 8 Pro device. It also leads to Pokémon failed to detect location error and will make sure that you get all the enjoyment for which the game has been downloaded.
Part 2: 3 solutions to fix Pokémon fails to detect the location

WPS Office Premium ( File Recovery, Photo Scanning, Convert PDF)–Yearly
Solution 1: Turn on GPS
This is the most common method that can be applied to make sure that the game works perfectly.
i. Drag the notification panel down on your device.
ii. Click on the location to turn it ON.

Solution 2: Setting Permissions for the application
If the right permissions are not given to the application then it can also lead to the fake GPS failed to detect location. To make sure that this is overcome you need to follow the steps as under.
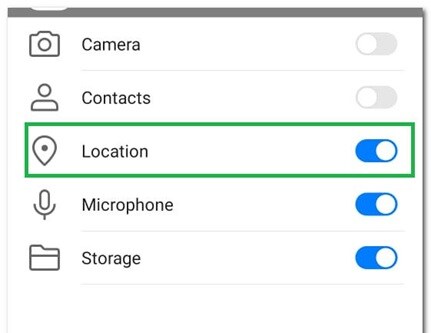
i. Go to Settings > Applications > Apps to access the permissions for the application.
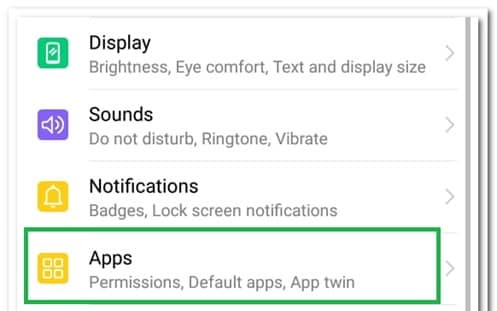
ii. Go to Pokémon Go > Permissions > Turn on location to get the issue resolved.
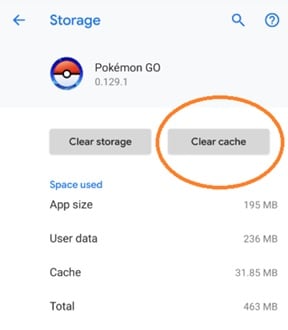
Solution 3: Clear Cache
i. Go to the Settings of your device
ii. Click on the app’s icon on the next screen
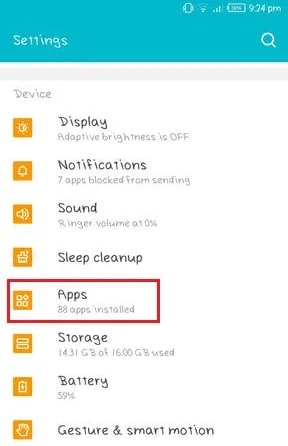
iii. Click on the storage option.
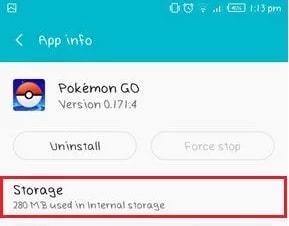
iv. Clear data and cache and restart the Asus ROG Phone 8 Pro device to get the issue fixed.
Part 3: Dr.Fone Virtual location change your location in one click
To fix the fake GPS Pokémon go failed to detect location Dr. Fone’s virtual location is the best and the state of the art program that can be used. It is not only the best but also allows the users to overcome the issues that are presented by the other similar programs. With this program, it is easy to make sure that the overall game performance improves in terms of location detection. You can teleport with ease using this program. With an intuitive interface and a professional team backing the program, you get the ultimate results. Not only Pokémon but all the location-based and AR games this program is a boon.

How to use Dr. Fone Virtual Location
Step 1: Program Installation
First of all download and install the program to get started.

Step 2: Enable Virtual Location
Click the get started icon once the iPhone has been connected to the system and the virtual location has been enabled.

Step 3: Locate the Asus ROG Phone 8 Pro device
Click the center on a button to make sure that your location is detected by the program.

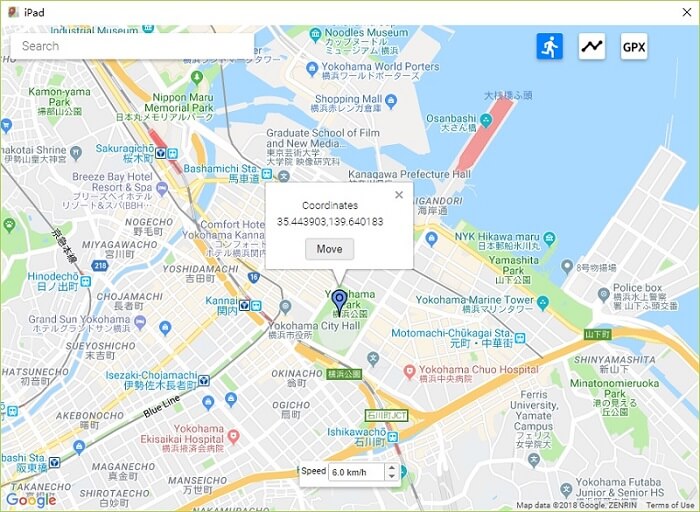
Step 4: Change Location
The third icon on the upper right corner is to be pressed to teleport. In the bar type the name of the location you want to teleport to.

Step 5: Move to a teleported location
Click on move here to get to the location that has been selected.

Step 6: Validation
Your iPhone will show the same location as on the program and this finishes the process.


Conclusion
Dr. Fone’s virtual location is the best and the most advanced program that will make sure that you get the best results. It will not only enhance your gaming experience but will also remove the Pokémon go GPS joystick that failed to detect location error with perfection. It is the best program that is easy to use and there are guides online that further foster the process. With this program, it is easy to get a step ahead for all AR and location-based games and to enjoy to your fullest.

The Best iSpoofer Alternative to Try On Asus ROG Phone 8 Pro
“Is iSpoofer for Pokemon Go not working anymore? Can someone tell me how to spoof my iPhone X location now when the iSpoofer tool is shut down?”
If you have been using iSpoofer for a while to change your iPhone location, you can encounter a similar situation. Since iSpoofer is no longer available, users are actively looking for its alternative. In this post, I will let you know the iSpoofer use and why we can’t take its assistance to change the Pokemon Go location anymore. I will also make you familiar with the best iSpoofer alternative for iPhone and Android.

Part 1: Why did iSpoofer shutdown?
Earlier, iSpoofer used to be one of the most popular apps to change our location on Pokemon Go. Sadly, the application is no longer working and you can’t even do iSpoofer download from its website.
Why did iSpoofer shutdown?
- The use of iSpoofer for Pokemon Go is against the terms of the game (as it doesn’t allow the use of third-party apps).
- Recently, Niantic caught many people using iSpoofer for Pokemon Go and this got their accounts banned.
- Since the iSpoofer use is no longer applicable, the company has shut down the product’s availability.
- Even if you have already done the iSpoofer download, the application will not be supported by Pokemon Go and its use will get your account terminated.

.png) Kanto Player Professional
Kanto Player ProfessionalWill iSpoofer work again?
Most likely, the chances of iSpoofer working again are pretty bleak. This is because Pokemon Go users were the major target customers of the product. Since Niantic has blocklisted iSpoofer a while back, Pokemon Go players can no longer use it. Therefore, it is better to look for a reliable iSpoofer alternative instead.
Part 2: The Best iSpoofer Alternative to Change your iPhone Location
If you are looking for an iSpoofer alternative to spoof your phone location, consider picking Dr.Fone – Virtual Location (iOS & Android) . The application is extremely easy to use and can instantly change your device location. Here are some of the reasons why Dr.Fone – Virtual Location (iOS & Android) is the best iSpoofer alternative:
- Compared to iSpoofer, using Dr.Fone – Virtual Location is extremely easy and it will not need jailbreak access as well.
- Since it is a 100% secure way to spoof your iPhone location, your Pokemon Go account won’t be compromised in the process.
- You can spoof your device location to anywhere you want by entering the place’s address or coordinates using the application.
- There is also a provision to simulate the Asus ROG Phone 8 Pro device’s movement between multiple spots at any speed of your choice.
- The interface will also display a GPS joystick that you can use to move realistically on the map.
You can follow these simple steps to use this iSpoofer alternative to change your iPhone location easily.
Step 1: Connect your iPhone to the system
To begin with, you can connect your iPhone to the system and launch the Dr.Fone – Virtual Location on it. Now, agree to its terms and click on the “Get Started” button.
Step 2: Enter the target location
Once your iPhone is detected, the interface will display its present location. You can now click on the teleport mode icon from the top.
Now, please enter the address or the coordinates of the target location and load it on the map.
Step 3: Spoof your iPhone location
As you would select the target location, the application will automatically change the interface. You can now drag the pin around and even zoom in/out the map to select the target location. Lastly, you can select the “Move Here” button and the location of your iPhone would be changed automatically.
You can now launch Pokemon Go or any other GPS-based app to check the spoofed location of your iPhone.

Note: Keep in mind the cooldown duration before changing your location to ensure your account won’t get banned by Niantic while using the location spoofer. For instance, wait for a few minutes and only change your location realistically.
Part 3: How to Spoof your Asus ROG Phone 8 Pro Device’s Location for Pokemon Go?
Unlike iOS devices, it is pretty easy to spoof location in Android devices. This is because Google allows us to mock the location of our device using any reliable mobile app (unlike Apple). Therefore, if you are looking for an iSpoofer alternative for Android devices, you can follow these basic instructions.
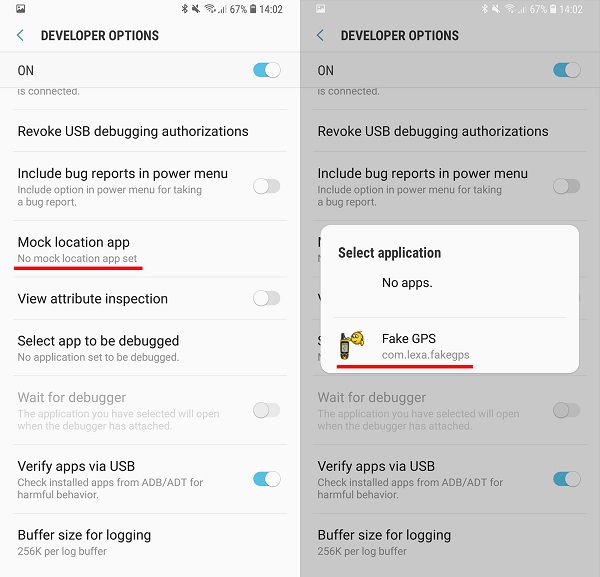
Step 1: Enable the Mock Location feature
At first, you need to turn on the Developer Options to enable the Mock Location feature. For this, go to your phone’s Settings > About Phone and tap the “Build Number” seven times to turn on Developer Options.
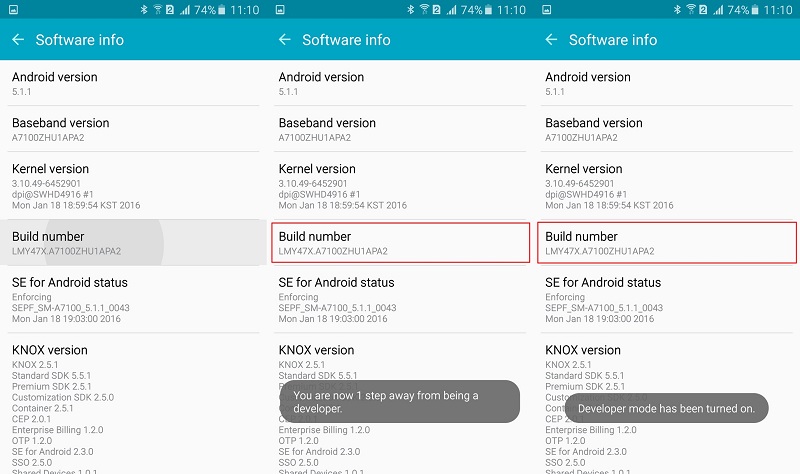
Great! Now you can go to your phone’s Settings > Developer Options and turn on the Mock Location option.

Step 2: Install a Mock Location App
Afterward, you can go to the Play Store and install any reliable mock location app from developers like Hola or Lexa. Let’s suppose we have installed the Mock GPS app by Lexa on the Asus ROG Phone 8 Pro device.


Once the app has been downloaded, you can again go to your phone’s Settings > Developer Options and set the app as a default tool to spoof your location.
Parental Control Software
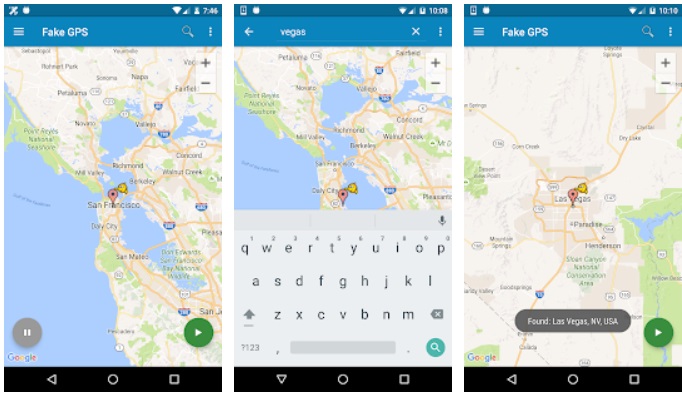
Step 3: Change your device’s location
That’s it! Now you can launch the mock location app and enter the address or coordinates of any target location. You can further adjust the pin and drop it anywhere you like to spoof the Asus ROG Phone 8 Pro device’s location.
There you go! After reading this post, I’m sure that you would be able to know about the iSpoofer use for Pokemon Go. Since iSpoofer has been shut down, you can no longer use it to change your iPhone location. Therefore, you can consider Dr.Fone - Virtual Location (iOS & Android) as an ideal iSpoofer alternative for your device. In just a few clicks, you can change the location of your iPhone anywhere you like and that too without jailbreaking your phone.
- Title: Ultimate guide to get the meltan box pokemon go For Asus ROG Phone 8 Pro | Dr.fone
- Author: Lary
- Created at : 2024-07-22 22:56:43
- Updated at : 2024-07-23 22:56:43
- Link: https://android-pokemon-go.techidaily.com/ultimate-guide-to-get-the-meltan-box-pokemon-go-for-asus-rog-phone-8-pro-drfone-by-drfone-virtual-android/
- License: This work is licensed under CC BY-NC-SA 4.0.