
In 2024, Where Is the Best Place to Catch Dratini On Xiaomi 14 | Dr.fone
Where Is the Best Place to Catch Dratini On Xiaomi 14
Dratini is a rare Pokemon that can be found in the wild. It is a Dragon-type Pokemon that evolves into Dragonair and then into Dragonite. Dratini is a popular Pokemon among players due to its rarity and powerful evolution. If you are looking to catch Dratini on your Xiaomi 14, you may be wondering where the best place to find them is.
Dratini is one of the Pokémon creatures that resemble a snake. It has an elongated blue body with a blue white underside. It carries three-pronged fins on each side of its head which are white in color. Dratini also has a white bump on the forehead.
Dratini has an energy level that is constantly increasing, which makes it grow and can reach a length of more than 6 feet. It sheds its skin every time it has to grow, and usually hide behind a waterfall when shedding. The colony of Dratini lives underwater, living at the bottom feeding on food that falls from the upper levels. Outrage is the signature move for this Pokémon creature.
Part 1: What’s the evolution of Dratini?
Dratini undergoes two different evolutions
The first un-evolved version is the serpentine Dratini that looks like a snake and continues shedding its skin as it grows. When you get to level 30, Dratini evolves into Dragonair, and at level 55 it becomes Dragonite
Dragonair
This is an evolution of Dratini, which has a long scaly serpent-like body. It still retails the blue body with a white underside. The white bump on the forehead now becomes a white horn. The budding wings on the side of the head have now grown into full wings. It also carries three crystal orbs, with one on the neck and the other two on the tail.
Dragonair has the ability to stretch its wings so it can fly. It has a huge amount of energy in the body and can discharge the energy through the crystals. The energy that it releases has the ability to change the weather wherever it is. Dragonair can be found in seas and lakes.
Dragonite
This is a Pokémon character that truly resembles a dragon and is the second evolution of Dratini. It has a yellow thick body, and a couple of antennae that come out of its forehead. It has a striated underbelly. The body is quite large when compared to the small wings.
Dragonite can fly at very high speeds despite its bulky appearance. It is a kindhearted Pokémon, which is as intelligent as a human being. It has been found to have tendencies to save humans from disasters, such as saving those who have come from a capsized ship on the high seas. It lives near the sea and is extremely rare in the Pokémon world.
Part 2: Where can I find the Dratini nest?
Dratini is a Pokémon that lives in the water. Since it loves lakes and seas, you can find it when you visit areas that are near water. For example, in the United States, the most famous nests for Dratini are found in North Eastern San Francisco, Pier 39 and Pier 15. You will always find Dratini at these sites and they are famous for people who want to farm Dratini.
You may also g West to Squirtle Nest where you can get a lot of Dratini.
Dratini has a 5% spawning chance every day, so if you have the time, you can spend it on these sites as you enjoy the watery view and wait for it to appear.
Dratini nests can also be found in other parts of the world, such as Tokyo, Japan; Sydney and New South Wales, Australia; Paris, France and others.
Part 3: Are the Dratini nest and spawn spot in the same place?
This is quite a common question for those who are new to the Pokémon universe. Basically, Dratini nests and spawn points are the same for a period of two weeks. The nests then migrate leaving the spawn points to spawn different types of Pokémon.
If the Dratini nest migrates, it can still come back in the future. You should always keep an eye at the spawn point where you first encountered your first Dratini Nest; it may come back once more and you can continue farming Dratini.
Dratini nests will migrate on alternate Thursdays at midnight. The nest migrations are random, so make sure that you visit and hit them many times over the two weeks in order to get the most Dratini that you can.
Part 4: How to increase the possibility of earning Pokémon Go Dratini?
As mentioned earlier, Dratini can be found in certain places around the world. If you live outside these regions, you cannot be able to get Dratini. The best way to go about getting Dratini in such cases is to virtually relocate your device. This means that you can take your device to Tokyo nest sites even if you live in Africa.
The best app to use for teleportation is Dr.Fone - Virtual Location (iOS)
Features of Dr.Fone - Virtual Location (iOS)
- Instantly teleport to an area where a Dratini nest has been found and remotely collect as many as you can.
- Use the joystick feature to move around the map until you come across Dratini.
- The app allows you to seem to be walking, riding a bike, or in a vehicle, on the map. This simulates real-time travel data, which is important when playing Pokémon Go.
- Any app that relies on geo-location data can safely use Dr.Fone - Virtual Location for teleportation.
A step-by-step guide to spoof your location using Dr.Fone Virtual Location (iOS)
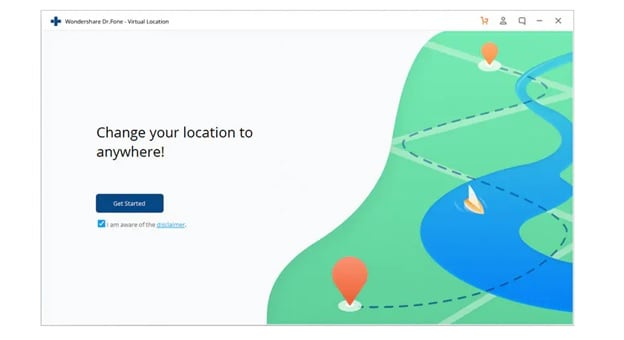
On the official Dr.Fone page, download and install Dr.Fone on your computer or you can click the Download button below to download it directly. Launch it and then go to the Home screen and click on “Virtual Location”.

After entering the virtual location module, connect your iOS device to your computer using an original USB cable.
Next, click on “Get Started”; you will now be able to start the spoofing process.

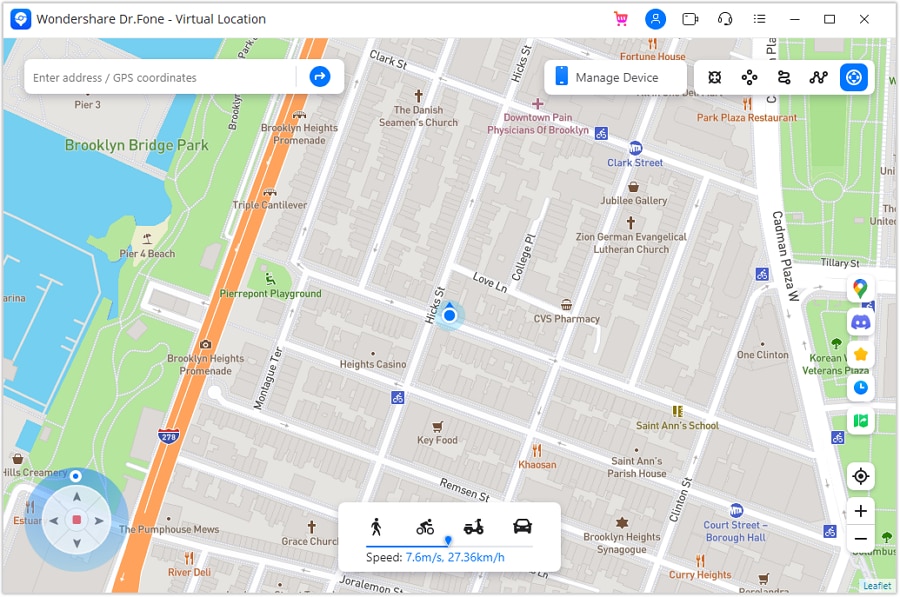
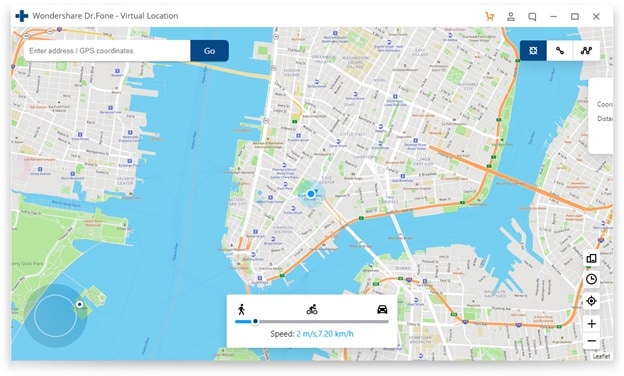
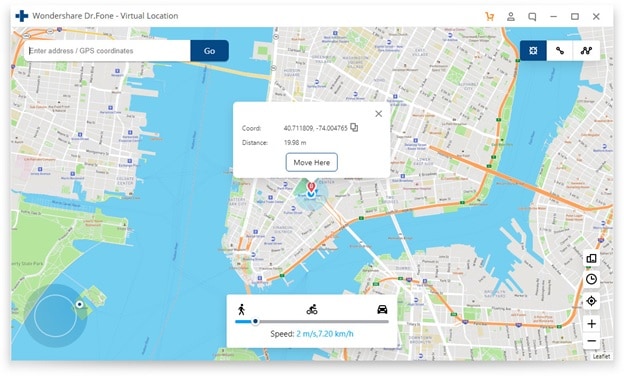
Looking at the map, you can now see the actual location of your device. If the coordinates are not the correct ones, go to the bottom of your computer screen and click on the “Current Virtual location” icon. This will instantly point to the current virtual location of your device.

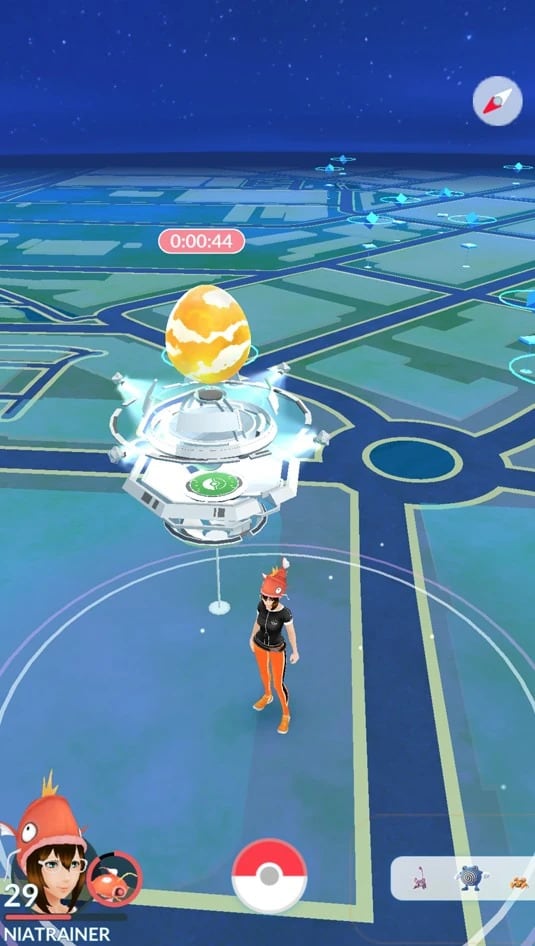
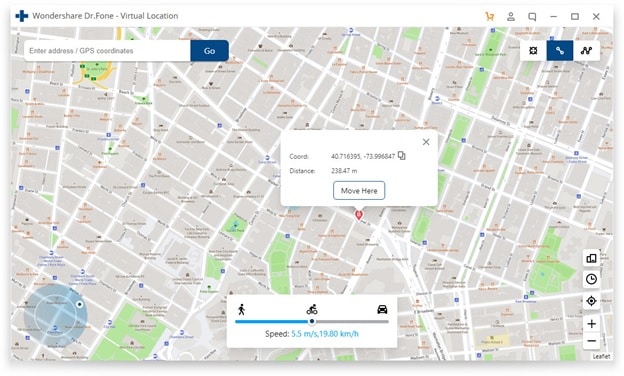
Now go to the top side of your computer screen and click on the third icon on the bar. This instantly puts you in “teleport” mode. Now enter the coordinates of the Dratini nest that you have located. Hit the “Go” button and your device will instantly be teleported to the coordinates you entered.
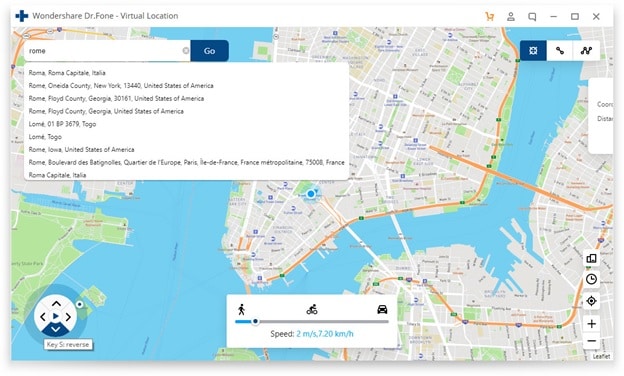
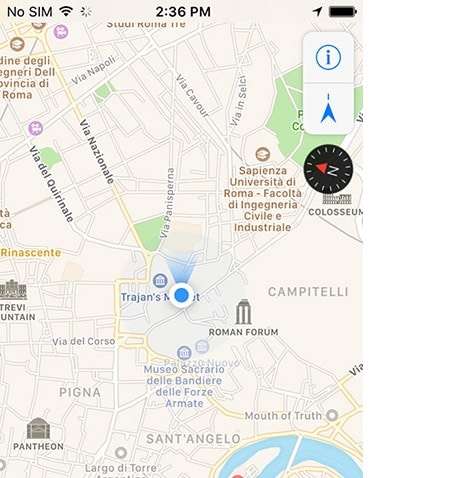
The image below shows an example of coordinates entered for Rome, Italy.

Once you have successfully teleported your device, you will be able to navigate to the area where the Dratini nest has been found. You can use the joystick feature for this. You should also click on “Move here” so your location is permanently moved to that place.
You may now camp and keep hitting the Dratini nest so you can farm as many as possible within the two weeks before the nest migrates to another location.
Camping and looking for other Pokémon in the area will help you cool down and therefore avoid being banned from the game for spoofing your iOS device.

This is how your location will be viewed on the map.

This is how your location will be viewed on another iPhone device.


In conclusion
Dratini is one of the most friendly but rare Pokémon to get. It can evolve from a small serpentine worm, into a might, good-hearted dragon. This is one of the Pokémon that people love to farm for trading and taking part in raids and such events.
When you need to, you can teleport your device to an area where Dratini is popular using Dr.Fone - Virtual Location (iOS). Use the Dratini nest maps to find Dratini, and then visit the area or teleport there.
How can I get more stardust in pokemon go On Xiaomi 14?
Pokemon Go is one of the most popular games worldwide, with over 80 million active players. The game will present tasks you should complete to collect items and Pokemons, thus improving your skill levels and making you better in the game.
One of the essential items you can get is Stardust, which will help you become the best trainer in the Pokemon Go industry. If you’re new to the game and are wondering what the importance of Stardust is in Pokemon Go, read ahead. We’ll teach you all about it and present methods to collect this item faster.
Part 1. What Is Stardust in Pokemon Go?
Stardust is a consumable item that allows you to strengthen your Pokemon. This item will help you reach the maximum of your Pokemon, making them more resilient and ready for potential fights. Moreover, Stardust is essential for trading – you must have a specific Stardust level to trade your valuables with another trainer.
Part 2. How Is Stardust Used in Pokemon Go?
Stardust can come in handy in several different scenarios in the Pokemon Go game. We’ll present all the use cases below to help you navigate your journey and learn the importance of collecting Stardust.
- Power up– the most crucial feature of Stardust is that it can power up your Pokemon to its maximum CP. It’s ideal for PVP games, and you’ll get the most out of your experience with this consumable.
- Trading– Stardust is essential for trading, and the amount of the item you need will depend on the Pokemon and the friendship level with the trader.
- Second Charged Attack– you can unlock the second charged attack if you have a couple of them up your sleeve.
- Purification – this consumable is used to purify the Shadow Pokemon left by Team Go Rocket.
- Changing the form– you can use Stardust to change the form of your Pokemon character.
As you can see, Stardust is crucial for numerous gameplay experiences, so you should check out the guide below to learn how to collect these consumables.

Part 3. Best Ways to Get Stardust in Pokemon Go
Since having Stardust is crucial for your Pokemon Go experience, you may be looking for the best ways to accumulate as many consumables as possible. We’ll present a couple of ways to reach your goals below.
Through Pvp Rewards
One of the best ways to earn Stardust is through Player versus Player features. When you’re playing with other users, you can earn Stardust based on the number of your previous wins, your game level, and the PVP outcome.
For instance, if you’re a Rank 2, you can earn around 2,000 Stardust points by winning a battle, and if you’re Rank 24, the number increases to about 200,000. You can also use a Star Piece to multiply your winnings by 1.5.
Another method is to play with your friends, and the Stardust points can vary from 300 to 1000, depending on your opponent’s rank.

By Opening Gifts
Opening gifts is one of the main components of the Pokemon Go experience. You’ll get daily gifts you can open for free, earn valuable items, and support your gameplay. Each gift can carry a certain amount of Stardust particles, so you don’t have to do anything to accumulate these items.
The maximum Stardust you can get in one gift is 300, which may not seem like a lot. However, if you open your gifts regularly, you’ll have the desired Stardust amount in no time. You should also combine this method with others mentioned in this article for the best experience.

By Hatching Pokemon
Hatching a Pokemon is also one of the essential parts of your Pokemon experience. Every time you hatch an egg, you’ll get Stardust points you can spend on numerous instances. The Stardust amount will depend on the egg itself; the higher the rank, the better the prices.
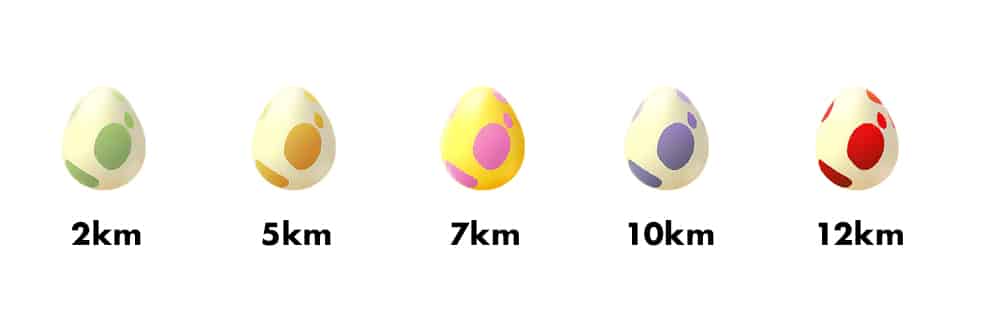
You can check out the list below to determine how much Stardust you’ll collect through your egg hatching:
- 400–800 Stardust for hatching a 2km egg;
- 600–1,600 Stardust for hatching a 5km egg;
- 800–1,600 Stardust for hatching a 7km egg;
- 1600–3200 Stardust for hatching a 10km egg;
- 3200–6400 Stardust for hatching a 12km egg.
You can also use the Star Piece item to multiply the Stardust amount by 1.5.
By Catching Pokemon
Catching Pokemon is one of the most efficient ways of earning Stardust points. Each Pokemon has a base rate of 100 Stardust points, but you can earn more points depending on the Pokemon’s evolution stage. For instance, if the Pokemon is in the second stage, you’ll earn an additional 500 Stardust points.
Another thing you should look out for is specific Pokemon characters – some may carry more than 100 Stardust points as their base. For instance, you can get a whopping 2,100 Stardust points if you catch Audino, 950 for Garbodor, 1,000 for Chimecho, etc.
If you stay consistent and catch at least one Pokemon daily, you can get up to 9,000 Stardust points on the seventh day. Moreover, the first catch of the day will bring you an additional 1,800 points.

By Claiming Raid Rewards
When the Boss enters your Gym, you may think it’s a stressful scenario. However, you should consider the bright side and fight to earn valuable rewards, such as Stardust points.
Once you and your team defeat the Boss, you can collect the prizes. You’ll win 1,000 Stardust points each time a Boss enters, even if it leaves the Gym without a fight.
If you defeat the boss, you’ll also get a chance to catch the Pokemon, which can bring you even more Stardust points!
By Getting Rocket Rewards
Rocket rewards are sets of items you get after fighting the Team Go Rocket. Each time you beat this criminal group, you’ll be rewarded with either 500 or 1,000 Stardust points, depending on whether you were fighting Grunt or Team Go Leader.
Additionally, if you ever face Giovanni, you’ll get 5,000 points for fighting and beating him.

By Earning Research Rewards Through Completed Tasks
Each player will get their daily to-do list depending on their skill and game level. Once you enter the app, you can complete these daily tasks for Stardust points.
The amount of points you will win depends on the task’s difficulty and duration. However, you should complete all the daily tasks to accumulate as many consumables as possible.
For instance, if you’re on level 45, you can head to the Go Battle League 45 times to earn 4,500 Stardust points.

By Visiting the Gym
While on your daily walk in the Pokemon world, you should check out whether you can find some Gyms around you. If you do, stop by to hang around with some of the most precious Pokemon characters and give them a berry while you’re there.
You’ll earn 20 Stardust points for each berry you give a Pokemon. It may be the easiest way to earn and use these points for your experience. Plus, you’ll meet new characters and fully experience what the Pokemon world offers.

Claim Stardust Quickly in Pokemon Go by Using Location Spoofing
If you live in a rural area and don’t get too many chances to walk around and catch Pokemon characters, you can use a classic trick of location spoofing. It will allow you to change your virtual location and wander the streets of another city to discover more Pokemon opportunities.
However, you’ll need a reliable tool to realize your Pokemon goals. One of the best options is Wondershare Dr. Fone, which provides a Virtual Location feature suitable for this quest. Aside from the obvious, you can use this application to manage your smartphone, recover data, and improve your overall smartphone experience.
Virtual Location will allow you to head to any city in the world, collect the rarest Pokemon characters, and earn the most Stardust points possible. Thus, download Dr. Fone Virtual Location from an official source, connect your phone, and follow the steps below to learn how to enable Virtual Location:
- Open Dr. Fone Virtual Location and select the mode in the top right corner (One-Stop, Multistop, or Joystick Route).

- Set the desired parameters.

- Click the Start Movingor Move Here
- You can also click on the Joystick feature to control your movements.
Once you turn the virtual location on, you’ll become an unbeatable Pokemon Go player.
Pokemon Go may be one of the most engaging games in the world. It requires you to move, complete tasks, catch Pokemon figures, and face numerous challenges daily, which is why it’s so popular in the gaming industry.
One of the features that contributes the most to your growth is Stardust, a consumable able to make your Pokemon dreams come to life.
If you’re searching for ways to collect these items as quickly as possible and gain incredible power, check out the guide below. We’ve discussed all the options you can try to obtain Stardust points, including changing your virtual location to get the most out of your journey.
All You Need To Know About Mega Greninja For Xiaomi 14
Are you a fan of Pokemon Go? Then, you will find this article not only useful but also quite interesting. In case you have never played this game before, then you should know that Pokemon Go is a fantastic augmented reality game.
It requires the use of GPS (Global Positioning System) to track your location. Basically, Pokemon Go is a mobile application which you can easily download from Google Play Store or App Store, and it’s absolutely free. In simple words, you can say that Pokemon Go makes use of mapping technology so as to plot your actual location as you roam around in the streets to catch your favourite Pokemon.
When you play the game, your main goal would be to catch as many Pokemon or fictional characters as you can. Your main task will be to battle your opponents to catch the Pokemon and then train them.
It’s worth mentioning here that this AR-game is absolutely convenient to play. Now, one of the most amazing features that have been added to this game is Mega Evolution. But, unfortunately if you were of the opinion that greninja can mega evolve, then you are completely wrong, in fact you should note that no Kalos pokemon can mega evolve.
Through this article, we will discuss all you need to know about Greninja. So, without any further delay, let’s get started.
Part 1: Who is Mega greninja?
Also, called the Ninja Pokemon, Greninja is Dark/ Water-type pokemon. Some people love to call it a frog-like master. One of the most amazing features of Greninja pokemon is that with its swift movements, you will notice that this pokemon succeeds in confusing its opponents.
It makes use of very sharp throwing stars to slice its enemies. It features Torrent ability.
There are various weaknesses of this pokemon which include “Fighting”, “Grass”, “Electric”, “Bug”, and “Fairy”.Its worth mentioning here that Greninja pokemon is the final evolution of Froakie.
Part 2: What are the Strengths of Greninja in Pokemon?

Greninja is resistant to “Water”, “Fire”, “Ice”, “Dark”, “Steel” and finally “Ghost”. Also, this pokemon is immune to “Psychic”. This pokemon’s presence can be very intimidating for its opponents, it would not be wrong if we say that Greninja is quite unpredictable. There is no doubt that the counter attacks of Greniaja prove to be very dangerous for its enemies.
Part 3: How to Catch Greninja?

In order to catch Greninja, you will be required to fulfill specific requirements in the Pokemon Sun and Moon Exclusive demo.
First of all, after launching the Pokemon Sun and Moon Demo, go to the Pokemon Center.
Then, you’ll meet Professor Kukui and when he starts talking to you and asks what you wish to do , choose the option of “bring to full version.After that, you will be required to choose Ash-Greninja. Then, open the full game, finally you have to enter the nearest Pokémon Center.
Catching your favourite Pokemon or to mega evolve a specific pokemon will require you to go to different places or explore different locations, but it’s not always possible to step out of your house, it might be raining, or its night time, in the case, we recommend using software called Dr.Fone(Virtual Location).
With the help of this amazing software, you can teleport to any location or place in the whole without even requiring you to step out of your house.
In order to get started with Dr.Fone, you need to download Dr.Fone(Virtual Location) iOS. Then, you have to install Dr.fone on your smartphone. Finally, you have to launch Dr.Fone (Virtual Location) on your device.
Step 1: You have to tap on “Virtual Location” among the various options that you will notice therein. It’s important to ensure that when you are setting up Dr.Fone on your device, always ensure that your iPhone is connected to the PC. Then, click on “Get Started”.
Step 2: If you have executed the prior steps or directions successfully, then you will see a new window that shows your actual location on a map will get displayed on your screen. Now, make sure that your displayed location on moa is accurate, if not, then click on “Center On,” with the help of this, you’ll be able to make your location correct.
Step 3: After all the previous steps, the next step is to click on the “teleport mode” icon, which will be located in the upper-right part. This will activate the teleport mode. After that, you have to enter the name of the location or place where you wish to teleport to in the upper left field. Finally, tap on “Go”. As an example, we are going to enter “Italy”, Rome in the left field.
Step 4: In this manner, your location will now be understood or set by the system to “Italy”. You’ll see a pop-up box; you have to just click on “Move On”.
Step 5: If you have followed the directions accurately, your actual location on the map will now be set to “Italy”. You can confirm your location from the Pokemon Go’s map. Finally, below we have provided a screenshot of how the location will be shown.
Step 6: Also, you’ll see that the location on your iPhone would have also changed now to “Italy” or any other place that you have entered earlier.
Conclusion
So, we have reached the end of this article. We hope that you found the article quite useful as well as insightful. We also hope that with the help of the setup guide for Dr.Fone you can now easily catch your favourite pokemon by teleporting to different locations across the world. If you have any doubts or suggestions related to this article, then feel free to write it down in the comment section. So, this was all from our side for now. Stay Tuned
Also read:
- [New] Essential 10 Games Comparable to Grand Theft Auto V
- [New] Keeping Memories Alive on Android/Mac with Snaps
- [Updated] The Beginner's Pathway Accelerating Snapchat Video Streams for 2024
- [Updated] Unveiling Success The Best Tools for YouTube SEO and Keyword Research
- Can I use iTools gpx file to catch the rare Pokemon On Motorola Moto G13 | Dr.fone
- How Can I Catch the Regional Pokémon without Traveling On Oppo Find X7 | Dr.fone
- In 2024, 9 Mind-Blowing Tricks to Hatch Eggs in Pokemon Go Without Walking On Tecno Spark 20C | Dr.fone
- In 2024, Here are Some of the Best Pokemon Discord Servers to Join On Motorola Defy 2 | Dr.fone
- In 2024, How Do I SIM Unlock My iPhone 11?
- In 2024, List of Pokémon Go Joysticks On Motorola Moto G24 | Dr.fone
- In 2024, List of Pokémon Go Joysticks On Motorola Razr 40 Ultra | Dr.fone
- In 2024, Planning to Use a Pokemon Go Joystick on Oppo Reno 10 Pro 5G? | Dr.fone
- Language Learning Unveiled with Googled Editors' Choice - Mondly
- Update Your Dell OptiPlex 7010 - Latest Driver Downloads
- Windows 모드에서 탁자표시기 제공: 8가지 무료 Windows 화면 캡처 소품 코스트!
- Title: In 2024, Where Is the Best Place to Catch Dratini On Xiaomi 14 | Dr.fone
- Author: Lary
- Created at : 2024-10-22 16:18:32
- Updated at : 2024-10-28 19:00:25
- Link: https://android-pokemon-go.techidaily.com/in-2024-where-is-the-best-place-to-catch-dratini-on-xiaomi-14-drfone-by-drfone-virtual-android/
- License: This work is licensed under CC BY-NC-SA 4.0.