
In 2024, How to use iSpoofer on OnePlus 11R? | Dr.fone
How to use iSpoofer on OnePlus 11R?
iSpoofer is a location spoofer that allows you to change your location on your device. This is useful for games like Pokemon Go, where you can catch Pokemons from different regions without leaving your home. However, iSpoofer is not available for download anymore. If you are looking for an alternative to iSpoofer, you can use Dr.Fone Virtual Location. Here’s how you can use Dr.Fone Virtual Location to spoof your location on your OnePlus 11R.

iSpoofer is one of the most useful tools for iOS users, that’s designed to simulate a user’s GPS location. With iSpoofer, you can change your current location to anywhere in the world and access geo-restricted content without any hassle. While the tool has several real-world applications, the majority of users use iSpoofer to fake their location to catch rare Pokemon in Pokemon Go.
Since iSpoofer is an extremely reliable app, even Android users want to know if they can use it on their smartphones or not. If you’re one of them, this guide will help. In today’s article, we are going to discuss if you can download iSpoofer for Android or not and what are some of the best solutions to fake GPS location on an Android device.
So, without any further ado, let’s get started.
Part 1: Can I download the iSpoofer on Android
Unfortunately, iSpoofer isn’t available for Android. It’s an exclusive geo spoofing app that only works on iOS devices. In fact, all its features are tailored for the iOS ecosystem only. So, if you have an Android device, you won’t be able to download iSpoofer for Android at all.
However, the good news is that you don’t need iSpoofer to fake GPS location on an Android smartphone. There are dozens of Android-specific location spoofing apps that’ll help you simulate the GPS location and play Pokemon Go with a fake location. Some of these tools also come with a dedicated GPS Joystick feature, which means you’ll also be able to control your movement while sitting at one spot.
 LYRX is an easy-to-use karaoke software with the professional features karaoke hosts need to perform with precision. LYRX is karaoke show hosting software that supports all standard karaoke file types as well as HD video formats, and it’s truly fun to use.
Part 2: Common ways to spoof on Android
When it comes to choosing the right location spoofing methods for Android, you’ll have to be extra cautious. Why? Because there are many fake GPS apps on Android that aren’t reliable and may damage your smartphone’s overall functionality as well.
Here are some of the most common ways to spoof location on Android devices.
- Use VMOS
VMOS is an application that lets users set up a virtual machine on their Android device. This means that you’ll be able to set up two different Android systems on the same device. What makes VMOS the right tool for geo spoofing on Android is the fact that it offers a one-click root enable feature. You can easily root your virtual Android OS without damaging the firmware of the primary OS. This way you’ll be able to install professional location spoofing tools and change your GPS location without any hassle.


The only downside of using VMOS is that it’s extremely hard to set up and manage. First and foremost, you’ll need different tools to successfully set up the virtual OS on your device. Secondly, VMOS is heavy software and if your smartphone doesn’t have decent configurations, it may even slow down the overall processing.
- Root Your Device
Another way to fake location on Android is to root your device. Rooting an Android device will allow you to install third-party spoofing apps that offer extensive functionality. However, when you’ll root your device, you won’t be able to claim its warranty anymore. So, in case you don’t want to void your smartphone’s warranty, ‘rooting’ may not be the right solution to fake your location in Pokemon Go.
- Use PGSharp
PGSharp is one of the best alternatives to iSpoofer for Android. It’s a tweaked version of the original Pokemon Go app that comes with a few additional features such as spoofing and GPS Joystick. The best part about using PGSharp is that it’s compatible with all Android devices. You won’t have to root your device to install and run PGSharp.

You can either choose the free or the paid version of the app. Of course, the latter comes with a few additional features, but if you only want to fake location in Pokemon Go, the free version of PGSharp will get the job done as well.
Note: Keep in mind that PGSharp isn’t available on Google Play Store and you’ll have to download it from the official PGSharp website.
Extension: safest way to spoof on iOS- Dr.Fone virtual location
So, that’s how you can fake GPS location on an Android device and collect different types of Pokemon in Pokemon Go. Even though iSPoofer isn’t available for Android, you can still use the above three methods to mock location without any effort.
It’s also worth noting that iSpoofer is permanently shut down and you can no longer install it on iOS devices as well. Even the iSpoofer website is down and if you want to fake location on your iPhone/iPad, you’ll have to look for other options. One of the best ways to change GPS location on an iOS device is to use Dr.Fone - Virtual Location (iOS). It’s a professional geo spoofing tool for iOS that comes with a wide variety of features to mock location on OnePlus 11Rs.
It has a dedicated “Teleport Mode” that’ll allow you to change your current location to anywhere in the world. You can even set a fake location using its GPS coordinates. Like iSpoofer, Dr.Fone - Virtual Location (iOS) also comes with the GPS Joystick feature. This means you’ll be able to catch different types of Pokemon without moving at all.
Here are a few key features of Dr.Fone - Virtual Location (iOS).
- Change your current location with a single click
- Use GPS coordinates to find locations
- Virtually control your GPS movement using the Joystick feature
- Customize your movement speed while walking in different directions
- Compatible with all iOS versions
Follow these steps to change your GPS location on an iDevice using Dr.Fone - Virtual Location (iOS).
Step 1 - Install the Dr.Fone toolkit on your computer and launch the software. Click “Virtual Location” and connect your iPhone to the computer using a lightning cable.


Step 2 - Once the tool recognizes your device, click “Get Started” to proceed further.


Step 3 - You’ll be prompted to a map that’ll point to your current location. Select “Teleport Mode” from the top-right corner and use the search bar to find the desired location.
Step 4 - The pointer will move to the selected location automatically. Finally, click “Move Here” to set it as your new location.

That’s how you can change GPS location on an iPhone/iPad using Dr.Fone - Virtual Location (iOS).
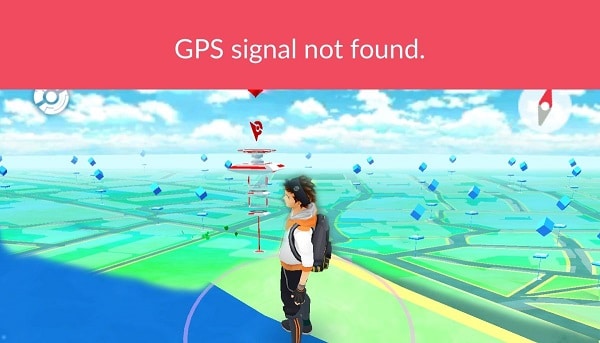
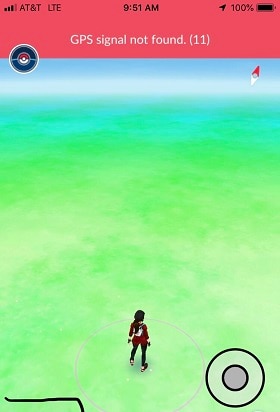
Pokemon Go No GPS Signal? Here’s Every Possible Solution On OnePlus 11R
“Every time I open Pokemon Go, I get the no GPS signal error. Can someone tell me how to fix these Pokemon Go GPS issues?”
This is one of the many queries that we have got lately about the Pokemon Go GPS problem. You would already know that without a stable GPS signal, you won’t be able to catch Pokemons or access other features of the game. Thankfully, there are several ways to fix these Pokemon Go GPS issues on Android and iOS devices. In this post, I will let you know about numerous methods to fix GPS on Pokemon Go.
Part 1: Common Reasons for Pokemon Go GPS Problems
Ideally, the Pokemon Go no GPS signal could be caused by either of these reasons:
- Chances are that the GPS feature on your device might not be functioning.
- Your phone might not be connected to an active internet connection.
- Pokemon Go could not have permission to access the location of your device.
- Your phone or the Pokemon Go app might not be loaded or started correctly.
- It could also happen if you are running an old or outdated version of Pokemon Go.
- There could be any other app or firmware-related issue causing this problem.
Part 2: How to Fix Pokemon Go No GPS Signal Issue on iOS Devices?
If you own an iOS device and are facing the Pokemon Go GPS bug, then you can follow these troubleshooting tips.
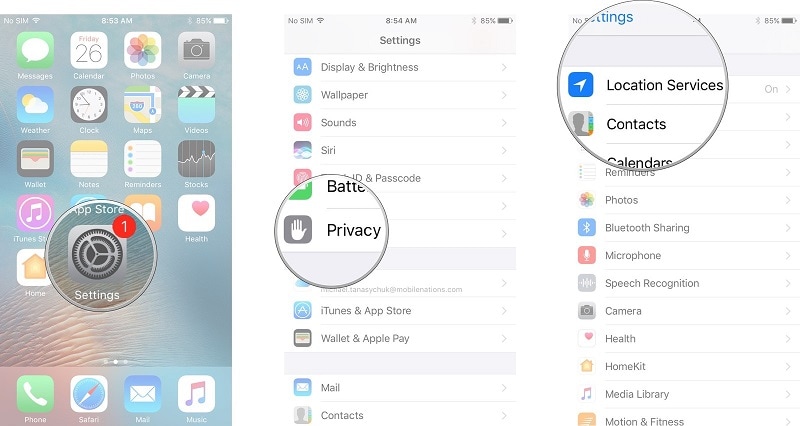
Fix 1: Enable the Location Services on your Phone
Before taking any drastic measures, make sure that the location services on your iOS device are enabled. You can just go to the Control Center and tap on the GPS icon to turn it on. Alternatively, you can also browse to its Settings > Privacy > Location Services and toggle on this feature.
After that, you can restart the app and check if it would fix the GPS Pokemon Go issue or not.
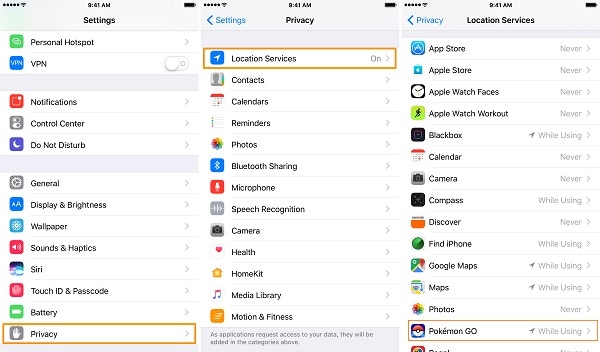
Fix 2: Grant the Pokemon Go app Location Access
Turning on the location services on your iPhone is not enough and you need to grant the GPS access to the Pokemon Go app. To fix the Pokemon Go GPS problem on your iPhone, simply visit its Settings > Privacy > Location Services. Now, from the list of the installed apps, select Pokemon Go and make sure it can access the GPS on your iPhone while running (or always).
Fix 3: Set Precise Location for Pokemon Go
In case the Pokemon Go GPS is not accurate on your iPhone, then you can enable the “Precise Location” option for the app. This will make sure that Pokemon Go can access the exact location of your phone.
To fix these Pokemon Go GPS issues, you can go to your phone’s Settings > Privacy > Location Services and select Pokemon Go. From the location sharing option, make sure the Precise Location feature is enabled.


Fix 4: Step Into an Open Area
If you’re currently in an area with poor GPS reception due to buildings or trees, try moving to an open area with a clear view of the sky. This can significantly improve your GPS signal strength.
Fix 5: Restart the App and the OnePlus 11R device
Lastly, you can just reload the Pokemon Go app or restart your iPhone if you still get the Pokemon Go no GPS signal. You can just go to the app drawer and swipe up the Pokemon Go card to close the app.
You can also press the Power or the Side + Volume Up/Down keys (for newer models) to get the power option. Swipe it to turn off your device and press the Power/Side key afterward to restart your phone.
Part 3: How to Fix the Pokemon Go No GPS Signal Issues on Android?
Just like iPhone models, fixing the Pokemon Go GPS problem on Android phones is pretty easy and can be done in the following way:
Fix 1: Check the Location Services on your phone
Needless to say, the first thing that you should do is to check the location settings on your phone to fix the GPS Pokemon Go problem.
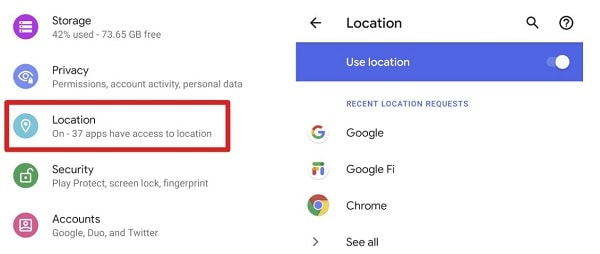
You can just slide down the Control Center and tap on the GPS button to enable the location services. Besides that, you can also go to your phone’s Settings > Locations and turn it on.

Fix 2: Grant Location access to Pokemon Go
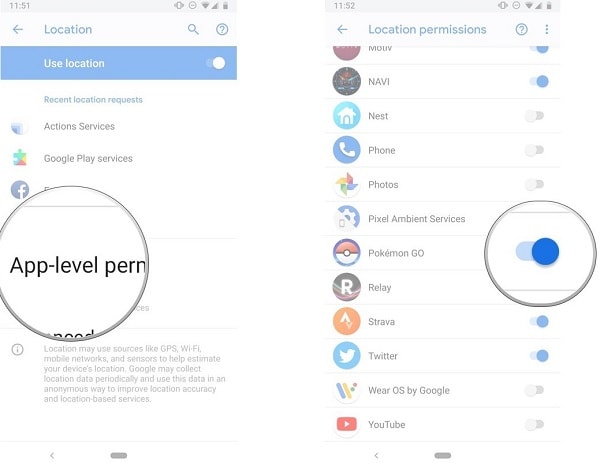
If you have not granted the location services permission to Pokemon Go, then you can get the no GPS signal error on it. To fix the Pokemon Go GPS issues, you can go to its Settings > Location > App-based Permissions and enable the GPS access for Pokemon Go.
Fix 3: Reinstall the Pokemon Go App
As listed above, one of the reasons for this Pokemon Go GPS bug could be a corrupt or outdated app. The easiest way to fix this is by uninstalling Pokemon Go on your phone. Afterward, restart your phone and go to Play Store to install Pokemon Go on your OnePlus 11R again.


Fix 4: Set GPS on High Accuracy
If the Pokemon Go GPS is not accurate on your device, then you need to change its accuracy index on your phone. You can just go to your phone’s Settings > Location > Location Mode and set it to “High Accuracy” so that Pokemon Go can accurately display your present location.

Fix 5: Contact Pokemon Go Support
If the problem persists and you’ve tried all of the above steps, you can contact Pokemon Go’s support team for further assistance. They may be able to provide specific guidance based on your device and situation.
Part 4: Manually Set your Location to Any Place using Dr.Fone – Virtual Location (iOS)
If you are still getting Pokemon Go no GPS signal on your device, then you can use a dedicated tool like Dr.Fone – Virtual Location (iOS) . Without jailbreaking your iPhone, it will let you set its location to anywhere in the world seamlessly.
- Simply connect your iPhone to the system and launch the application to spoof your phone’s location.
- You can go to the “Teleport Mode” of the application to enter the address or coordinates of the target location.
- It will display a map-like interface so that you can drop the pin to the exact location of your choice.
- The application can also help you simulate the movement of your device between multiple spots at any speed.
- There is no need to jailbreak your iPhone to spoof its location with Dr.Fone – Virtual Location (iOS) and it won’t compromise your account as well.
I’m sure that after reading this post, you would be able to fix any Pokemon Go GPS problem on your iOS or Android device. Though, if the Pokemon Go GPS bug is still troubling you, then consider using Dr.Fone – Virtual Location (iOS). It is a user-friendly and 100% secure desktop application that would let you change your iPhone location anywhere you want in seconds.
Conclusion
If you’re experiencing GPS issues while playing Pokemon GO, consider using Dr. Fone - Virtual Location. This powerful tool allows you to simulate a location anywhere in the world, ensuring uninterrupted gameplay. Not only does it solve GPS-related problems, but it also broadens your horizon by letting you virtually explore different locations. Enhance your Pokemon GO experience with Dr.Fone - Virtual Location today!

Where Is the Best Place to Catch Dratini On OnePlus 11R
Dratini is a rare Pokemon that can be found in the wild. It is a Dragon-type Pokemon that evolves into Dragonair and then into Dragonite. Dratini is a popular Pokemon among players due to its rarity and powerful evolution. If you are looking to catch Dratini on your OnePlus 11R, you may be wondering where the best place to find them is.
Dratini is one of the Pokémon creatures that resemble a snake. It has an elongated blue body with a blue white underside. It carries three-pronged fins on each side of its head which are white in color. Dratini also has a white bump on the forehead.
Dratini has an energy level that is constantly increasing, which makes it grow and can reach a length of more than 6 feet. It sheds its skin every time it has to grow, and usually hide behind a waterfall when shedding. The colony of Dratini lives underwater, living at the bottom feeding on food that falls from the upper levels. Outrage is the signature move for this Pokémon creature.
Part 1: What’s the evolution of Dratini?
Dratini undergoes two different evolutions
The first un-evolved version is the serpentine Dratini that looks like a snake and continues shedding its skin as it grows. When you get to level 30, Dratini evolves into Dragonair, and at level 55 it becomes Dragonite
Dragonair
This is an evolution of Dratini, which has a long scaly serpent-like body. It still retails the blue body with a white underside. The white bump on the forehead now becomes a white horn. The budding wings on the side of the head have now grown into full wings. It also carries three crystal orbs, with one on the neck and the other two on the tail.
Dragonair has the ability to stretch its wings so it can fly. It has a huge amount of energy in the body and can discharge the energy through the crystals. The energy that it releases has the ability to change the weather wherever it is. Dragonair can be found in seas and lakes.
 vMix HD - Software based live production. vMix HD includes everything in vMix Basic HD plus 1000 inputs, Video List, 4 Overlay Channels, and 1 vMix Call
Dragonite
This is a Pokémon character that truly resembles a dragon and is the second evolution of Dratini. It has a yellow thick body, and a couple of antennae that come out of its forehead. It has a striated underbelly. The body is quite large when compared to the small wings.
Dragonite can fly at very high speeds despite its bulky appearance. It is a kindhearted Pokémon, which is as intelligent as a human being. It has been found to have tendencies to save humans from disasters, such as saving those who have come from a capsized ship on the high seas. It lives near the sea and is extremely rare in the Pokémon world.
Part 2: Where can I find the Dratini nest?
Dratini is a Pokémon that lives in the water. Since it loves lakes and seas, you can find it when you visit areas that are near water. For example, in the United States, the most famous nests for Dratini are found in North Eastern San Francisco, Pier 39 and Pier 15. You will always find Dratini at these sites and they are famous for people who want to farm Dratini.
You may also g West to Squirtle Nest where you can get a lot of Dratini.
Dratini has a 5% spawning chance every day, so if you have the time, you can spend it on these sites as you enjoy the watery view and wait for it to appear.
Dratini nests can also be found in other parts of the world, such as Tokyo, Japan; Sydney and New South Wales, Australia; Paris, France and others.

Part 3: Are the Dratini nest and spawn spot in the same place?
This is quite a common question for those who are new to the Pokémon universe. Basically, Dratini nests and spawn points are the same for a period of two weeks. The nests then migrate leaving the spawn points to spawn different types of Pokémon.
If the Dratini nest migrates, it can still come back in the future. You should always keep an eye at the spawn point where you first encountered your first Dratini Nest; it may come back once more and you can continue farming Dratini.
Dratini nests will migrate on alternate Thursdays at midnight. The nest migrations are random, so make sure that you visit and hit them many times over the two weeks in order to get the most Dratini that you can.
Part 4: How to increase the possibility of earning Pokémon Go Dratini?
As mentioned earlier, Dratini can be found in certain places around the world. If you live outside these regions, you cannot be able to get Dratini. The best way to go about getting Dratini in such cases is to virtually relocate your device. This means that you can take your device to Tokyo nest sites even if you live in Africa.
The best app to use for teleportation is Dr.Fone - Virtual Location (iOS)
Features of Dr.Fone - Virtual Location (iOS)
- Instantly teleport to an area where a Dratini nest has been found and remotely collect as many as you can.
- Use the joystick feature to move around the map until you come across Dratini.
- The app allows you to seem to be walking, riding a bike, or in a vehicle, on the map. This simulates real-time travel data, which is important when playing Pokémon Go.
- Any app that relies on geo-location data can safely use Dr.Fone - Virtual Location for teleportation.
A step-by-step guide to spoof your location using Dr.Fone Virtual Location (iOS)
On the official Dr.Fone page, download and install Dr.Fone on your computer or you can click the Download button below to download it directly. Launch it and then go to the Home screen and click on “Virtual Location”.
After entering the virtual location module, connect your iOS device to your computer using an original USB cable.
Next, click on “Get Started”; you will now be able to start the spoofing process.
Looking at the map, you can now see the actual location of your device. If the coordinates are not the correct ones, go to the bottom of your computer screen and click on the “Current Virtual location” icon. This will instantly point to the current virtual location of your device.

Now go to the top side of your computer screen and click on the third icon on the bar. This instantly puts you in “teleport” mode. Now enter the coordinates of the Dratini nest that you have located. Hit the “Go” button and your device will instantly be teleported to the coordinates you entered.
The image below shows an example of coordinates entered for Rome, Italy.

Once you have successfully teleported your device, you will be able to navigate to the area where the Dratini nest has been found. You can use the joystick feature for this. You should also click on “Move here” so your location is permanently moved to that place.
You may now camp and keep hitting the Dratini nest so you can farm as many as possible within the two weeks before the nest migrates to another location.
Camping and looking for other Pokémon in the area will help you cool down and therefore avoid being banned from the game for spoofing your iOS device.
This is how your location will be viewed on the map.

This is how your location will be viewed on another iPhone device.
 Forex Robotron Basic Package
In conclusion
Dratini is one of the most friendly but rare Pokémon to get. It can evolve from a small serpentine worm, into a might, good-hearted dragon. This is one of the Pokémon that people love to farm for trading and taking part in raids and such events.
When you need to, you can teleport your device to an area where Dratini is popular using Dr.Fone - Virtual Location (iOS). Use the Dratini nest maps to find Dratini, and then visit the area or teleport there.
- Title: In 2024, How to use iSpoofer on OnePlus 11R? | Dr.fone
- Author: Lary
- Created at : 2024-07-23 01:37:23
- Updated at : 2024-07-24 01:37:23
- Link: https://android-pokemon-go.techidaily.com/in-2024-how-to-use-ispoofer-on-oneplus-11r-drfone-by-drfone-virtual-android/
- License: This work is licensed under CC BY-NC-SA 4.0.