
How to use iSpoofer on Nokia C12 Pro? | Dr.fone
How to use iSpoofer on Nokia C12 Pro?
iSpoofer is a location spoofer that allows you to change your location on your device. This is useful for games like Pokemon Go, where you can catch Pokemons from different regions without leaving your home. However, iSpoofer is not available for download anymore. If you are looking for an alternative to iSpoofer, you can use Dr.Fone Virtual Location. Here’s how you can use Dr.Fone Virtual Location to spoof your location on your Nokia C12 Pro.

iSpoofer is one of the most useful tools for iOS users, that’s designed to simulate a user’s GPS location. With iSpoofer, you can change your current location to anywhere in the world and access geo-restricted content without any hassle. While the tool has several real-world applications, the majority of users use iSpoofer to fake their location to catch rare Pokemon in Pokemon Go.
Since iSpoofer is an extremely reliable app, even Android users want to know if they can use it on their smartphones or not. If you’re one of them, this guide will help. In today’s article, we are going to discuss if you can download iSpoofer for Android or not and what are some of the best solutions to fake GPS location on an Android device.
So, without any further ado, let’s get started.
## ****Part 1: Can I download the iSpoofer on Android****Unfortunately, iSpoofer isn’t available for Android. It’s an exclusive geo spoofing app that only works on iOS devices. In fact, all its features are tailored for the iOS ecosystem only. So, if you have an Android device, you won’t be able to download iSpoofer for Android at all.
However, the good news is that you don’t need iSpoofer to fake GPS location on an Android smartphone. There are dozens of Android-specific location spoofing apps that’ll help you simulate the GPS location and play Pokemon Go with a fake location. Some of these tools also come with a dedicated GPS Joystick feature, which means you’ll also be able to control your movement while sitting at one spot.
Part 2: Common ways to spoof on Android
When it comes to choosing the right location spoofing methods for Android, you’ll have to be extra cautious. Why? Because there are many fake GPS apps on Android that aren’t reliable and may damage your smartphone’s overall functionality as well.
Here are some of the most common ways to spoof location on Android devices.
- Use VMOS
VMOS is an application that lets users set up a virtual machine on their Android device. This means that you’ll be able to set up two different Android systems on the same device. What makes VMOS the right tool for geo spoofing on Android is the fact that it offers a one-click root enable feature. You can easily root your virtual Android OS without damaging the firmware of the primary OS. This way you’ll be able to install professional location spoofing tools and change your GPS location without any hassle.

The only downside of using VMOS is that it’s extremely hard to set up and manage. First and foremost, you’ll need different tools to successfully set up the virtual OS on your device. Secondly, VMOS is heavy software and if your smartphone doesn’t have decent configurations, it may even slow down the overall processing.
- Root Your Device
Another way to fake location on Android is to root your device. Rooting an Android device will allow you to install third-party spoofing apps that offer extensive functionality. However, when you’ll root your device, you won’t be able to claim its warranty anymore. So, in case you don’t want to void your smartphone’s warranty, ‘rooting’ may not be the right solution to fake your location in Pokemon Go.
- Use PGSharp
PGSharp is one of the best alternatives to iSpoofer for Android. It’s a tweaked version of the original Pokemon Go app that comes with a few additional features such as spoofing and GPS Joystick. The best part about using PGSharp is that it’s compatible with all Android devices. You won’t have to root your device to install and run PGSharp.

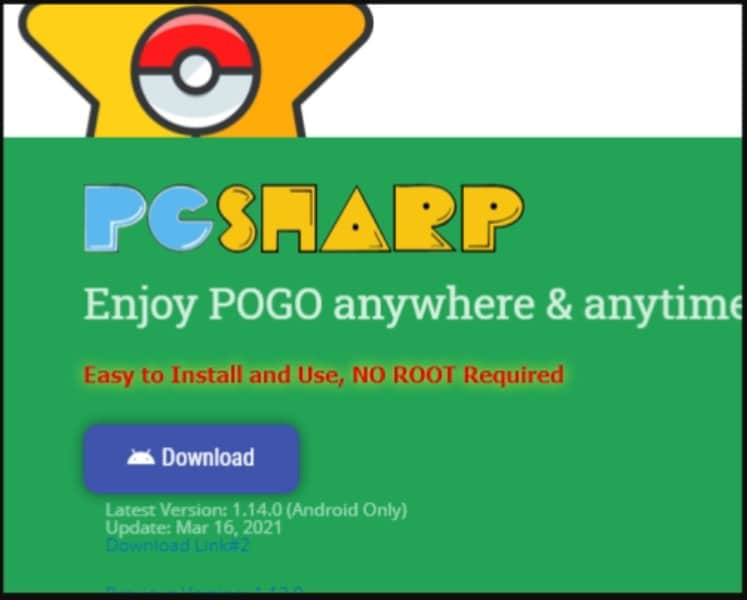
You can either choose the free or the paid version of the app. Of course, the latter comes with a few additional features, but if you only want to fake location in Pokemon Go, the free version of PGSharp will get the job done as well.
Note: Keep in mind that PGSharp isn’t available on Google Play Store and you’ll have to download it from the official PGSharp website.
Extension: safest way to spoof on iOS- Dr.Fone virtual location
So, that’s how you can fake GPS location on an Android device and collect different types of Pokemon in Pokemon Go. Even though iSPoofer isn’t available for Android, you can still use the above three methods to mock location without any effort.
It’s also worth noting that iSpoofer is permanently shut down and you can no longer install it on iOS devices as well. Even the iSpoofer website is down and if you want to fake location on your iPhone/iPad, you’ll have to look for other options. One of the best ways to change GPS location on an iOS device is to use Dr.Fone - Virtual Location (iOS). It’s a professional geo spoofing tool for iOS that comes with a wide variety of features to mock location on Nokia C12 Pros.
It has a dedicated “Teleport Mode” that’ll allow you to change your current location to anywhere in the world. You can even set a fake location using its GPS coordinates. Like iSpoofer, Dr.Fone - Virtual Location (iOS) also comes with the GPS Joystick feature. This means you’ll be able to catch different types of Pokemon without moving at all.
Here are a few key features of Dr.Fone - Virtual Location (iOS).
- Change your current location with a single click
- Use GPS coordinates to find locations
- Virtually control your GPS movement using the Joystick feature
- Customize your movement speed while walking in different directions
- Compatible with all iOS versions
Follow these steps to change your GPS location on an iDevice using Dr.Fone - Virtual Location (iOS).
Step 1 - Install the Dr.Fone toolkit on your computer and launch the software. Click “Virtual Location” and connect your iPhone to the computer using a lightning cable.

Step 2 - Once the tool recognizes your device, click “Get Started” to proceed further.
 Jet Profiler for MySQL, Enterprise Version: Jet Profiler for MySQL is real-time query performance and diagnostics tool for the MySQL database server. Its detailed query information, graphical interface and ease of use makes this a great tool for finding performance bottlenecks in your MySQL databases.
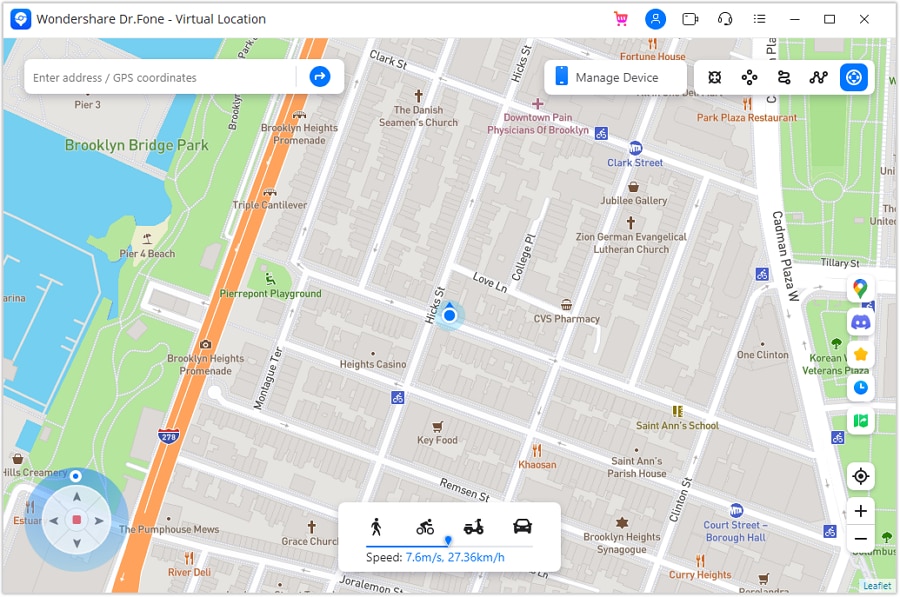
Step 3 - You’ll be prompted to a map that’ll point to your current location. Select “Teleport Mode” from the top-right corner and use the search bar to find the desired location.


Step 4 - The pointer will move to the selected location automatically. Finally, click “Move Here” to set it as your new location.

That’s how you can change GPS location on an iPhone/iPad using Dr.Fone - Virtual Location (iOS).
 Easy GIF Animator is a powerful animated GIF editor and the top tool for creating animated pictures, banners, buttons and GIF videos. You get extensive animation editing features, animation effects, unmatched image quality and optimization for the web. No other GIF animation software matches our features and ease of use, that’s why Easy GIF Animator is so popular.
Detailed guide of ispoofer for pogo installation On Nokia C12 Pro
Pokemon Go is Niantic’s most successful game that has taken the world by storm. Players get to be a part of the various regions of the Pokemon has now become one with our world. The game requires you to travel to different locations to complete researches, catch Pokemon, defend gyms, and most importantly, complete the Pokedex given by Professor Willow. Niantic’s games are designed to be played with others outdoors. This feature ends up giving players in some parts of the world advantage over others. This is specially to catch regional Pokemon and during ticketed events and sponsored events. Spoofers can avoid the barriers of distance and play anywhere in the world by iSpoofer for pogo installation and other such apps. Niantic, however, does not allow this and considers it the same as hacking. Players who were looking to play and access all the features of the game available all across the world.
Part 1: Will the iSpoofer back on 2020?
iSpoofer has been shut down. All its applications, websites, and other related services have been terminated. iSpoofer for pogo installation does not exist. If any website claims to give access to the application or iSpoofer direct download, it is fake. Also, the new Pokemon Go application version which is 0.195.0 has been updated to detect applications like iSpoofer, so on being detected, it may lead to a warning, or a permanent ban as well. And we don’t see the certainty to get it back soon.
Part 2: Detailed guide of iSpoofer for pogo installation
This detailed guide for iSpoofer installation is for those who still possess the older version of the app that works in an older iOS version.
Step 1 – Install the setup for iSpoofer on your computer if you had got it using. This requires the latest version of iTunes, so make sure that you have it installed.

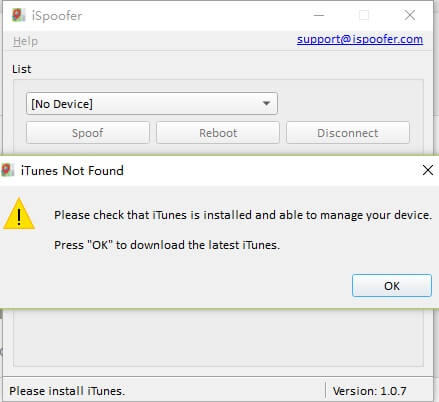
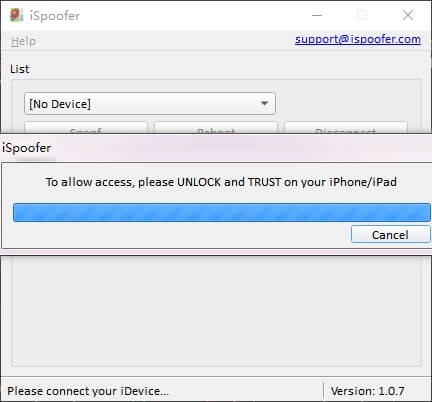
Step 2 – Once the setup is done, connect your phone to the computer and unlock it. You will have to select the “TRUST” option for the software to do its work. On selecting this option, iSpoofer will download a developer file that will spoof the location.
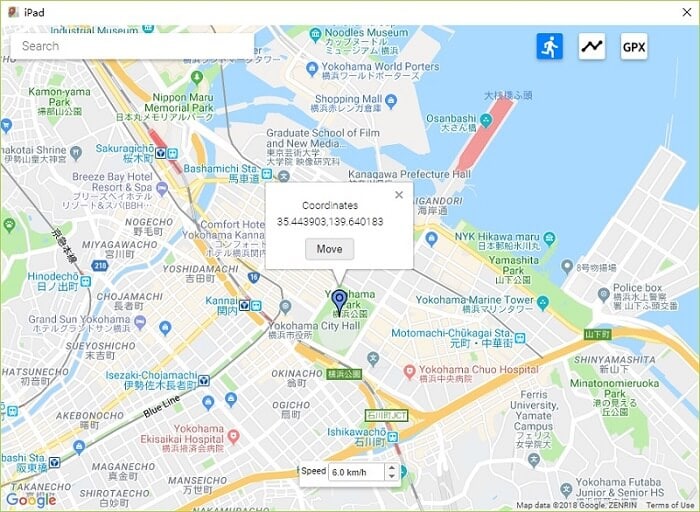
Step 3 – A map will load on your computer screen, which allows you to enter or point the location. Enter the location of your choice and click on “MOVE”. And that is it! Three simple steps and you have spoofed!
Part 3: How to use the iSpoofer when you play pokemon
Follow the tutorial above for ispoofer for pogo installation. A mock location has now been added to your device that makes iOS believe that you are at the entered spot.
 /a>
/a>
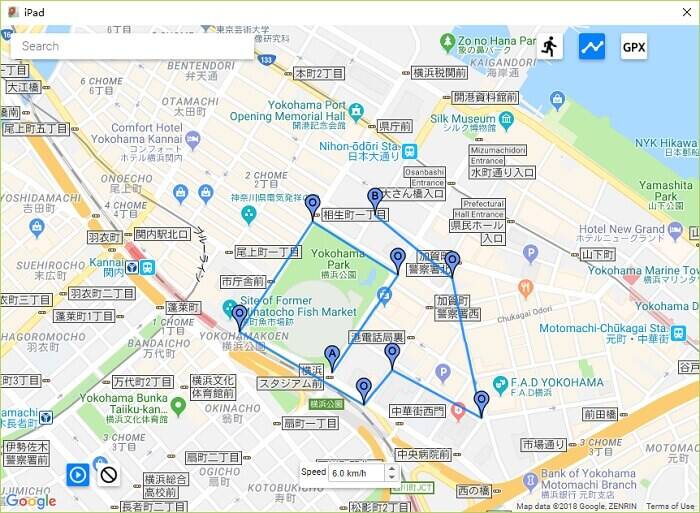
Following these steps, disconnect your phone and launch Pokemon Go. From here you can either use the joystick to move around or use a “.gpx” file to add a preset route for you to move around. That would look like this -
iSpoofer for pogo installation has the following disadvantages -
- The application cannot work without iTunes and is very dependent on it.
- Niantic can easily detect spoofing through this app and may lead to a ban.
- Movement simulations are hard and unnatural, making it more susceptible to a ban.
- Configurations and settings require some technical knowledge in to troubleshoot any errors.
- The app is prone to crashing a lot. The interface sometimes cannot handle the constant change of locations.
All these issues are overcome with great detail by Dr. Fone Virtual Location (iOS) by Wondershare.

Part 4: Safer tool to spoof pokemon- drfone virtual location
Pokemon Go Spoofers using iOS need not depend on iSpoofer for jumping locations. Dr. Fone Virtual Location by Wondershare is the new, safer app to spoof in Pokemon Go. The app uses mock location services to help you teleport to anywhere across the world. This also allows you to be safe from the detection software in Pokemon Go.
What are the benefits of using Dr. Fone Virtual Location?
- It provides a mock location and location changer – With just a single click, the application can change your location to where you want to. All apps on your phone will start recognizing this location.
- It enables you to move at different speeds - It has 3 different speeds, namely walking, cycling, and driving that helps you travel faster or log in kilometers too.
- The joystick allows movement – You can use the joystick to move your character around the map to navigate to Pokestops or rare wild spawns easily.
- The map view gives a 360o view – By scrolling around the screen, you can get to see all the routes around you and plan accordingly.
- Auto-walk feature - The game has an auto-walk feature in case you do not want to use the joystick to move around manually.
- Keyboard movement commands – The player can also use the A, S, W and D keys on the keyboard to move around
Step by Step Guide to Install and use Dr. Fone Virtual Location -
Step 1 - Download the Dr. Fone Virtual Location by official Wondershare website. Connect your phone to the computer in to execute the changes. Click on the “Virtual Location” option.
Step 2 – Now, on the next screen, you will see “Get Started” option. Click on it to proceed.
 The BootIt Collection covers multi-booting, partitioning, and disk imaging on traditional PC’s using the standard BIOS and newer PC’s using UEFI. The collection includes BootIt Bare Metal (BIBM) for standard BIOS systems and BootIt UEFI (BIU) for UEFI system.
Step 3 – The screen will now show a map with your current location on it. In case the location is incorrect, click on the “Center On” button at the bottom-right side of your screen.

Step 4 – Select the “teleport” option by clicking on the icon on the top right corner. Then, in the text box, enter the city or the location’s exact name or the coordinates in the “latitude, longitude” format.
 TubeDigger - online video downloader from mostly any site
Step 5 – After entering your location, select the “GO” option.
Step 6 – The app will show you an option that says “Move Here”. Click on it, and now you have successfully spoofed to your location of choice.
Your spoofed location is now the default location of your phone, and all the apps will recognize it. The maps app on your phone looks like this –

The teleportation is now complete. Enjoy playing the game with no lags or errors.
Alert
While spoofing between two distant locations give the required amount of time for the cooldown timer to reach zero. If you decide to spoof too quickly, you will automatically trigger a soft ban, and you will not be able to play most parts of the game like catching Pokemon or spinning Pokestops. If this occurs consistently over multiple occasions, it will trigger Niantic’s warning and may end up getting a permanent ban. It has a 3-strike policy. 3 warnings are given before the account is permanently deleted.
The notice looks like this -

The cool-down period between two locations is based on distance and you can refer to the table below to understand the time you need to wait before logging in again.
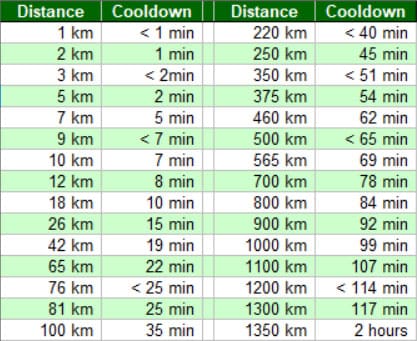
Most gamers wait for the standard 2 hours before logging in again. This gives them access to all the game’s features like before.
 SwifDoo PDF Perpetual (1 PC) Free upgrade. No monthly fees ever.
Conclusion
We hope that this article has been informative, about Dr Fone Virtual Location and ispoofer for pogo installation. You can now spoof locations with ease by using Dr.Fone - Virtual Location app. Vigilance is needed, and spoofing must be done by following all rules of cool down. This would prevent you from being caught by Niantic, and by Officer Jenny. We would like you to enjoy the game throughout without having to lose any of your levels and Pokemon.
How can I get more stardust in pokemon go On Nokia C12 Pro?
Pokemon Go is one of the most popular games worldwide, with over 80 million active players. The game will present tasks you should complete to collect items and Pokemons, thus improving your skill levels and making you better in the game.
One of the essential items you can get is Stardust, which will help you become the best trainer in the Pokemon Go industry. If you’re new to the game and are wondering what the importance of Stardust is in Pokemon Go, read ahead. We’ll teach you all about it and present methods to collect this item faster.
Part 1. What Is Stardust in Pokemon Go?
Stardust is a consumable item that allows you to strengthen your Pokemon. This item will help you reach the maximum of your Pokemon, making them more resilient and ready for potential fights. Moreover, Stardust is essential for trading – you must have a specific Stardust level to trade your valuables with another trainer.
Part 2. How Is Stardust Used in Pokemon Go?
Stardust can come in handy in several different scenarios in the Pokemon Go game. We’ll present all the use cases below to help you navigate your journey and learn the importance of collecting Stardust.
- Power up– the most crucial feature of Stardust is that it can power up your Pokemon to its maximum CP. It’s ideal for PVP games, and you’ll get the most out of your experience with this consumable.
- Trading– Stardust is essential for trading, and the amount of the item you need will depend on the Pokemon and the friendship level with the trader.
- Second Charged Attack– you can unlock the second charged attack if you have a couple of them up your sleeve.
- Purification – this consumable is used to purify the Shadow Pokemon left by Team Go Rocket.
- Changing the form– you can use Stardust to change the form of your Pokemon character.
As you can see, Stardust is crucial for numerous gameplay experiences, so you should check out the guide below to learn how to collect these consumables.

Part 3. Best Ways to Get Stardust in Pokemon Go
Since having Stardust is crucial for your Pokemon Go experience, you may be looking for the best ways to accumulate as many consumables as possible. We’ll present a couple of ways to reach your goals below.
Through Pvp Rewards
One of the best ways to earn Stardust is through Player versus Player features. When you’re playing with other users, you can earn Stardust based on the number of your previous wins, your game level, and the PVP outcome.
For instance, if you’re a Rank 2, you can earn around 2,000 Stardust points by winning a battle, and if you’re Rank 24, the number increases to about 200,000. You can also use a Star Piece to multiply your winnings by 1.5.
Another method is to play with your friends, and the Stardust points can vary from 300 to 1000, depending on your opponent’s rank.

Opening gifts is one of the main components of the Pokemon Go experience. You’ll get daily gifts you can open for free, earn valuable items, and support your gameplay. Each gift can carry a certain amount of Stardust particles, so you don’t have to do anything to accumulate these items.
The maximum Stardust you can get in one gift is 300, which may not seem like a lot. However, if you open your gifts regularly, you’ll have the desired Stardust amount in no time. You should also combine this method with others mentioned in this article for the best experience.

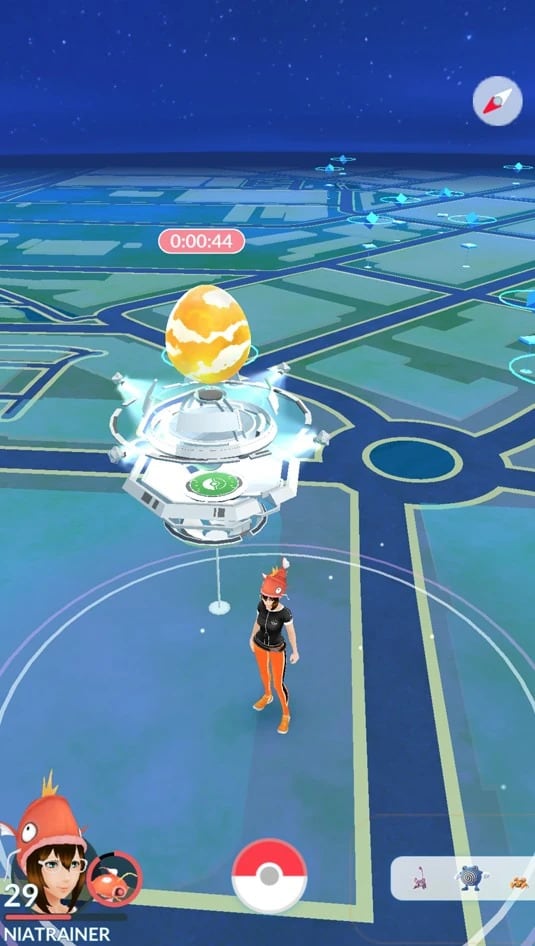
By Hatching Pokemon
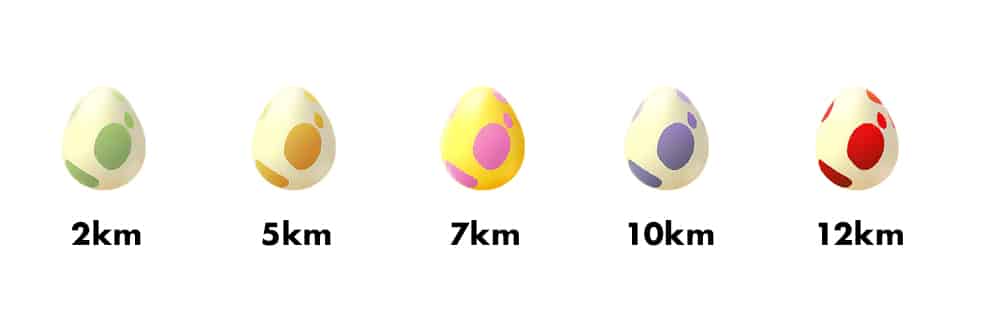
Hatching a Pokemon is also one of the essential parts of your Pokemon experience. Every time you hatch an egg, you’ll get Stardust points you can spend on numerous instances. The Stardust amount will depend on the egg itself; the higher the rank, the better the prices.
You can check out the list below to determine how much Stardust you’ll collect through your egg hatching:
- 400–800 Stardust for hatching a 2km egg;
- 600–1,600 Stardust for hatching a 5km egg;
- 800–1,600 Stardust for hatching a 7km egg;
- 1600–3200 Stardust for hatching a 10km egg;
- 3200–6400 Stardust for hatching a 12km egg.
You can also use the Star Piece item to multiply the Stardust amount by 1.5.

By Catching Pokemon
Catching Pokemon is one of the most efficient ways of earning Stardust points. Each Pokemon has a base rate of 100 Stardust points, but you can earn more points depending on the Pokemon’s evolution stage. For instance, if the Pokemon is in the second stage, you’ll earn an additional 500 Stardust points.
Another thing you should look out for is specific Pokemon characters – some may carry more than 100 Stardust points as their base. For instance, you can get a whopping 2,100 Stardust points if you catch Audino, 950 for Garbodor, 1,000 for Chimecho, etc.
If you stay consistent and catch at least one Pokemon daily, you can get up to 9,000 Stardust points on the seventh day. Moreover, the first catch of the day will bring you an additional 1,800 points.

By Claiming Raid Rewards
When the Boss enters your Gym, you may think it’s a stressful scenario. However, you should consider the bright side and fight to earn valuable rewards, such as Stardust points.
Once you and your team defeat the Boss, you can collect the prizes. You’ll win 1,000 Stardust points each time a Boss enters, even if it leaves the Gym without a fight.
If you defeat the boss, you’ll also get a chance to catch the Pokemon, which can bring you even more Stardust points!
By Getting Rocket Rewards
Rocket rewards are sets of items you get after fighting the Team Go Rocket. Each time you beat this criminal group, you’ll be rewarded with either 500 or 1,000 Stardust points, depending on whether you were fighting Grunt or Team Go Leader.
Additionally, if you ever face Giovanni, you’ll get 5,000 points for fighting and beating him.

By Earning Research Rewards Through Completed Tasks
Each player will get their daily to-do list depending on their skill and game level. Once you enter the app, you can complete these daily tasks for Stardust points.
The amount of points you will win depends on the task’s difficulty and duration. However, you should complete all the daily tasks to accumulate as many consumables as possible.
For instance, if you’re on level 45, you can head to the Go Battle League 45 times to earn 4,500 Stardust points.

By Visiting the Gym
While on your daily walk in the Pokemon world, you should check out whether you can find some Gyms around you. If you do, stop by to hang around with some of the most precious Pokemon characters and give them a berry while you’re there.
You’ll earn 20 Stardust points for each berry you give a Pokemon. It may be the easiest way to earn and use these points for your experience. Plus, you’ll meet new characters and fully experience what the Pokemon world offers.

Claim Stardust Quickly in Pokemon Go by Using Location Spoofing
If you live in a rural area and don’t get too many chances to walk around and catch Pokemon characters, you can use a classic trick of location spoofing. It will allow you to change your virtual location and wander the streets of another city to discover more Pokemon opportunities.
However, you’ll need a reliable tool to realize your Pokemon goals. One of the best options is Wondershare Dr. Fone, which provides a Virtual Location feature suitable for this quest. Aside from the obvious, you can use this application to manage your smartphone, recover data, and improve your overall smartphone experience.
Virtual Location will allow you to head to any city in the world, collect the rarest Pokemon characters, and earn the most Stardust points possible. Thus, download Dr. Fone Virtual Location from an official source, connect your phone, and follow the steps below to learn how to enable Virtual Location:
- Open Dr. Fone Virtual Location and select the mode in the top right corner (One-Stop, Multistop, or Joystick Route).

- Set the desired parameters.

- Click the Start Movingor Move Here

- You can also click on the Joystick feature to control your movements.
Once you turn the virtual location on, you’ll become an unbeatable Pokemon Go player.
Pokemon Go may be one of the most engaging games in the world. It requires you to move, complete tasks, catch Pokemon figures, and face numerous challenges daily, which is why it’s so popular in the gaming industry.
One of the features that contributes the most to your growth is Stardust, a consumable able to make your Pokemon dreams come to life.
If you’re searching for ways to collect these items as quickly as possible and gain incredible power, check out the guide below. We’ve discussed all the options you can try to obtain Stardust points, including changing your virtual location to get the most out of your journey.
- Title: How to use iSpoofer on Nokia C12 Pro? | Dr.fone
- Author: Lary
- Created at : 2024-07-23 00:59:02
- Updated at : 2024-07-24 00:59:02
- Link: https://android-pokemon-go.techidaily.com/how-to-use-ispoofer-on-nokia-c12-pro-drfone-by-drfone-virtual-android/
- License: This work is licensed under CC BY-NC-SA 4.0.