
How to use iSpoofer on Lava Yuva 2? | Dr.fone
How to use iSpoofer on Lava Yuva 2?
iSpoofer is a location spoofer that allows you to change your location on your device. This is useful for games like Pokemon Go, where you can catch Pokemons from different regions without leaving your home. However, iSpoofer is not available for download anymore. If you are looking for an alternative to iSpoofer, you can use Dr.Fone Virtual Location. Here’s how you can use Dr.Fone Virtual Location to spoof your location on your Lava Yuva 2.

iSpoofer is one of the most useful tools for iOS users, that’s designed to simulate a user’s GPS location. With iSpoofer, you can change your current location to anywhere in the world and access geo-restricted content without any hassle. While the tool has several real-world applications, the majority of users use iSpoofer to fake their location to catch rare Pokemon in Pokemon Go.
Since iSpoofer is an extremely reliable app, even Android users want to know if they can use it on their smartphones or not. If you’re one of them, this guide will help. In today’s article, we are going to discuss if you can download iSpoofer for Android or not and what are some of the best solutions to fake GPS location on an Android device.
So, without any further ado, let’s get started.
 Forex Robotron Gold Package
Part 1: Can I download the iSpoofer on Android
Unfortunately, iSpoofer isn’t available for Android. It’s an exclusive geo spoofing app that only works on iOS devices. In fact, all its features are tailored for the iOS ecosystem only. So, if you have an Android device, you won’t be able to download iSpoofer for Android at all.
However, the good news is that you don’t need iSpoofer to fake GPS location on an Android smartphone. There are dozens of Android-specific location spoofing apps that’ll help you simulate the GPS location and play Pokemon Go with a fake location. Some of these tools also come with a dedicated GPS Joystick feature, which means you’ll also be able to control your movement while sitting at one spot.
Part 2: Common ways to spoof on Android
When it comes to choosing the right location spoofing methods for Android, you’ll have to be extra cautious. Why? Because there are many fake GPS apps on Android that aren’t reliable and may damage your smartphone’s overall functionality as well.
Here are some of the most common ways to spoof location on Android devices.
- Use VMOS
VMOS is an application that lets users set up a virtual machine on their Android device. This means that you’ll be able to set up two different Android systems on the same device. What makes VMOS the right tool for geo spoofing on Android is the fact that it offers a one-click root enable feature. You can easily root your virtual Android OS without damaging the firmware of the primary OS. This way you’ll be able to install professional location spoofing tools and change your GPS location without any hassle.

The only downside of using VMOS is that it’s extremely hard to set up and manage. First and foremost, you’ll need different tools to successfully set up the virtual OS on your device. Secondly, VMOS is heavy software and if your smartphone doesn’t have decent configurations, it may even slow down the overall processing.
- Root Your Device
Another way to fake location on Android is to root your device. Rooting an Android device will allow you to install third-party spoofing apps that offer extensive functionality. However, when you’ll root your device, you won’t be able to claim its warranty anymore. So, in case you don’t want to void your smartphone’s warranty, ‘rooting’ may not be the right solution to fake your location in Pokemon Go.
- Use PGSharp
PGSharp is one of the best alternatives to iSpoofer for Android. It’s a tweaked version of the original Pokemon Go app that comes with a few additional features such as spoofing and GPS Joystick. The best part about using PGSharp is that it’s compatible with all Android devices. You won’t have to root your device to install and run PGSharp.
You can either choose the free or the paid version of the app. Of course, the latter comes with a few additional features, but if you only want to fake location in Pokemon Go, the free version of PGSharp will get the job done as well.
Note: Keep in mind that PGSharp isn’t available on Google Play Store and you’ll have to download it from the official PGSharp website.

Extension: safest way to spoof on iOS- Dr.Fone virtual location
So, that’s how you can fake GPS location on an Android device and collect different types of Pokemon in Pokemon Go. Even though iSPoofer isn’t available for Android, you can still use the above three methods to mock location without any effort.
It’s also worth noting that iSpoofer is permanently shut down and you can no longer install it on iOS devices as well. Even the iSpoofer website is down and if you want to fake location on your iPhone/iPad, you’ll have to look for other options. One of the best ways to change GPS location on an iOS device is to use Dr.Fone - Virtual Location (iOS). It’s a professional geo spoofing tool for iOS that comes with a wide variety of features to mock location on Lava Yuva 2s.
It has a dedicated “Teleport Mode” that’ll allow you to change your current location to anywhere in the world. You can even set a fake location using its GPS coordinates. Like iSpoofer, Dr.Fone - Virtual Location (iOS) also comes with the GPS Joystick feature. This means you’ll be able to catch different types of Pokemon without moving at all.
Here are a few key features of Dr.Fone - Virtual Location (iOS).
- Change your current location with a single click
- Use GPS coordinates to find locations
- Virtually control your GPS movement using the Joystick feature
- Customize your movement speed while walking in different directions
- Compatible with all iOS versions
Follow these steps to change your GPS location on an iDevice using Dr.Fone - Virtual Location (iOS).
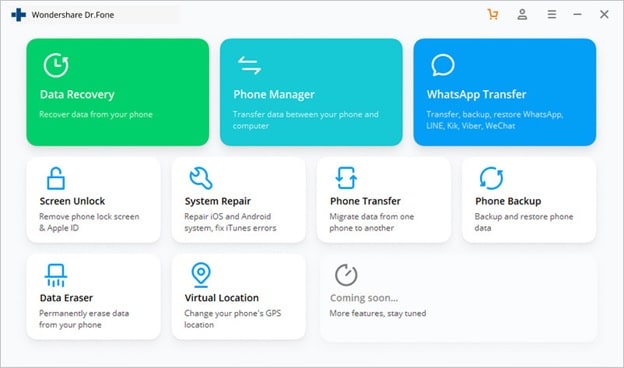
Step 1 - Install the Dr.Fone toolkit on your computer and launch the software. Click “Virtual Location” and connect your iPhone to the computer using a lightning cable.
 CalendarBudget - Monthly subscription membership to CalendarBudget via web browser or mobile app. Support included.
Step 2 - Once the tool recognizes your device, click “Get Started” to proceed further.

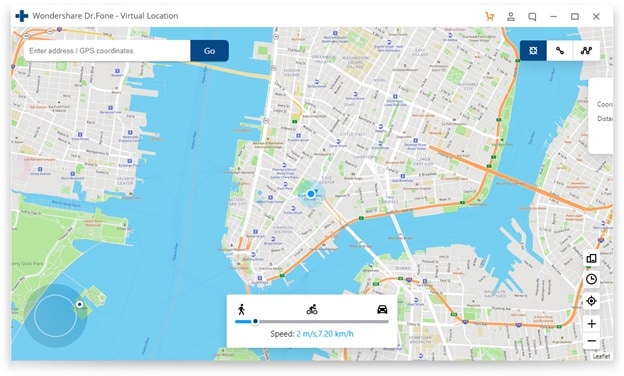
Step 3 - You’ll be prompted to a map that’ll point to your current location. Select “Teleport Mode” from the top-right corner and use the search bar to find the desired location.


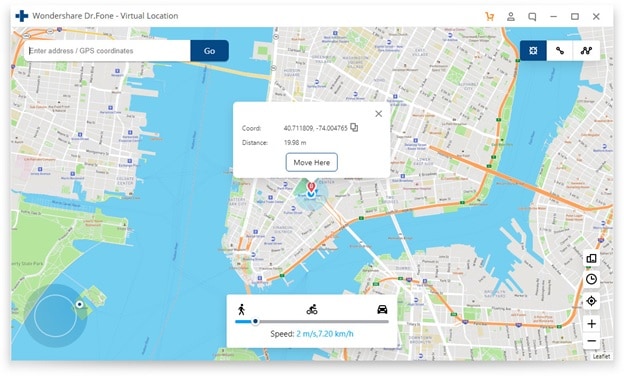
Step 4 - The pointer will move to the selected location automatically. Finally, click “Move Here” to set it as your new location.

That’s how you can change GPS location on an iPhone/iPad using Dr.Fone - Virtual Location (iOS).
All You Need To Know About Mega Greninja For Lava Yuva 2
Are you a fan of Pokemon Go? Then, you will find this article not only useful but also quite interesting. In case you have never played this game before, then you should know that Pokemon Go is a fantastic augmented reality game.
It requires the use of GPS (Global Positioning System) to track your location. Basically, Pokemon Go is a mobile application which you can easily download from Google Play Store or App Store, and it’s absolutely free. In simple words, you can say that Pokemon Go makes use of mapping technology so as to plot your actual location as you roam around in the streets to catch your favourite Pokemon.
When you play the game, your main goal would be to catch as many Pokemon or fictional characters as you can. Your main task will be to battle your opponents to catch the Pokemon and then train them.
It’s worth mentioning here that this AR-game is absolutely convenient to play. Now, one of the most amazing features that have been added to this game is Mega Evolution. But, unfortunately if you were of the opinion that greninja can mega evolve, then you are completely wrong, in fact you should note that no Kalos pokemon can mega evolve.
Through this article, we will discuss all you need to know about Greninja. So, without any further delay, let’s get started.
Part 1: Who is Mega greninja?

Also, called the Ninja Pokemon, Greninja is Dark/ Water-type pokemon. Some people love to call it a frog-like master. One of the most amazing features of Greninja pokemon is that with its swift movements, you will notice that this pokemon succeeds in confusing its opponents.
It makes use of very sharp throwing stars to slice its enemies. It features Torrent ability.
There are various weaknesses of this pokemon which include “Fighting”, “Grass”, “Electric”, “Bug”, and “Fairy”.Its worth mentioning here that Greninja pokemon is the final evolution of Froakie.
Part 2: What are the Strengths of Greninja in Pokemon?

Greninja is resistant to “Water”, “Fire”, “Ice”, “Dark”, “Steel” and finally “Ghost”. Also, this pokemon is immune to “Psychic”. This pokemon’s presence can be very intimidating for its opponents, it would not be wrong if we say that Greninja is quite unpredictable. There is no doubt that the counter attacks of Greniaja prove to be very dangerous for its enemies.
Part 3: How to Catch Greninja?

In order to catch Greninja, you will be required to fulfill specific requirements in the Pokemon Sun and Moon Exclusive demo.
First of all, after launching the Pokemon Sun and Moon Demo, go to the Pokemon Center.
Then, you’ll meet Professor Kukui and when he starts talking to you and asks what you wish to do , choose the option of “bring to full version.After that, you will be required to choose Ash-Greninja. Then, open the full game, finally you have to enter the nearest Pokémon Center.
Catching your favourite Pokemon or to mega evolve a specific pokemon will require you to go to different places or explore different locations, but it’s not always possible to step out of your house, it might be raining, or its night time, in the case, we recommend using software called Dr.Fone(Virtual Location).
With the help of this amazing software, you can teleport to any location or place in the whole without even requiring you to step out of your house.
In order to get started with Dr.Fone, you need to download Dr.Fone(Virtual Location) iOS. Then, you have to install Dr.fone on your smartphone. Finally, you have to launch Dr.Fone (Virtual Location) on your device.
Step 1: You have to tap on “Virtual Location” among the various options that you will notice therein. It’s important to ensure that when you are setting up Dr.Fone on your device, always ensure that your iPhone is connected to the PC. Then, click on “Get Started”.
 SwifDoo PDF 2-Year Plan
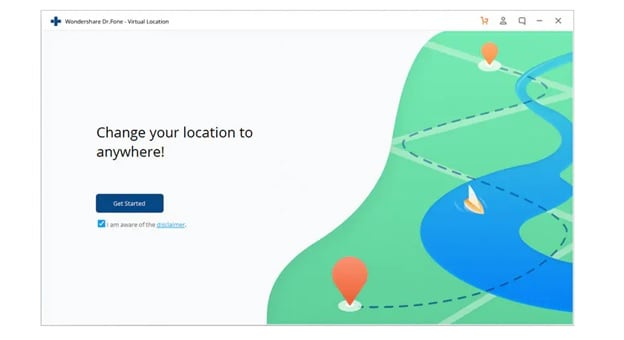
Step 2: If you have executed the prior steps or directions successfully, then you will see a new window that shows your actual location on a map will get displayed on your screen. Now, make sure that your displayed location on moa is accurate, if not, then click on “Center On,” with the help of this, you’ll be able to make your location correct.

Step 3: After all the previous steps, the next step is to click on the “teleport mode” icon, which will be located in the upper-right part. This will activate the teleport mode. After that, you have to enter the name of the location or place where you wish to teleport to in the upper left field. Finally, tap on “Go”. As an example, we are going to enter “Italy”, Rome in the left field.
 DLNow Video Downloader
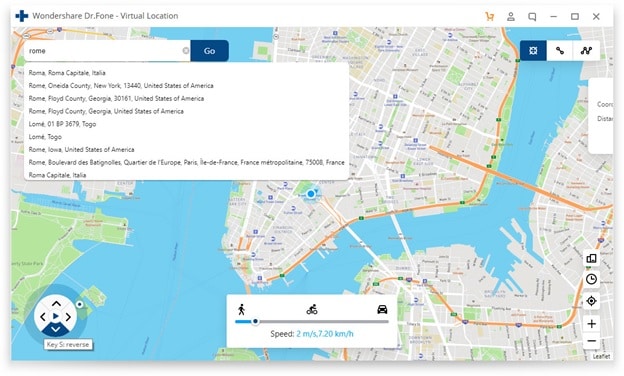
Step 4: In this manner, your location will now be understood or set by the system to “Italy”. You’ll see a pop-up box; you have to just click on “Move On”.
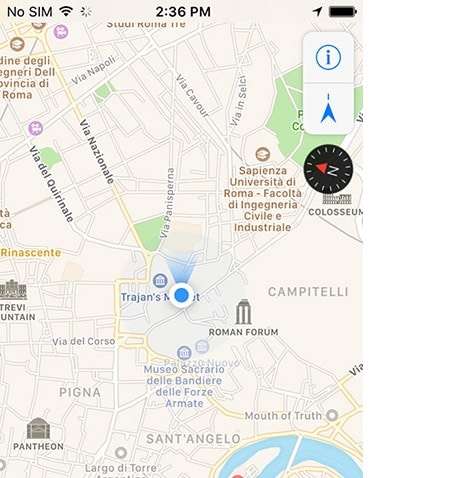
Step 5: If you have followed the directions accurately, your actual location on the map will now be set to “Italy”. You can confirm your location from the Pokemon Go’s map. Finally, below we have provided a screenshot of how the location will be shown.
Step 6: Also, you’ll see that the location on your iPhone would have also changed now to “Italy” or any other place that you have entered earlier.
Conclusion
So, we have reached the end of this article. We hope that you found the article quite useful as well as insightful. We also hope that with the help of the setup guide for Dr.Fone you can now easily catch your favourite pokemon by teleporting to different locations across the world. If you have any doubts or suggestions related to this article, then feel free to write it down in the comment section. So, this was all from our side for now. Stay Tuned
 Glary Utilities PRO - Premium all-in-one utility to clean, speed up, maintain and protect your PC
What Pokémon Evolve with A Dawn Stone For Lava Yuva 2?
If you are a diehard Pokémon Go player, you probably know how exciting it is when your Pokémon evolves. Evolutions mean a boost in stats and strength in raids. Plenty of Pokémon users are conversant with the traditional raiding as a way to evolve. However, you can use special items to evolve your Pokémon. One such item is the dawn stone. In this article, we are going to take you through a detailed guide on dawn stone evolutions and how to get it with ease.
 Greeting Card Builder
Part 1. Dawn Stone Pokémon Evolutions
What is Dawn Stone in Pokémon Sword and Shield?
Like Shiny Stone, dusk stone, Sun Stone, and Moon Stone, Dawn Stone is another peculiar evolution item in Pokémon Sword and Shield. If you combine Dawn Stone with certain Pokémon, they will evolve to another level. This peculiar stone was introduced in Generation IV, and in terms of appearance, Dawn Stone sparkles like a glittering eye.

You can get dawn stone from the Digging Duo found near the Wild Area nursery. You will, however, be required to pay them 500 watts before digging random items for you. Remember, this is a trial and error thing, and you might have to spend a lot of watts before finding a dawn stone. Also, you can get any evolutionary stone, including the Dawn Stone in the Lake of Outrage. Here, you will have to first obtain a Rotom Bike on route 9 to move across the water.
### Pokémon that Evolve with Dawn StoneAs aforementioned, dawn stone is an evolution item that is used to evolve certain species of Pokémon. To evolve your Pokémon using Dawn Stone in Pokémon Sword and Shield, enter the bag menu and choose the “Other Items” tab. Hover on the Dawn Stone and select the “Use this item” option. Finally, select the Pokémon to evolve. These Pokémon that can be evolved using dawn stone include:
1. Kirlia
Kirlia is a small humanoid Pokémon whose upper body and arms are white while the waist and legs are light green. This makes it appear as though it is wearing tights. Kirlia’s natural abilities include synchronization and trace. It loves dancing on sunny mornings and becomes more beautiful when they sense e positive emotions of trainers. A vast majority of Kirlia live in the cities, although some are still found in the forest. Kirlia evolved from Ralts and has two possible evolutions, namely Gardevoir and Gallade. If it reaches level 30, it evolves to Gardevoir. However, if it is male and given a dawn stone, it will evolve to Gallade.
2. Snorunt
Snorunt is an ice-type Pokémon that was introduced in Generation III. It is also referred to as the “Snow Hat Pokémon.” You can find Snorunt in seafoam café, snow canyon, or even in Mysterious Grotto. Furthermore, you can obtain it by trading or Pokémon Roulette. Snorunt can evolve into Glalie or Froslass. If it reaches level 42, Snorunt evolves to Glalie. For Snorunt to evolve into Froslass, it requires a dawn stone. However, the Snorunt must be a female to evolve to Froslass.

Part 2. Hacks and Tricks to get Dawn Stone Pokémon
It is every player’s wish to avoid the long hunt for a Dawn Stone into their Podex. This issue has given birth to some of the hacks and tricks to help players cross territory and find the intended evolution item or Pokémon. Some of these tricks include:
1. Use iOS spoofing tool- Dr. Fone Virtual Location
Dr. Fone Virtual Location is an amazing iOS spoofer tool that allows users to fake their actual location. This makes it a good tool for location-based games like Pokémon Go. With Dr. Fone Virtual Location, you can teleport to whichever place across the globe by a click of a button. If you want to simulate movements to confuse the game app, you can simulate two or multiple points. Furthermore, you can leverage the joystick to improve the flexibility of GPS control. To teleport to any place in the world with Dr. Fone Virtual Location’s help, follow the steps below.
Step 1. Download Dr. Fone Virtual Location and install it on your computer. Once installed, launch it and then select the “Virtual Location” tab on the primary window. Also, connect your iOS device to the computer.
 Project Manager - Asset Browser for 3Ds Max
Step 2. On the next page, click the “Get Started” button to proceed.
Step 3. You should see three icons on the top-right of the subsequent page. Click the third icon to switch to the teleport mode. At the top-left, enter the location of the place you want to teleport to and click “Go.”

Step 4. When the program has found the location, a dialog box will appear in the background. Click “Move Here” to teleport to this location.
2. Use Pokémon Gotcha
Pokémon Go-tcha makes hunting Pokémon and evolution items much easier. With this tool, you can go for a hunt without looking at your smartphone. When you run Go-tcha Evolve on the Pokémon Go application, you can set color animations and vibrations to alert you about Pokémon and pokestops that are in range. Moreover, you can use the auto-catch feature so that you don’t have to respond to alerts. You can also check on time, your stats, and leverage the new pedometer feature to count your steps. This program comes with various exciting colors for you to choose from and a bunch of other great features.
3. Use iTools
iTools location spoofer is another good GPS mocking tool that is suitable for Pokémon Go games. By faking the GPS location, you can easily access territories where rare Pokémon or evolution items are available while seated at home or in the office. This program supports iOS 12 devices or earlier versions. However, there are scores of people who have complained about several crashes. Nevertheless, you can try it if you have got some penny to spare.
- Title: How to use iSpoofer on Lava Yuva 2? | Dr.fone
- Author: Lary
- Created at : 2024-07-22 23:25:50
- Updated at : 2024-07-23 23:25:50
- Link: https://android-pokemon-go.techidaily.com/how-to-use-ispoofer-on-lava-yuva-2-drfone-by-drfone-virtual-android/
- License: This work is licensed under CC BY-NC-SA 4.0.