
How does the stardust trade cost In pokemon go On Xiaomi Redmi 12? | Dr.fone
How does the stardust trade cost In pokemon go On Xiaomi Redmi 12?
Pokemon go has been around for a while now and has arisen as one of the most talked-about games in the gaming community. The fact that it is a location-based game and needs you to move around while playing the game makes it further interesting. Trading in Pokemon go is one of the most talked-about features. Today, we will help you explore more about stardust trade costs and how can you easily perform trades! Hang on as we dwell deeper into Pokemon go and trade stardust costs.
Part 1: How does Pokemon trading work?
So as we’ve discussed earlier, Pokemon go trading is one of the most interesting features of the game. So how does this trading work? In Pokemon Go, you can trade pokemon possessed by you with those possessed by your friends if both you and your friend, decide to mutually trade the pokemon with each other! For trading in Pokemon go, there are certain criteria you need to satisfy to qualify for trading in Pokemon go! Given below are the requirements to qualify for trading in Pokemon go
- Be at least level 10
- Be friends with the person you’re trading on Pokemon go
- Be in a radius of 100 m while you’re trading
However, Pokemon go also has levels of friendship and you can trade pokemon of different levels with friends with whom you have different friendship levels. Higher is the friendship level, higher is the level of Pokemon which you can trade. every trade requires you and your partner to spend stardust points. So There are basically 4 levels of friendship in Pokemon go
- Friend
- Good friend
- Ultra friend
- Best friend
The levels of your friendship with a player on Pokemon go increase with the increase in the number of days you stay friends with them. Within a month of friendship, you can become best friends with a player on Pokemon go! You also need stardust points on Pokemon go. So what is stardust trade cost? Before you trade any pokemon you must spend stardust coins. Not having enough stardust trade coins will not allow the trade of pokemon to happen. Hence, you must have enough stardust trade costs.
Part 2: How much stardust do you need in pokemon trading costs?
Trading in Pokemon go is quite complex. This is because the needed Stardust points will be different in every case and will depend on several factors. Factors such as whether you already half got that Pokemon in your pokedesk or not, the friendship level of you and your friend who are interested in trading, or whether the Pokemon is rare or common. Given below are the Stardust trade costs for each Pokemon.
Standard trades
- Good friend:100
- Great friends:80
- Ultra Friends: 8
- Best friend: 4
Shiny or legendary (caught by you)
- Good Friend: 20,000
- Great Friend: 16,000
- Ultra Friend: 1,600
- Best Friend: 800
Shiny or Legendary (not caught by you)
- Good Friend: 1,000,000
- Great Friend: 800,000
- Ultra Friend: 80,000
- Best Friend: 40,000
However, this Stardust trade cost may vary according to the friendship levels! Before trading, you must think of the friendship level between you and your friend and also if the Pokemon which has been traded can be evolved through trading. Evolving Pokemon through trading is another beneficial tactic that could benefit you as a player of Pokemon go.
Part 3: Ways to increase stardust in pokemon go?
1. Use Dr.Fone – Virtual Location (iOS/Android)
Do you want to increase your Stardust trade cost in Pokemon go? There is no better way for doing so other than using Dr.Fone - Virtual location (iOS/Android) . Using this will easily help you to catch more Pokemon, as you can fake your location using this app. You can change your location to any given location on the map and catch Pokemons from different regions without having to move around. Doesn’t it sound fun? Catching the rarest Pokemon all by sitting at home!
Teleport to anywhere in the world
Step 1: Firstly, you need to install Dr.Fone- Virtual location (iOS/Android) on your computer(Win/Mac). Then, install and launch the program on your computer. Click on “Virtual Location” from the options on the main interface.

Step 2: Now, you need to connect your iPhone to the PC and click on “Get Started”.

Step 3: A new window would now pop up where you can see your current location. If you are unable to see your current location, then click on “center on” icon at the bottom. Doing so will lead you to show your location on the map.

Step 4: Now click on “Teleport mode” using the button on the top right corner of the window. Enter the place you want your location to be set to and then click on “Go”. Once done the click on “Move Here”. Well, that’s it! We’re done with changing our location to the desired location!

2. Exchange the gift with friends to level up a friendship
Pokemon go also allows you to send gifts to your game friends and receive gifts from your game friends. Well, this can help both of you grow and progress in the game and can be a helpful trick to increase Stardust!
3. Play the game as much as you can
Investing more and more time on the game will lead you to catching more pokemons which will, in turn, lead to getting more stardust! Hence play it regularly with continuity!
Conclusion
Well, the article did give us a lot of idea about stardust trade cost and how to increase Stardust trade points in Pokemon go. We dwelled more into major facts about the game and learned a lot about it. We also explored what is drfone-Virtual location (iOS) and how it can help you to teleport from one place to another! Using the app will help you a lot in improving the game and wouldn’t require you to do much! All you’ve to do is teleport from one place to another, catch more and more pokemons and get more stardust! As a player, it shall improve your stats by a huge margin!
Which Pokémon can Evolve with a Moon Stone For Xiaomi Redmi 12?
Evolution items play a significant role in evolving certain species in the Pokémon game. Moon Stone is one of these peculiar items that are worth adding to your Pokedex. However, getting Moon Stone Pokémon is a tough assignment and you have to pull your best bells and whistles. However, there are several hacks and tricks that can reduce your hunting pain. In this article, we shall take you through a complete guide on Moon Stone Pokémon and evolutions.
Part 1. Moon Stone Pokémon
What is Moon Stone Pokémon?
Moon Stone is an evolution stone introduced in generation I. This peculiar stone is used to evolve certain species of Pokémon. In terms of appearance, Moon Stone Pokémon is elliptical and black as the night sky.

The simplest way to get a Moon Stone in Pokémon Sword and Shield is to go to Lake of Outrage in the Wild area. You will see a body of water on your left and a watt trader standing near it. To cross this water body, you will have to unlock the Rotom Bike from Route 9. When you manage this, check under the eight stones and you might be lucky that one of them might yield a Moon Stone. Also, you can navigate to the Dusty Bowl in the Wild Area. Here, you will find barren stones between a grassy rock and wheat field.
Pokémon that Evolve with a Moon Stone
Moon Stone makes certain species of Pokémon evolve. To evolve a Pokémon using Moon Stone in Pokémon Sword and Shield, simply open the bag and go to the “Other Items” section. Finally, use Moon Stone in any of the following Pokémon.
1. Nidorina
Nidorina is a poison type Pokémon that was introduced in Generation I. it looks like a rabbit with blue skin and dark spots around the body. Its natural abilities are poison point, rivalry, and hustle. As of level 16, Nidorona evolved from Nidoran. With the use of Moon Stone, Nidorina can evolve into Nidoqueen.
2. Nidorino
Nidorino is a male counterpart of Nidorina. This poison-type Pokémon debuted in Generation I and looks like a rabbit. It has a red-purple color with some dark spots spread across the body. Sharp teeth protrude with large upper jaws and spikes. This Pokémon is quick to anger. Nidorino evolved from Nidoran as of level 16 and can evolve to Nidoking using the Moon Stone.
3. Clefairy
This is a fairy-type Pokémon that was introduced in Generation I. It is a small, round, and star-shaped Pokémon whose abilities include magic guard and cute charm. It is timid and rarely feature near humans. Clefairy evolves from Cleffa when it gets leveled up with high friendship. With the help of Moon Stone, Clefairy evolves into Clefable.
4. Jigglypuff
This is a normal/fairy type of Pokémon that was also introduced in Generation I. Before Generation VI, this Pokémon was entirely a normal-type Pokémon. Jigglypuff itself is an evolution of Igglybuff and can evolve into Wigglytuff with the help of Moon Stone.
5. Skitty
This is a normal type Pokémon that was introduced in Generation II. This Pokémon is pink and looks like a cat with a cute charm ability. Skitty can evolve to Delcatty using the Moon Stone.
6. Munna
Munna is a psychic-type Pokémon that was introduced in Generation V. It is a small Pokémon with a pink round body having purple flower painting on its back. With the use of Moon Stone, Munna evolves into a Musharna.
Part 2. Tricks and Hacks to Get Moon Stone Pokémon
As you have seen above, getting a Moon Stone is not an easy ride. It involves lots of trials and there is no guarantee to get it. But what tricks and hacks can you incorporate to make your hunt seamless? The following are some of the plausible tricks that you can use to easily grab a Moon Stone and add it to your Pokedex.
1. Use Dr. Fone Virtual iOS Location
It goes without question that Dr. Fone Virtual Location is the best location spoofer tool. Remember Pokémon game is location-based and if you can play around with your location then you are at an upper hand of grabbing a rare Pokémon or an evolution item like Moon Stone. Dr. Fone Virtual Location makes it seamless to teleport to any location across the globe while you are seated comfortably at home. Besides, you can simulate movements between two or more points and make GPS control more flexible with the help of a joystick.
How to Teleport with Dr. Fone Virtual Location
Step 1. After installing Dr. Fone Virtual Location, launch it, and select “Virtual Location.” Now connect your iPhone to the computer.
Step 2. Click the “Get Started” on the subsequent page to access the teleport options.
Step 3. The program will display a new page with three icons at the top-right. Click the third icon to take you to the teleport mode. Again enter the place you want to teleport to in the text field at the top-left of this same window and then hit “Go.”

Step 4. Click “Move Here” from the pop-up that follows to teleport to the location you provided.
2. Use Android Spoofing Tool- Pgsharp
Pgsharp is a fake GPS location tool for Android devices and is suitable for playing Pokémon from a fake location with no root. It allows users to teleport in real-time while they are just sited at home. It has a downloadable free version. It has a user-friendly interface, and once you have set the fake GPS location on your Xiaomi Redmi 12, you can catch rare Pokémon and evolution items with ease.
3. Use Go-tcha Evolve
Go-tcha Evolve is an application that allows you to set animations and vibration to alert you in the case of Pokémon or pokestops. You can use its “auto-catch” feature to allow it automatically grab the Pokémon or pokestops without having to respond to alerts.
Preparation to Beat Giovani in Pokemon Go For Xiaomi Redmi 12
Are you ready to defeat Giovani effortlessly in Pokemon Go? Keep reading.
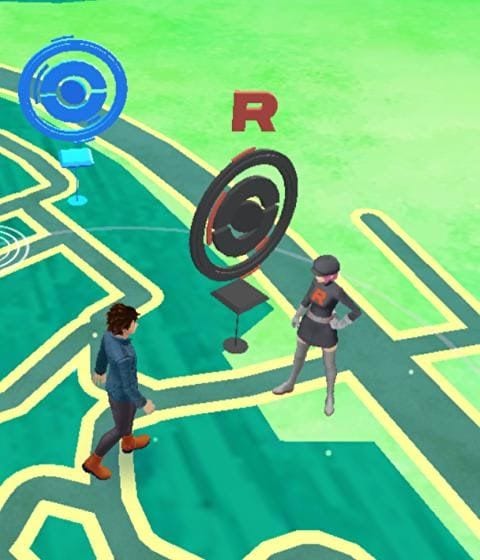
Giovani is the grand commander of the Team Go Rocket crime syndicate. The big boss appears stronger every month as he also changes his lineup of creatures monthly. This means your lineup of Pokemon Go Giovani counters would have to change subsequently. So how do you know the best Giovani Pokemon Go counters to use against the Team Go Rocket boss when next you meet him? Well, that’s left for this guide to answer. Here you will learn about how to defeat this monster and how to find him. Without wasting your time, let’s start with how to find Giovani in Pokemon.
Part 1. How to Find the Giovani in Pokemon
Locating Giovani’s hideout is never a walk in the park as you need to complete some daunting tasks. A detailed explanation of each task is given below:
1. A Troubling Situation Task
This four-step storyline Special Research task introduces players to the Team Go Rocket Invasion and Shadow Pokemon feature in the Pokemon Go game. Players leverage the task to learn how to stop the Team Go Rocket crime syndicate by reclaiming PokeStop and then purifying Shadow Pokemon.
How to Complete ’A Troubling Situation’ Task in Pokemon Go Giovani
Below you will find all the four steps you need to complete in the ‘A Troubling Situation’ task with their rewards:
Pokemon Go: A Troubling Situation Step 1
This step should be completed with ease since you aren’t new to the Giovani Pokemon Go game. Just evolve any two Pokemon that you own and then charge them up five times. And boom! You are done with this step.
Reward: 1,000 Stardust and 2,000 XP
Pokemon Go: A Troubling Situation Step 2
For this step, you have to catch two shadow Pokemon which can be achieved by defeating two Grunts from Team Go Rocket. On killing them, they will leave some shadow Pokemon behind which you have to catch. After that, go ahead and defeat the last Grunt to complete this step.
Reward: 2,000 Stardust, 2,000 XP, and 5 Golden Razz Berries
Pokemon Go: A Troubling Situation Step 3
After catching the shadow Pokemon in step 2, you need to catch one more to cleanse or purify the three of them. To do this, just tap on your shadow Pokemon, and then hit the Purify option. You will be charged some thousands of Stardust and a couple of candy for the shadow Pokemon.
Rewards: 2000 Stardust, 5 Silver Pinap Berries, and 1 Rare Candy
Pokemon Go: A Troubling Situation Step 4
For this step, you’ve got nothing to do. All three objectives have been automatically completed for you when you finished the previous step. You only get rewards at this final step.
Rewards: One Fast TM, One Charged TM, and 3 Rare Candies
2. Giovani Special Research Task 
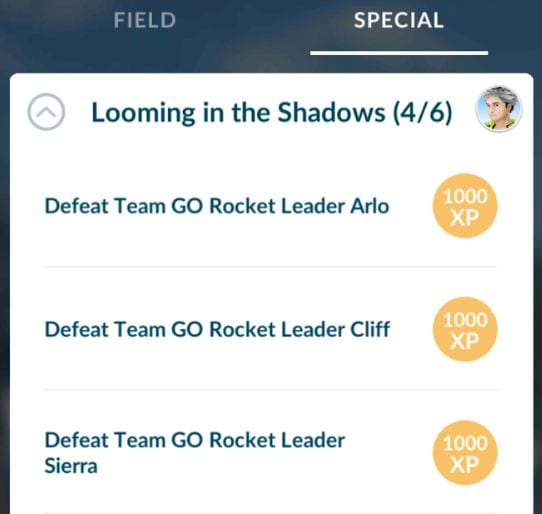
After completing the quest above, Giovani Special Research or Looming in the Shadows is the next and final quest you have to complete to face Giovani. It’s a six-step Special Research that introduces the Team Go Rocket Grunts and Leaders: Cliff, Arlo, and Sierra.
On completing one research step, you will be given a reward called the Super Rocket Radar. Like the Rocket Radar, the Super Rocket Radar can be equipped and unequipped from your Bag. This reward doesn’t only show Giovani’s hideout, it also shows some of his Grunts hideouts.
Part 2. What does the Pokemon Go Giovani Counter Contain?
Giovani remains the toughest beast amongst all the Team Go Rocket Leaders. When you find him in the game, be prepared to face his wrath. To defeat him, you need a powerful team.
The big boss choice of legendary Shadow Pokemon and second party members changes every month- the Pokemon you fought against the previous month will be different from that of the present month and thereafter.
Giovani’s lineup of creatures for October 2022 is shown below:
| Lineup of Creature | Pokemon |
|---|---|
| First | Persian |
| Second | Kangashkan, Nidoking, Garchomp |
| Third | Mewtwo |
For the Pokemon, Persian, and Kangashkan, try to have a Lucario, Conkeldurr, or Machamp in your team and you are good to defeat them.
When you encounter Nidoking or Garchomp, your team has to change. You will need to have a strong ice-type Pokemon on your team. The reason is that this new Lineup of creatures is strong on land and could cause substantial damage to the dragon-type Pokemon in case you wanna choose them.
Picking any of these great ice-type Pokemon, Mamoswine, Glaceon, or Weavile when you face Nidoking or Garchomp is a perfect choice. However, we recommend Mamoswine, because he isn’t just an ice-type Pokemon but also a strong ground-type Pokemon.
Once you defeat Team Go Rocket’s second lineup creatures, you will have to battle against the legendary psychic Pokemon, Mewtwo, who is weak to this set of Pokemon; bug, ghost, and Dark-type Pokemon. So beating this Pokemon Go Giovani grunt shouldn’t be a tedious task as you’ve got a plethora of choices when deciding the Pokemon-type to use. Origin Giratina and Tyranitar are some strong Dark-type Pokemon you can use to defeat Mewtwo.
Now you know the best Giovani Pokemon Go counters to use against each lineup of creatures, leverage it to advance to the next phase of the game where you will face the big bad boss himself, Giovani.
Part 3. Tips to Beat Giovani in Pokemon Go

Just as you did against Team Go Rocket Leaders, Arlo, Cliff, and Sierra, you need a Pokemon stronger than two of Giovani’s. With that, you can use the same Pokemon twice, thereby keeping your choice for Legendary Shadow Pokemon safe till you need it to beat Giovani.
Mind you, the big bad boss, Giovani has two Protect Shields at his disposal so you have to be careful while fighting against the monster. We implore you to start your game with a Pokemon that has a Charged move so you can charge as fast as possible.
Getting a strong Pokemon won’t come with ease, however, with the use of Dr.Fone- Virtual Location you can achieve this. The handy software is designed to help you spoof your iOS device location so you can catch any strong Pokemon of your choice remotely.
Key Features
- With just a single click you can spoof your iPhone GPS location
- The application allows you to simulate GPS movement at your comfort
- It saves your location automatically in the database
- Provides full-screen HD map view
- Easily enter your target location name, address, or the exact coordinate on the application with a joystick
Guide to Use Dr.fone Virtual Location to Get Stronger Pokemon in Giovanni Pokemon Go
Step 1: Firstly, you have to download and install a compatible version of Wondershare drfone virtual location on your PC. Wait for the installation to complete, then run the application.
Step 2: The interface above will appear on your screen. With the aid of a lightning cable, connect your iPhone to a PC, then click on the Virtual Location icon. A new interface will pop up as shown in the image below
Click on Get Started to change your location.
Step 3: Your current location will appear on the PC screen. Switch location by entering the name or address of the place in the field at the upper left corner of the application.
Step 4: The interface below will pop up on your screen. Click on the Move Here icon to teleport to your chosen location.
And now you are good to have one of the strongest Pokemon on your team when fighting against Giovani. Leverage the Dr.Fone- Virtual Location program as it will help you ease the stress of catching stronger Pokemon remotely on your device without jailbreaking it.
Also read:
- [New] Best of the Chill Easy Phone Game Compilation
- [New] In 2024, Reflex Toolbox Bundle
- Expert Gear Review at TomTechSpotlight
- In 2024, Detailed guide of ispoofer for pogo installation On Xiaomi Redmi Note 13 5G | Dr.fone
- In 2024, How and Where to Find a Shiny Stone Pokémon For Infinix Smart 8 Pro? | Dr.fone
- In 2024, iPogo will be the new iSpoofer On Xiaomi Redmi 12 5G? | Dr.fone
- In 2024, Pokemon Go Error 12 Failed to Detect Location On Infinix Note 30 5G? | Dr.fone
- In 2024, Small-Scale Success with the Safest Online Meeting Tools
- In 2024, Streaming Success Easily Convert SRT Formats
- In 2024, The Best iSpoofer Alternative to Try On Infinix Note 30i | Dr.fone
- In 2024, The Magnificent Art of Pokemon Go Streaming On Infinix Hot 40 Pro? | Dr.fone
- In 2024, Will Pokémon Go Ban the Account if You Use PGSharp On Xiaomi Redmi 13C 5G | Dr.fone
- Latest OnePlus Flagship Now Packs Enhanced Operating System Features
- Quick Fix: Disconnecting OneDrive From Your Windows Explorer View
- Windows Defender Compatibility: Understanding Minimum System Specifications
- Title: How does the stardust trade cost In pokemon go On Xiaomi Redmi 12? | Dr.fone
- Author: Lary
- Created at : 2024-12-21 17:19:01
- Updated at : 2024-12-23 19:09:14
- Link: https://android-pokemon-go.techidaily.com/how-does-the-stardust-trade-cost-in-pokemon-go-on-xiaomi-redmi-12-drfone-by-drfone-virtual-android/
- License: This work is licensed under CC BY-NC-SA 4.0.