
How can I get more stardust in pokemon go On Nokia C22? | Dr.fone
How can I get more stardust in pokemon go On Nokia C22?
Pokemon Go is one of the most popular games worldwide, with over 80 million active players. The game will present tasks you should complete to collect items and Pokemons, thus improving your skill levels and making you better in the game.
One of the essential items you can get is Stardust, which will help you become the best trainer in the Pokemon Go industry. If you’re new to the game and are wondering what the importance of Stardust is in Pokemon Go, read ahead. We’ll teach you all about it and present methods to collect this item faster.
Part 1. What Is Stardust in Pokemon Go?
Stardust is a consumable item that allows you to strengthen your Pokemon. This item will help you reach the maximum of your Pokemon, making them more resilient and ready for potential fights. Moreover, Stardust is essential for trading – you must have a specific Stardust level to trade your valuables with another trainer.
Part 2. How Is Stardust Used in Pokemon Go?
Stardust can come in handy in several different scenarios in the Pokemon Go game. We’ll present all the use cases below to help you navigate your journey and learn the importance of collecting Stardust.
- Power up– the most crucial feature of Stardust is that it can power up your Pokemon to its maximum CP. It’s ideal for PVP games, and you’ll get the most out of your experience with this consumable.
- Trading– Stardust is essential for trading, and the amount of the item you need will depend on the Pokemon and the friendship level with the trader.
- Second Charged Attack– you can unlock the second charged attack if you have a couple of them up your sleeve.
- Purification – this consumable is used to purify the Shadow Pokemon left by Team Go Rocket.
- Changing the form– you can use Stardust to change the form of your Pokemon character.
As you can see, Stardust is crucial for numerous gameplay experiences, so you should check out the guide below to learn how to collect these consumables.

Part 3. Best Ways to Get Stardust in Pokemon Go
Since having Stardust is crucial for your Pokemon Go experience, you may be looking for the best ways to accumulate as many consumables as possible. We’ll present a couple of ways to reach your goals below.

Through Pvp Rewards
One of the best ways to earn Stardust is through Player versus Player features. When you’re playing with other users, you can earn Stardust based on the number of your previous wins, your game level, and the PVP outcome.
For instance, if you’re a Rank 2, you can earn around 2,000 Stardust points by winning a battle, and if you’re Rank 24, the number increases to about 200,000. You can also use a Star Piece to multiply your winnings by 1.5.
Another method is to play with your friends, and the Stardust points can vary from 300 to 1000, depending on your opponent’s rank.

 PCDJ Karaoki is the complete professional karaoke software designed for KJs and karaoke venues. Karaoki includes an advanced automatic singer rotation list with singer history, key control, news ticker, next singers screen, a song book exporter and printer, a jukebox background music player and many other features designed so you can host karaoke shows faster and easier!
By Opening Gifts
Opening gifts is one of the main components of the Pokemon Go experience. You’ll get daily gifts you can open for free, earn valuable items, and support your gameplay. Each gift can carry a certain amount of Stardust particles, so you don’t have to do anything to accumulate these items.
The maximum Stardust you can get in one gift is 300, which may not seem like a lot. However, if you open your gifts regularly, you’ll have the desired Stardust amount in no time. You should also combine this method with others mentioned in this article for the best experience.

By Hatching Pokemon
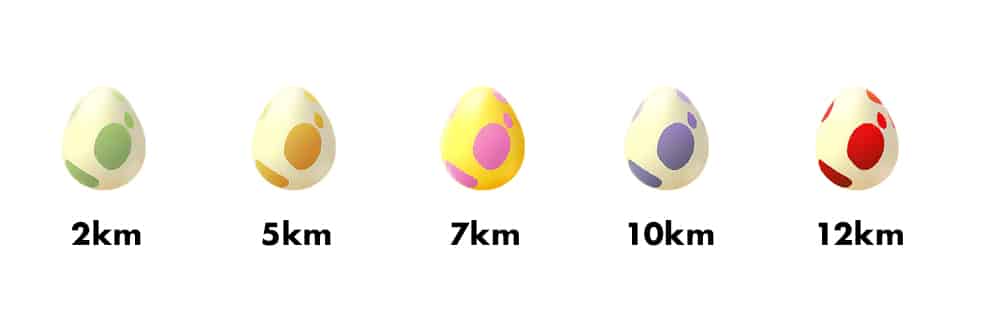
Hatching a Pokemon is also one of the essential parts of your Pokemon experience. Every time you hatch an egg, you’ll get Stardust points you can spend on numerous instances. The Stardust amount will depend on the egg itself; the higher the rank, the better the prices.
You can check out the list below to determine how much Stardust you’ll collect through your egg hatching:
- 400–800 Stardust for hatching a 2km egg;
- 600–1,600 Stardust for hatching a 5km egg;
- 800–1,600 Stardust for hatching a 7km egg;
- 1600–3200 Stardust for hatching a 10km egg;
- 3200–6400 Stardust for hatching a 12km egg.
You can also use the Star Piece item to multiply the Stardust amount by 1.5.

By Catching Pokemon
Catching Pokemon is one of the most efficient ways of earning Stardust points. Each Pokemon has a base rate of 100 Stardust points, but you can earn more points depending on the Pokemon’s evolution stage. For instance, if the Pokemon is in the second stage, you’ll earn an additional 500 Stardust points.
Another thing you should look out for is specific Pokemon characters – some may carry more than 100 Stardust points as their base. For instance, you can get a whopping 2,100 Stardust points if you catch Audino, 950 for Garbodor, 1,000 for Chimecho, etc.
If you stay consistent and catch at least one Pokemon daily, you can get up to 9,000 Stardust points on the seventh day. Moreover, the first catch of the day will bring you an additional 1,800 points.

By Claiming Raid Rewards
When the Boss enters your Gym, you may think it’s a stressful scenario. However, you should consider the bright side and fight to earn valuable rewards, such as Stardust points.
Once you and your team defeat the Boss, you can collect the prizes. You’ll win 1,000 Stardust points each time a Boss enters, even if it leaves the Gym without a fight.
If you defeat the boss, you’ll also get a chance to catch the Pokemon, which can bring you even more Stardust points!
By Getting Rocket Rewards
Rocket rewards are sets of items you get after fighting the Team Go Rocket. Each time you beat this criminal group, you’ll be rewarded with either 500 or 1,000 Stardust points, depending on whether you were fighting Grunt or Team Go Leader.
Additionally, if you ever face Giovanni, you’ll get 5,000 points for fighting and beating him.
 Jet Profiler for MySQL, Enterprise Version: Jet Profiler for MySQL is real-time query performance and diagnostics tool for the MySQL database server. Its detailed query information, graphical interface and ease of use makes this a great tool for finding performance bottlenecks in your MySQL databases.
By Earning Research Rewards Through Completed Tasks
Each player will get their daily to-do list depending on their skill and game level. Once you enter the app, you can complete these daily tasks for Stardust points.
The amount of points you will win depends on the task’s difficulty and duration. However, you should complete all the daily tasks to accumulate as many consumables as possible.
For instance, if you’re on level 45, you can head to the Go Battle League 45 times to earn 4,500 Stardust points.
 Screensaver Factory, Create stunning professional screensavers within minutes. Create screensavers for yourself, for marketing or unlimited royalty-free commercial distribution. Make screensavers from images, video and swf flash, add background music and smooth sprite and transition effects. Screensaver Factory is very easy to use, and it enables you to make self-installing screensaver files and CDs for easy setup and distribution. Screensaver Factory is the most advanced software of its kind.
By Visiting the Gym
While on your daily walk in the Pokemon world, you should check out whether you can find some Gyms around you. If you do, stop by to hang around with some of the most precious Pokemon characters and give them a berry while you’re there.
You’ll earn 20 Stardust points for each berry you give a Pokemon. It may be the easiest way to earn and use these points for your experience. Plus, you’ll meet new characters and fully experience what the Pokemon world offers.

Claim Stardust Quickly in Pokemon Go by Using Location Spoofing
If you live in a rural area and don’t get too many chances to walk around and catch Pokemon characters, you can use a classic trick of location spoofing. It will allow you to change your virtual location and wander the streets of another city to discover more Pokemon opportunities.
However, you’ll need a reliable tool to realize your Pokemon goals. One of the best options is Wondershare Dr. Fone, which provides a Virtual Location feature suitable for this quest. Aside from the obvious, you can use this application to manage your smartphone, recover data, and improve your overall smartphone experience.
Virtual Location will allow you to head to any city in the world, collect the rarest Pokemon characters, and earn the most Stardust points possible. Thus, download Dr. Fone Virtual Location from an official source, connect your phone, and follow the steps below to learn how to enable Virtual Location:
- Open Dr. Fone Virtual Location and select the mode in the top right corner (One-Stop, Multistop, or Joystick Route).

- Set the desired parameters.

- Click the Start Movingor Move Here
- You can also click on the Joystick feature to control your movements.
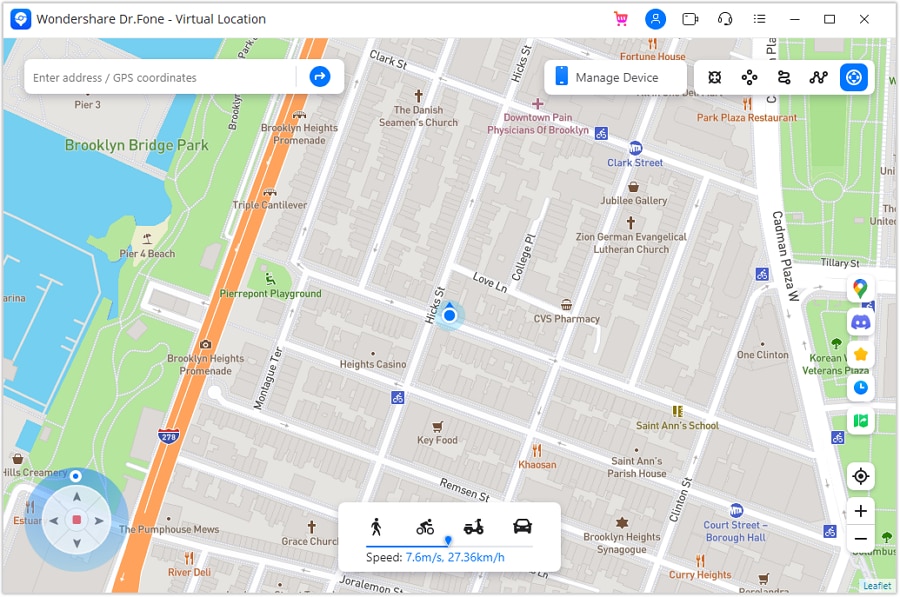
Once you turn the virtual location on, you’ll become an unbeatable Pokemon Go player.
Pokemon Go may be one of the most engaging games in the world. It requires you to move, complete tasks, catch Pokemon figures, and face numerous challenges daily, which is why it’s so popular in the gaming industry.
One of the features that contributes the most to your growth is Stardust, a consumable able to make your Pokemon dreams come to life.
If you’re searching for ways to collect these items as quickly as possible and gain incredible power, check out the guide below. We’ve discussed all the options you can try to obtain Stardust points, including changing your virtual location to get the most out of your journey.
4 solution to get rid of pokemon fail to detect location On Nokia C22
Pokémon go failed to detect location is an error that is frequently faced by the players and there are several reasons for it. From device to server-based all the reasons amount to the error and therefore the right solution must be applied to get the work done with ease and perfection. The location-based attribute of the game is something that has been one of the best features. It is the sole reason for which the game is not only popular but also one of the most downloaded games of all time. It is therefore important to overcome fail to detect location error in this game.
Part 1: Why does Pokémon fail to detect location?
The two main and frequent errors that are related to the Pokémon are error 11 and error 12. These not only frustrate the users but also hamper the game experience. Failed to detect location Pokémon go is the result. This part of the article will make sure that you get all the information that is needed to overcome the issue. The GPS joystick failed to detect location error will also be overcome and you will also be able to guide others.
Causes of Error 11
- If the game failed to detect location Pokémon go fake GPS then the most common reason is the fact that the GPS has been disabled. The internet and GPS are the two important aspects of this game. If anyone is not available then it is a must that the game will not work at all.
- Once the game has been installed it requires certain permissions that should be granted for proper working. All the permissions must be accepted for the game to work fine. If the GPS access has not been granted then it should be so that the GPS joystick Pokémon go failed to detect location error is resolved and you can enjoy the game.
- To install some applications and to enhance the features of the phone it is at times rooted in the case of android or jailbroken in the case of iPhone. In both cases, you will get the Pokémon to go failed to detect location fake GPS error. It is therefore important that the issue is resolved by getting the Nokia C22 device back to its original shape. It can be done by unrooting the Nokia C22 devices so that the issue is resolved.
Causes of Error 12
- The Mock location on the Nokia C22 device is enabled can lead to failed to detect location GPS joystick or error 12 on the Nokia C22 device. It is therefore advised to make sure that the location in question is disabled to get the gaming experience back on track.
- The other and the most common reason for the error 12 is the fact that the GPS signals are not received by the Nokia C22 device. It also leads to Pokémon failed to detect location error and will make sure that you get all the enjoyment for which the game has been downloaded.
Part 2: 3 solutions to fix Pokémon fails to detect the location
Solution 1: Turn on GPS
This is the most common method that can be applied to make sure that the game works perfectly.
i. Drag the notification panel down on your device.
ii. Click on the location to turn it ON.

Solution 2: Setting Permissions for the application
If the right permissions are not given to the application then it can also lead to the fake GPS failed to detect location. To make sure that this is overcome you need to follow the steps as under.
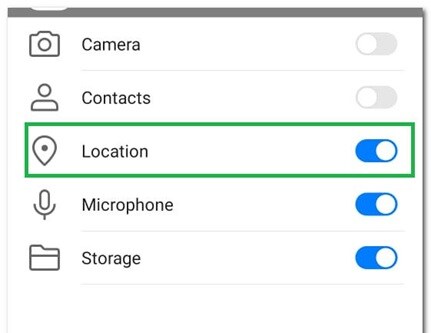
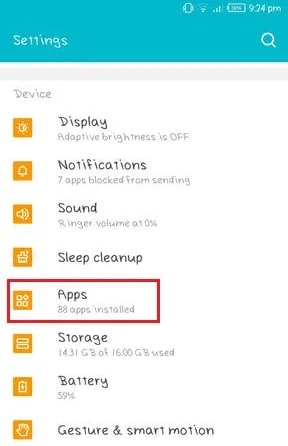
i. Go to Settings > Applications > Apps to access the permissions for the application.

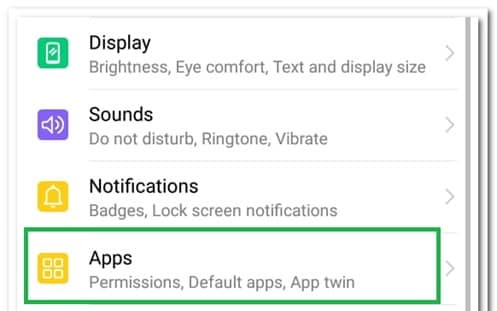
ii. Go to Pokémon Go > Permissions > Turn on location to get the issue resolved.
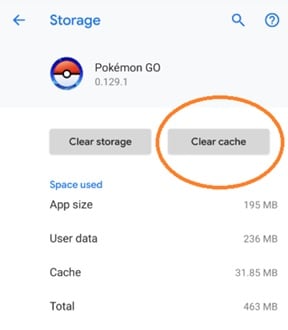
Solution 3: Clear Cache
i. Go to the Settings of your device
 /a>
/a>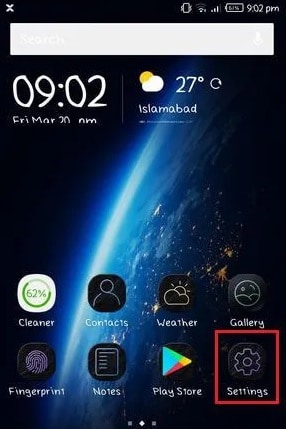
ii. Click on the app’s icon on the next screen
iii. Click on the storage option.
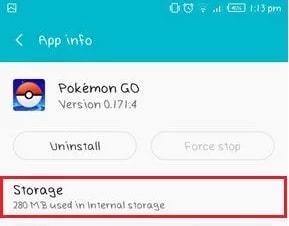
iv. Clear data and cache and restart the Nokia C22 device to get the issue fixed.
Part 3: Dr.Fone Virtual location change your location in one click
To fix the fake GPS Pokémon go failed to detect location Dr. Fone’s virtual location is the best and the state of the art program that can be used. It is not only the best but also allows the users to overcome the issues that are presented by the other similar programs. With this program, it is easy to make sure that the overall game performance improves in terms of location detection. You can teleport with ease using this program. With an intuitive interface and a professional team backing the program, you get the ultimate results. Not only Pokémon but all the location-based and AR games this program is a boon.
How to use Dr. Fone Virtual Location
Step 1: Program Installation
First of all download and install the program to get started.


Step 2: Enable Virtual Location
Click the get started icon once the iPhone has been connected to the system and the virtual location has been enabled.

Step 3: Locate the Nokia C22 device
Click the center on a button to make sure that your location is detected by the program.

Step 4: Change Location
The third icon on the upper right corner is to be pressed to teleport. In the bar type the name of the location you want to teleport to.

Step 5: Move to a teleported location
Click on move here to get to the location that has been selected.

Step 6: Validation
Your iPhone will show the same location as on the program and this finishes the process.


Conclusion
Dr. Fone’s virtual location is the best and the most advanced program that will make sure that you get the best results. It will not only enhance your gaming experience but will also remove the Pokémon go GPS joystick that failed to detect location error with perfection. It is the best program that is easy to use and there are guides online that further foster the process. With this program, it is easy to get a step ahead for all AR and location-based games and to enjoy to your fullest.
Preparation to Beat Giovani in Pokemon Go For Nokia C22
Are you ready to defeat Giovani effortlessly in Pokemon Go? Keep reading.
Giovani is the grand commander of the Team Go Rocket crime syndicate. The big boss appears stronger every month as he also changes his lineup of creatures monthly. This means your lineup of Pokemon Go Giovani counters would have to change subsequently. So how do you know the best Giovani Pokemon Go counters to use against the Team Go Rocket boss when next you meet him? Well, that’s left for this guide to answer. Here you will learn about how to defeat this monster and how to find him. Without wasting your time, let’s start with how to find Giovani in Pokemon.
Part 1. How to Find the Giovani in Pokemon
Locating Giovani’s hideout is never a walk in the park as you need to complete some daunting tasks. A detailed explanation of each task is given below:
1. A Troubling Situation Task
This four-step storyline Special Research task introduces players to the Team Go Rocket Invasion and Shadow Pokemon feature in the Pokemon Go game. Players leverage the task to learn how to stop the Team Go Rocket crime syndicate by reclaiming PokeStop and then purifying Shadow Pokemon.
How to Complete ’A Troubling Situation’ Task in Pokemon Go Giovani
Below you will find all the four steps you need to complete in the ‘A Troubling Situation’ task with their rewards:
Pokemon Go: A Troubling Situation Step 1
This step should be completed with ease since you aren’t new to the Giovani Pokemon Go game. Just evolve any two Pokemon that you own and then charge them up five times. And boom! You are done with this step.
Reward: 1,000 Stardust and 2,000 XP
Pokemon Go: A Troubling Situation Step 2
For this step, you have to catch two shadow Pokemon which can be achieved by defeating two Grunts from Team Go Rocket. On killing them, they will leave some shadow Pokemon behind which you have to catch. After that, go ahead and defeat the last Grunt to complete this step.
Reward: 2,000 Stardust, 2,000 XP, and 5 Golden Razz Berries
Pokemon Go: A Troubling Situation Step 3
After catching the shadow Pokemon in step 2, you need to catch one more to cleanse or purify the three of them. To do this, just tap on your shadow Pokemon, and then hit the Purify option. You will be charged some thousands of Stardust and a couple of candy for the shadow Pokemon.
Rewards: 2000 Stardust, 5 Silver Pinap Berries, and 1 Rare Candy
Pokemon Go: A Troubling Situation Step 4
For this step, you’ve got nothing to do. All three objectives have been automatically completed for you when you finished the previous step. You only get rewards at this final step.
Rewards: One Fast TM, One Charged TM, and 3 Rare Candies

2. Giovani Special Research Task
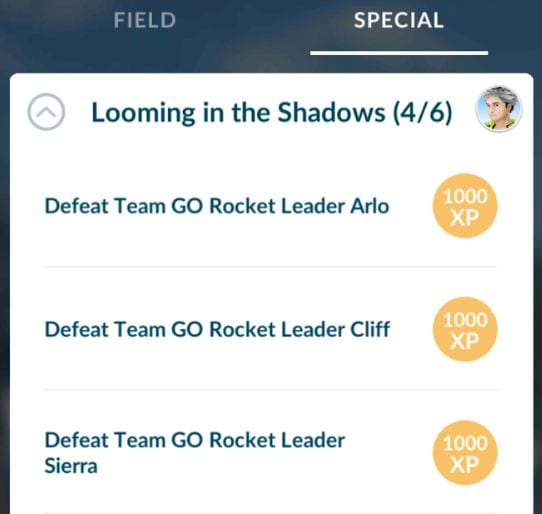
After completing the quest above, Giovani Special Research or Looming in the Shadows is the next and final quest you have to complete to face Giovani. It’s a six-step Special Research that introduces the Team Go Rocket Grunts and Leaders: Cliff, Arlo, and Sierra.
On completing one research step, you will be given a reward called the Super Rocket Radar. Like the Rocket Radar, the Super Rocket Radar can be equipped and unequipped from your Bag. This reward doesn’t only show Giovani’s hideout, it also shows some of his Grunts hideouts.

Part 2. What does the Pokemon Go Giovani Counter Contain?
Giovani remains the toughest beast amongst all the Team Go Rocket Leaders. When you find him in the game, be prepared to face his wrath. To defeat him, you need a powerful team.
The big boss choice of legendary Shadow Pokemon and second party members changes every month- the Pokemon you fought against the previous month will be different from that of the present month and thereafter.
Giovani’s lineup of creatures for October 2022 is shown below:
| Lineup of Creature | Pokemon |
|---|---|
| First | Persian |
| Second | Kangashkan, Nidoking, Garchomp |
| Third | Mewtwo |
For the Pokemon, Persian, and Kangashkan, try to have a Lucario, Conkeldurr, or Machamp in your team and you are good to defeat them.
When you encounter Nidoking or Garchomp, your team has to change. You will need to have a strong ice-type Pokemon on your team. The reason is that this new Lineup of creatures is strong on land and could cause substantial damage to the dragon-type Pokemon in case you wanna choose them.
Picking any of these great ice-type Pokemon, Mamoswine, Glaceon, or Weavile when you face Nidoking or Garchomp is a perfect choice. However, we recommend Mamoswine, because he isn’t just an ice-type Pokemon but also a strong ground-type Pokemon.
Once you defeat Team Go Rocket’s second lineup creatures, you will have to battle against the legendary psychic Pokemon, Mewtwo, who is weak to this set of Pokemon; bug, ghost, and Dark-type Pokemon. So beating this Pokemon Go Giovani grunt shouldn’t be a tedious task as you’ve got a plethora of choices when deciding the Pokemon-type to use. Origin Giratina and Tyranitar are some strong Dark-type Pokemon you can use to defeat Mewtwo.
Now you know the best Giovani Pokemon Go counters to use against each lineup of creatures, leverage it to advance to the next phase of the game where you will face the big bad boss himself, Giovani.
Part 3. Tips to Beat Giovani in Pokemon Go
 SwifDoo PDF 2-Year Plan
Just as you did against Team Go Rocket Leaders, Arlo, Cliff, and Sierra, you need a Pokemon stronger than two of Giovani’s. With that, you can use the same Pokemon twice, thereby keeping your choice for Legendary Shadow Pokemon safe till you need it to beat Giovani.
Mind you, the big bad boss, Giovani has two Protect Shields at his disposal so you have to be careful while fighting against the monster. We implore you to start your game with a Pokemon that has a Charged move so you can charge as fast as possible.
Getting a strong Pokemon won’t come with ease, however, with the use of Dr.Fone- Virtual Location you can achieve this. The handy software is designed to help you spoof your iOS device location so you can catch any strong Pokemon of your choice remotely.
Key Features
- With just a single click you can spoof your iPhone GPS location
- The application allows you to simulate GPS movement at your comfort
- It saves your location automatically in the database
- Provides full-screen HD map view
- Easily enter your target location name, address, or the exact coordinate on the application with a joystick
Guide to Use Dr.fone Virtual Location to Get Stronger Pokemon in Giovanni Pokemon Go
Step 1: Firstly, you have to download and install a compatible version of Wondershare drfone virtual location on your PC. Wait for the installation to complete, then run the application.
Step 2: The interface above will appear on your screen. With the aid of a lightning cable, connect your iPhone to a PC, then click on the Virtual Location icon. A new interface will pop up as shown in the image below

Click on Get Started to change your location.

Step 3: Your current location will appear on the PC screen. Switch location by entering the name or address of the place in the field at the upper left corner of the application.

Step 4: The interface below will pop up on your screen. Click on the Move Here icon to teleport to your chosen location.
And now you are good to have one of the strongest Pokemon on your team when fighting against Giovani. Leverage the Dr.Fone- Virtual Location program as it will help you ease the stress of catching stronger Pokemon remotely on your device without jailbreaking it.
- Title: How can I get more stardust in pokemon go On Nokia C22? | Dr.fone
- Author: Lary
- Created at : 2024-07-23 00:54:40
- Updated at : 2024-07-24 00:54:40
- Link: https://android-pokemon-go.techidaily.com/how-can-i-get-more-stardust-in-pokemon-go-on-nokia-c22-drfone-by-drfone-virtual-android/
- License: This work is licensed under CC BY-NC-SA 4.0.