
Detailed guide of ispoofer for pogo installation On Oppo Reno 10 Pro+ 5G | Dr.fone
Detailed guide of ispoofer for pogo installation On Oppo Reno 10 Pro+ 5G
Pokemon Go is Niantic’s most successful game that has taken the world by storm. Players get to be a part of the various regions of the Pokemon has now become one with our world. The game requires you to travel to different locations to complete researches, catch Pokemon, defend gyms, and most importantly, complete the Pokedex given by Professor Willow. Niantic’s games are designed to be played with others outdoors. This feature ends up giving players in some parts of the world advantage over others. This is specially to catch regional Pokemon and during ticketed events and sponsored events. Spoofers can avoid the barriers of distance and play anywhere in the world by iSpoofer for pogo installation and other such apps. Niantic, however, does not allow this and considers it the same as hacking. Players who were looking to play and access all the features of the game available all across the world.

Part 1: Will the iSpoofer back on 2020?
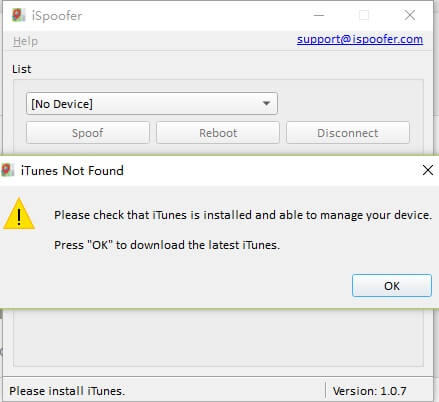
iSpoofer has been shut down. All its applications, websites, and other related services have been terminated. iSpoofer for pogo installation does not exist. If any website claims to give access to the application or iSpoofer direct download, it is fake. Also, the new Pokemon Go application version which is 0.195.0 has been updated to detect applications like iSpoofer, so on being detected, it may lead to a warning, or a permanent ban as well. And we don’t see the certainty to get it back soon.
Part 2: Detailed guide of iSpoofer for pogo installation
This detailed guide for iSpoofer installation is for those who still possess the older version of the app that works in an older iOS version.
Step 1 – Install the setup for iSpoofer on your computer if you had got it using. This requires the latest version of iTunes, so make sure that you have it installed.
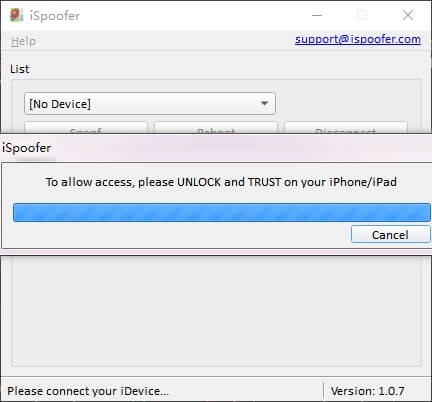
Step 2 – Once the setup is done, connect your phone to the computer and unlock it. You will have to select the “TRUST” option for the software to do its work. On selecting this option, iSpoofer will download a developer file that will spoof the location.
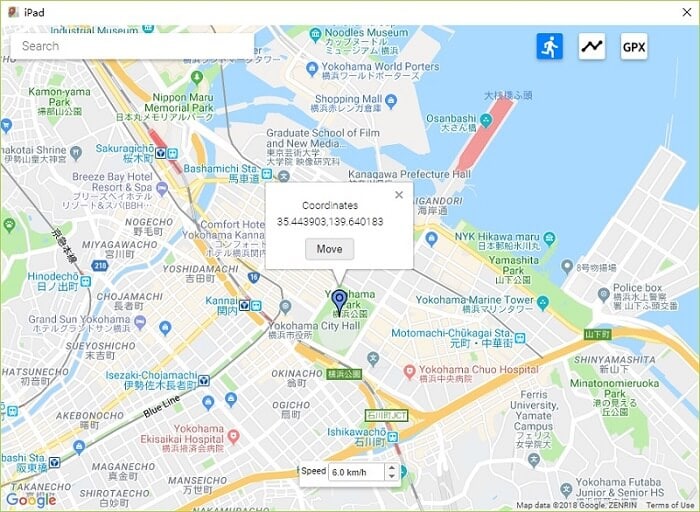
Step 3 – A map will load on your computer screen, which allows you to enter or point the location. Enter the location of your choice and click on “MOVE”. And that is it! Three simple steps and you have spoofed!
 Power Tools add-on for Google Sheets, 12-month subscription
Part 3: How to use the iSpoofer when you play pokemon
Follow the tutorial above for ispoofer for pogo installation. A mock location has now been added to your device that makes iOS believe that you are at the entered spot.

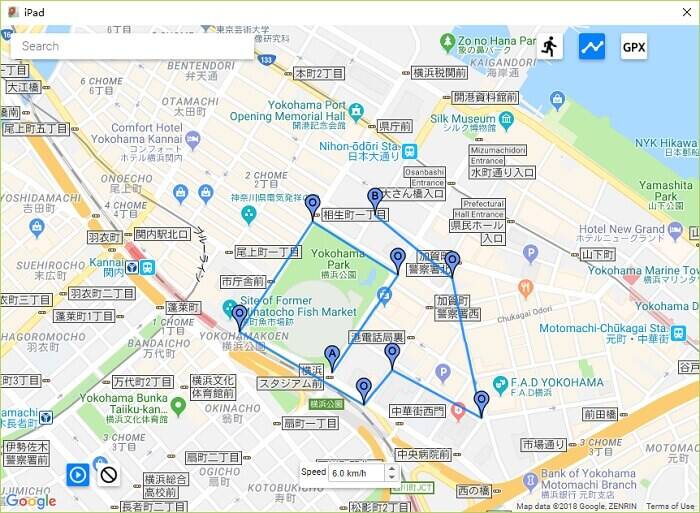
Following these steps, disconnect your phone and launch Pokemon Go. From here you can either use the joystick to move around or use a “.gpx” file to add a preset route for you to move around. That would look like this -
iSpoofer for pogo installation has the following disadvantages -
- The application cannot work without iTunes and is very dependent on it.
- Niantic can easily detect spoofing through this app and may lead to a ban.
- Movement simulations are hard and unnatural, making it more susceptible to a ban.
- Configurations and settings require some technical knowledge in to troubleshoot any errors.
- The app is prone to crashing a lot. The interface sometimes cannot handle the constant change of locations.
All these issues are overcome with great detail by Dr. Fone Virtual Location (iOS) by Wondershare.
Part 4: Safer tool to spoof pokemon- drfone virtual location
Pokemon Go Spoofers using iOS need not depend on iSpoofer for jumping locations. Dr. Fone Virtual Location by Wondershare is the new, safer app to spoof in Pokemon Go. The app uses mock location services to help you teleport to anywhere across the world. This also allows you to be safe from the detection software in Pokemon Go.
What are the benefits of using Dr. Fone Virtual Location?
- It provides a mock location and location changer – With just a single click, the application can change your location to where you want to. All apps on your phone will start recognizing this location.
- It enables you to move at different speeds - It has 3 different speeds, namely walking, cycling, and driving that helps you travel faster or log in kilometers too.
- The joystick allows movement – You can use the joystick to move your character around the map to navigate to Pokestops or rare wild spawns easily.
- The map view gives a 360o view – By scrolling around the screen, you can get to see all the routes around you and plan accordingly.
- Auto-walk feature - The game has an auto-walk feature in case you do not want to use the joystick to move around manually.
- Keyboard movement commands – The player can also use the A, S, W and D keys on the keyboard to move around

Step by Step Guide to Install and use Dr. Fone Virtual Location -
Step 1 - Download the Dr. Fone Virtual Location by official Wondershare website. Connect your phone to the computer in to execute the changes. Click on the “Virtual Location” option.

Step 2 – Now, on the next screen, you will see “Get Started” option. Click on it to proceed.

Step 3 – The screen will now show a map with your current location on it. In case the location is incorrect, click on the “Center On” button at the bottom-right side of your screen.


Step 4 – Select the “teleport” option by clicking on the icon on the top right corner. Then, in the text box, enter the city or the location’s exact name or the coordinates in the “latitude, longitude” format.

Step 5 – After entering your location, select the “GO” option.
Step 6 – The app will show you an option that says “Move Here”. Click on it, and now you have successfully spoofed to your location of choice.

Your spoofed location is now the default location of your phone, and all the apps will recognize it. The maps app on your phone looks like this –

The teleportation is now complete. Enjoy playing the game with no lags or errors.
Alert
While spoofing between two distant locations give the required amount of time for the cooldown timer to reach zero. If you decide to spoof too quickly, you will automatically trigger a soft ban, and you will not be able to play most parts of the game like catching Pokemon or spinning Pokestops. If this occurs consistently over multiple occasions, it will trigger Niantic’s warning and may end up getting a permanent ban. It has a 3-strike policy. 3 warnings are given before the account is permanently deleted.
The notice looks like this -

The cool-down period between two locations is based on distance and you can refer to the table below to understand the time you need to wait before logging in again.

WPS Office Premium ( File Recovery, Photo Scanning, Convert PDF)–Yearly
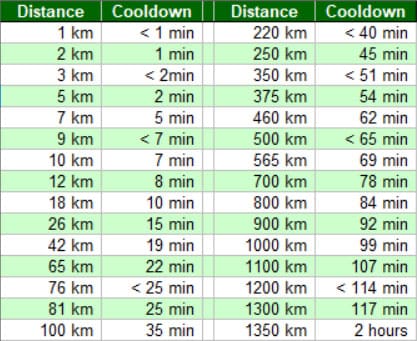
Most gamers wait for the standard 2 hours before logging in again. This gives them access to all the game’s features like before.
Conclusion
We hope that this article has been informative, about Dr Fone Virtual Location and ispoofer for pogo installation. You can now spoof locations with ease by using Dr.Fone - Virtual Location app. Vigilance is needed, and spoofing must be done by following all rules of cool down. This would prevent you from being caught by Niantic, and by Officer Jenny. We would like you to enjoy the game throughout without having to lose any of your levels and Pokemon.

Pokemon Go Error 12 Failed to Detect Location On Oppo Reno 10 Pro+ 5G?
Pokemon Go is a popular game that has taken the world by storm. It is an augmented reality game that allows players to catch Pokemon in the real world using their smartphones. However, many players have reported encountering the “Failed to detect location (12)” error while playing the game. This error can be frustrating as it prevents players from playing the game properly. In this article, we will discuss what causes the “Failed to detect location (12)” error in Pokemon Go and how you can fix it on your Oppo Reno 10 Pro+ 5G.
Pokémon Go has been on the nerves of its players and this is all because of the AR notion that it presents. The failed to detect location 12 is one of the most common errors that are faced by the players while playing this game. You might not believe but the GPS signals and the location settings on iPhone or Android are the two main reasons for this error. It can be resolved with ease and this article has been written to get the work done with ease. Applying the methods explained will ensure that you get the best results overall.
Part 1: Why is Location Important in Pokémon Go?
The best part of this game is that it has been compiled keeping in view the location mechanics. The location analytics of the game has made sure that it becomes the overnight sensation. Three main attributes are associated with the location framework of the game. These attributes also show how important the location is for the game. Understanding these attributes will also make sure that the user can overcome the errors such as failed to detect location 12 GPS joystick 2019.
i. Physical World Attribute
The best part of this attribute is that it is the center of the user experience of the game. The second part is the fact that this map has evolved and there are no shortcuts to its success. Ingress was the previous game that was developed by Niantic and the crowdsourcing of this map started with the evolution of this application. This was developed by the same team that is working on the core of Google Earth.
ii. Real World Gestures
The augmented reality is another important aspect that is related to Pokemon Go and this also means that the location services are relied on when it comes to this application. The android and the iOS location services are continuously used by the game to provide the pinpoint locations as well as the game features that are not found in other applications. The use of location through GPS satellites even becomes more important for such gestures. Especially when the player is outdoors it becomes too important to deal with using GPS location.
iii. Place Attribution
The system within the system that has been designed by the game developers makes sure that the location inaccuracies are accounted for. This also means that the 4-meter accuracy of the GPS is further enhanced to deal with the perfect location identification of each player.
Part 2: Ways to Fix Error 12 on Pokémon Go
Several ways can be used to make sure that the subject error is resolved with ease. This section of the article will deal with all such ways that can be used to get the work done with ease and perfection.
Method 1: Enable Mock Locations
As the name suggests it is to set the fake location using the build-in iPhone feature. It will also make sure that the feature of the game continues to work perfectly.
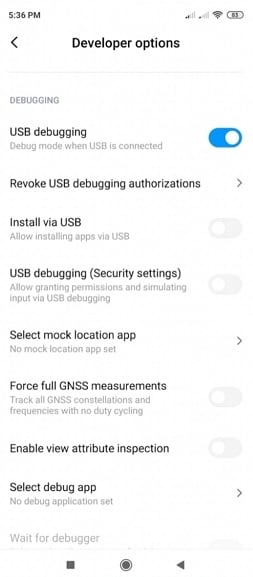
Step 1. Go to the developer options of your device. To get to the developer options simply head over to the settings > About Phone > Software Info > Build number and tap it 7 times to enable the mock locations.
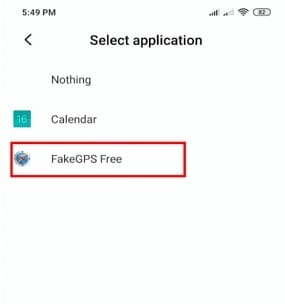
Step 2. Install the Fake GPS that is a free application and can easily be found on the Play Store.
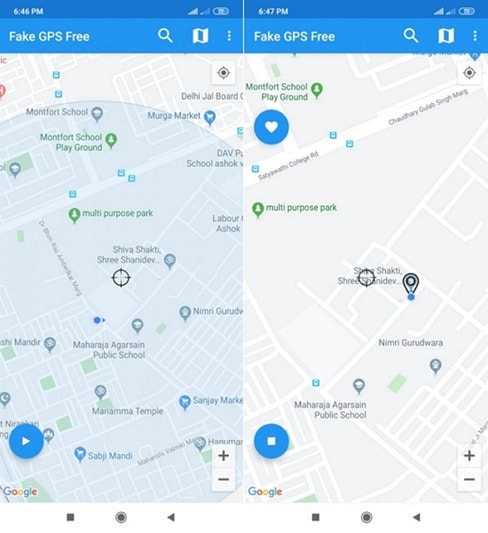
Step 3. Launch the application and you can easily enjoy Pokémon Go without any hassle and trouble and resolve the Pokémon go failed to detect location 12 fake GPS error.
Method 2: Location Activation
This is another important and easy way to make sure that the Pokémon failed to detect location 12 error is resolved with ease and perfection. To execute the process the steps are mentioned as follows:
Step 1. Open the settings on your Phone to start with:

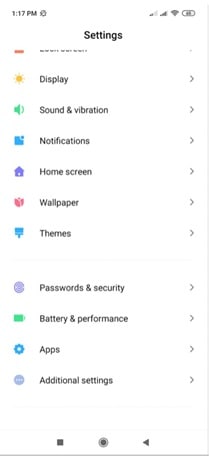
Step 2. Tap on the passwords and security to proceed with the process:
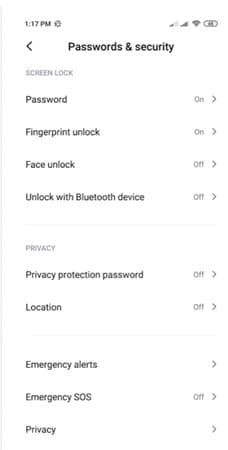
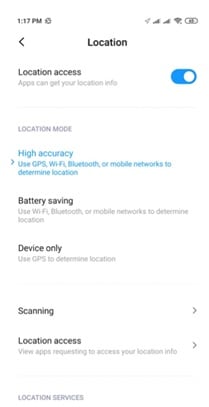
Step 3. Tap to turn on the location to finish the process and eliminate the failed to detect location 12 Pokémon Go errors.
Method 3: Reboot the Oppo Reno 10 Pro+ 5G device
This might seems weird but this trick has been working to quiet some time now and has been proven to eliminate the failed location 12 Pokémon Go issue. There is a possibility that the server location is not synced with the Oppo Reno 10 Pro+ 5G device. Restarting the Oppo Reno 10 Pro+ 5G device will make sure that both the locations are sync and the problem is resolved with ease.
Just long-press the power button and choose the reboot option from the menu that appears to complete the process in full.
 vMix 4K - Software based live production. vMix 4K includes everything in vMix HD plus 4K support, PTZ control, External/Fullscreen output, 4 Virtual Outputs, 1 Replay, 4 vMix Call, and 2 Recorders.
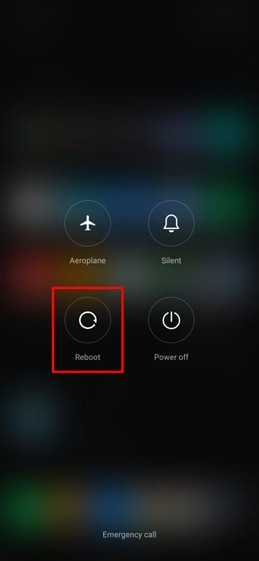
Part 3: Best Way to Overcome Location Error 12 on Pokémon Go for iOS Devices
Dr. Fone Virtual location is the best tool to overcome issues such as failure to detect location 12 Pokémon go on iPhone. The program has been designed to make sure that the GPS location is spoofed and you get the perfect outcome in resolving the error under discussion.
### The ProcessStep 1: Program Installation
To begin the process, download and install the program to get going with the process.
Step 2: Enable Virtual Location
Connect your iPhone and enable virtual location from the options of the program. Hit get started to begin the spoof.
Step 3: Locate yourself
The center on the button on the next screen is to be clicked to get the accurate location.
Step 4: Teleportation
On the upper right corner click the icon on the third to begin teleportation or spoofing to be precise. Enter the name of the place where you want to teleport to.
Step 5: Move to the teleported location
Click on move here and the system will move you to the location that has been entered.

Step 6: Validate and Completion
The location will be locked by the program and your iPhone will also show the same location as on Dr. Fone. This also completes the process in full:

Conclusion
Dr.Fone - Virtual Location is the best and the state-of-the-art program to overcome Pokémon go unable to detect location 12 on iOS devices. It has an intuitive interface and it also allows the users to overcome the issues that traditional spoofing programs present. It is being updated constantly which also means that you will be able to get the best results. There is no program on the internet that can resolve the error that failed to detect location 12 in Pokémon go as easily as this one does.
 Nero Burning ROM:
The ultimate burning program for all your needs!
How Can I Catch the Regional Pokémon without Traveling On Oppo Reno 10 Pro+ 5G
The main goal that the designers of Pokémon Go had in mind for the past few years was to create a framework that prompts players to get off their loungers and go into the real world in search of Pokémon. If you are wondering why there are certain types of Pokémon enlisted as ‘blanks’ in your Pokedex and you haven’t yet found them, it’s probably because they are marked as ‘regional’ types. This means that these Pokémon are exclusively locked in select regions around the world. Don’t Panic! You don’t have to spend a boat load of cash in order to catch these special regional Pokémon as there are tricks you can apply to catch them without even stepping out of your kitchen.
Part 1: List of the regional Pokémon that have been announced
Since the game publishers released these special regional Pokémon, they have been locked in their geo-specific locations around the world. There is a set or pair of regional Pokémon for each generation that has been introduced into the game. Regions may not be defined by real-time borders but are divided according to the type of the Pokémon and the place they are more likely to spawn.
These places may be specific to countries (Tauros spawn in the US), specific to a continent (Mr.Mime Spawn in Europe), specific to a region (Corsola spawn in the Tropics), and even certain halves of the planet (Lunastone and Solrock spawn in the Southern half and Northern half of the equator, respectively). These Pokémon are not necessarily rare spawn types. If you are traveling in their region, they may pop up quite frequently. You should take note that regional Pokémon won’t become available in Gyms or in Nests since they will only spawn in the wild. However, you can yet find them through eggs but only in their specific regions.
There are some exceptions among the regionals as well. These exceptions are known to swap their spawn locations or drop out of regional exclusivities like Zangoose and Seviper, or Minun and Plusle. Some regional Pokémon may also turn up in special in-game events like how Farfetch’d spawned during the 2017 Pokémon Go Travel Challenge.
If you are not a frequent traveler or know fellow trainers who are willing to trade their regional Pokémon then you may need to be patient and follow a few extra steps in order to get your hands on these rare types of Pokémon.
List of different Regional Pokémon – Where and How to Catch them All!
As of now, there are over 40 different regional Pokémon divided across generations that can be captured or hatched only in specific expanses of the world. There are of course occasional overlaps of Pokémon slipping out of their region and into other sectors. Let’s get into the list of all the region-specific Pokémon of different generations and where to find them.
Gen 1/ Kanto Pokémon
 Glarysoft File Recovery Pro - Helps to recover your lost file/data, even permanently deleted data.

- Taouros: North America.
- Farfetch’d: Asia.
- Mr. Mime: Europe.
- Kangashkhan: Australia/Pacific.
Gen 2/ Johto Pokémon

- Heracross: South America/ Southern Florida.
- Corsola: Equatorial Latitudes.
Gen 3/ Hoenn Pokémon

- Tropius: The Middle East and Africa.
- Torkoal: Southeast Asia.
- Volbeat: Europe, Australia, and Asia.
- Relicanth: The Cook Islands/New Zealand.
- Solrock: Currently America and Africa. Switches with Lunastone.
- Lunastone: Currently Europe and Asia. Switches with Solrock.
- Illumise: America and Africa.
- Seviper: Currently America and Africa. Switches with Zangoose.
- Zangoose: Currently in Europe, Australia, and Asia. Switches with Seviper.
Gen 4/ Sinnoh Pokémon

- Pachirisu: Canada.
- Chatot: Southern Hemisphere.
- Shellos: Pink Variant – Western Hemisphere. Blue Variant – Eastern Hemisphere.
- Carnivine: Southeastern United States.
- Uxie: Available on select raid periods. Asia and Pacific.
- Azelf: Available on select raid periods. America.
- Mesprit: Available on select raid periods. Middle East, Africa, and India.
Gen 5/ Unova Pokémon

- Pansear: The Middle East, Africa, India, and Europe.
- Pansage: Asia/Pacific.
- Heatmor: Western Hemisphere. Switches with Durant.
- Durant: Eastern Hemisphere. Switches with Heatmor.
Part 2: How to use Dr.Fone - Virtual Location to catch Regional Pokémon
Catching regionally exclusive Pokémon requires you to travel to that location or region where the Pokémon is located, as it was originally intended by the game. Remember that Pokémon Go functions by tracking your location via GPS. Your GPS however, is a virtual means of tracking your IP address which can be faked using the right mock GPS and VPN. You can use a mock virtual location to fake your actual location and make it seem like you’re traveling around the world. The game itself would be tricked, allowing you to travel to regions and get your hands on those geo-exclusive Pokémon.
To get the best out of your mock location and also to avoid the risk of hitting a light ban on your account, Dr.Fone Virtual Location by Wondershare has been reviewed as a Mock GPS you can easily rely on. It offers a number of features that can come in handy while faking your location such as adjusting the speed so that it may seem like you’re actually traveling, you can use a 360-degree virtual joystick for manual control over your movements and you can also select specific routes on the map on which you want your in-game avatar to move on.
Step-by-Step Tutorial
You can follow these easy steps to set up and access your Dr.Fone Virtual Location in an instant and teleport to anywhere in the world.
Step 1: Download the Program
Download Dr.Fone – Virtual Location. Install and launch the program. Click ‘Virtual Location’ to get access to the options window.
Step 2: Connect Device
Get the USB cable and connect your iPhone to the PC. And then click ‘Get Started’ to proceed.
Step 3: Check the Location
When the location map opens, click on ‘Centre On’ to accurately pinpoint the GPS to your location.
Step 4: Activate teleport mode
Now, click on the icon given in the upper right-hand corner. Enter your desired location on the upper right field and then click ‘Go’.
Step 5: Start Teleporting
Once the location of your choice pops up, click ‘Move here’ in the pop-up box.
Once the location has been changed, you can center your GPS or move the location on your device, it will still be set to the location you have selected.
Part 3: Tips to help catch Regional Pokémon
Catching regional Pokémon is just like catching any regular Pokémon. When they spawn near your location, you catch it by throwing a Poke ball at it. If the Poke ball is seen shaking, it means that the Pokémon is resisting and may just pop out from the ball in which case you may have to throw another one at it. Now, if you are traveling and you have limited time or a number of spawns then here are a few tips you can utilize to enhance your chances of landing a catch.
- Curve Ball: Practice your curveball throws. Throwing a curve ball automatically increases your chances of preventing a Pokémon from slipping through your hands, plus you also get a 17x bonus with each successful curve catch.
- Maximize your Medals: Medals increase your performance in the game without costing you any extra resources like Great balls, Ultra Balls, or Razz Balls. So, try and max out your medals to increase your chances of catching rare Pokémon, especially the exclusive ones.
- Keep Consistent: The algorithm of the game is quite complex but eventually, a pattern emerges. You will notice that if you keep practicing with great or excellent catches with the smaller (low XP) Pokémon, it increases your chances of catching the ones that put up a fight.
- Save your Berries: Feeding a Pokémon with Razz Berries increases your assurances of catching the Pokémon while also giving you a 15x bonus when you land a successful catch. Save your berries for those persistent Pokémon spawns.
- Use Powerful Poke balls: Last but definitely not least, use powerful balls like the Great Ball or Ultra Ball to maximize your chances of catching Pokémon. You should also remember that these are diminishable resources so use them wisely. On catching a Pokémon with a Great ball you will get 15x and with an Ultra ball you would get 2x so utilize them accordingly to catch rare and super rare Pokémon.
Conclusion
The journey to completing your Pokedex may not be a short one as there are hundreds of Pokémon out there, and even hundreds more yet to be introduced into the game. Traveling the world in search of the rarest regional Pokémon is meant to be a fun and exciting experience, yet it may not be viable for some who wish to enjoy the game to the fullest. Utilizing a fake GPS and VPN can bridge the gaps in your Pokedex and keep the game fun for you at the same time. So keep playing and catching Pokémon as there are loads of other exciting installments yet to be introduced by Niantic in the future.
- Title: Detailed guide of ispoofer for pogo installation On Oppo Reno 10 Pro+ 5G | Dr.fone
- Author: Lary
- Created at : 2024-07-23 02:39:25
- Updated at : 2024-07-24 02:39:25
- Link: https://android-pokemon-go.techidaily.com/detailed-guide-of-ispoofer-for-pogo-installation-on-oppo-reno-10-proplus-5g-drfone-by-drfone-virtual-android/
- License: This work is licensed under CC BY-NC-SA 4.0.