
Can I use iTools gpx file to catch the rare Pokemon On Motorola Razr 40 | Dr.fone
Can I use iTools gpx file to catch the rare Pokemon On Motorola Razr 40
Pokemon continues to be an after-sought mobile gaming app. The iTool gpx completes the game. This tool is dully smart, letting you catch Pokemon without much hassle. iTools is a replacement for iTunes which you can now use to manage your iDevice and computer. Its simplicity makes it a walk-in-the-park as you try to catch Pokemon. It will save your computer battery life and also save you from complex background operations.
It will inform you when a pokestop arrives without the need to even use your phone. More so, simply connect the Motorola Razr 40 device to your phone via Bluetooth technology and move along as you enjoy your game. The device will vibrate or blink, an indication that you need to get ready to catch a Pokemon. So yes, you can use iTool gpx file to catch rare Pokemon.

Part 1:What can the gpx file do?
The gpx file is mainly used in software applications to transfer information about tracks and points from one application to another. These files are saved in ‘XML’ format, which makes it easy to import and read GPS data by several programs.
How to download gpx file on iOS and Android
On iOS
First, open the route that you are interested in, then select the ‘Export gpx’ option > ‘Export’ in the lower line. Next, choose whether to forward the gpx file via a provider or to copy and save it in your data.
On Android
Open the route you are interested in and hit the ‘More’ option. Next, select the ‘Export gps’ option and the file will be downloaded to your smartphone. You can forward the route to various providers by tapping the ‘Share’ button.
Why gpx Pokemon
Many games have thronged our screens but not many matches Pokemon. Once you download gpx to iTools mobile, you get real-life benefits from this hottest virtual game. As gpx files are a list of exact locations that form a route for cycling or walking, they direct the player. A player can, therefore, see their location regarding the route via GPS for surety.
Likewise, players are assured of being on the right trail when they use navigation apps with gpx files. And whey they get off track, they can redirect themselves to the path and continue gaming.
Part 2:Where to find the iTools gpx file
You have to import gpx file before opening it. The easiest way is to upload it to the web version of Google Maps. First, open and sign in to Google Maps then add a gpx file as a new map. Follow these steps.
- First, open the Google Maps menu and select ‘Your places’.
- Select ‘Maps’ > ‘Create map’.
- Select the ‘Import’ button after a new Google Maps window opens.
- Finally, upload your gpx file. You should see the map data in your file on Google Maps.
For you to use gpx file iTools, you first have to enable the virtual location on your device. It is from the virtual location where you can cycle and pin mode with teleport and joystick. More so, you can adjust the speed as desired. You just need to choose your favorite location and get to playing. Import, export, and save the iTools gpx to continue from your last stop point.
Follow these steps to save the iTools gpx file and get gpx files from friends
With ThinkSky, you can add gpx file to iTools and fake your gps location. This app comes with plenty of functionalities to make every fake location appear real to your friends.
- First, determine and click on the point that you wish to fake.
- Next, copy the coordinates by clicking the ‘Copy to clipboard’ button.
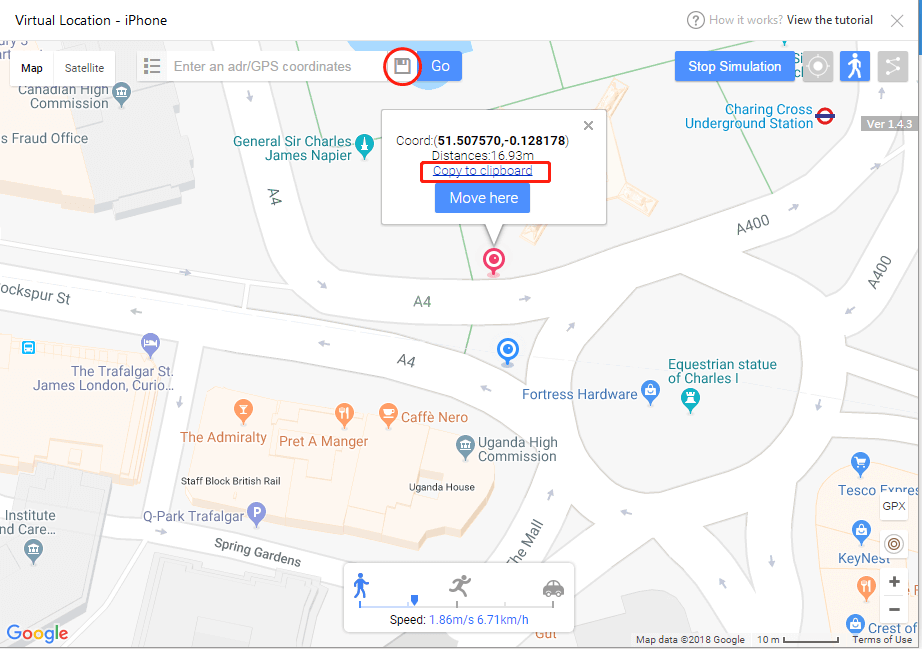
- Then, confirm group name and click on the ‘Save’ icon. You’ll see it located besides the search bar.
 Power Tools add-on for Google Sheets, 12-month subscription
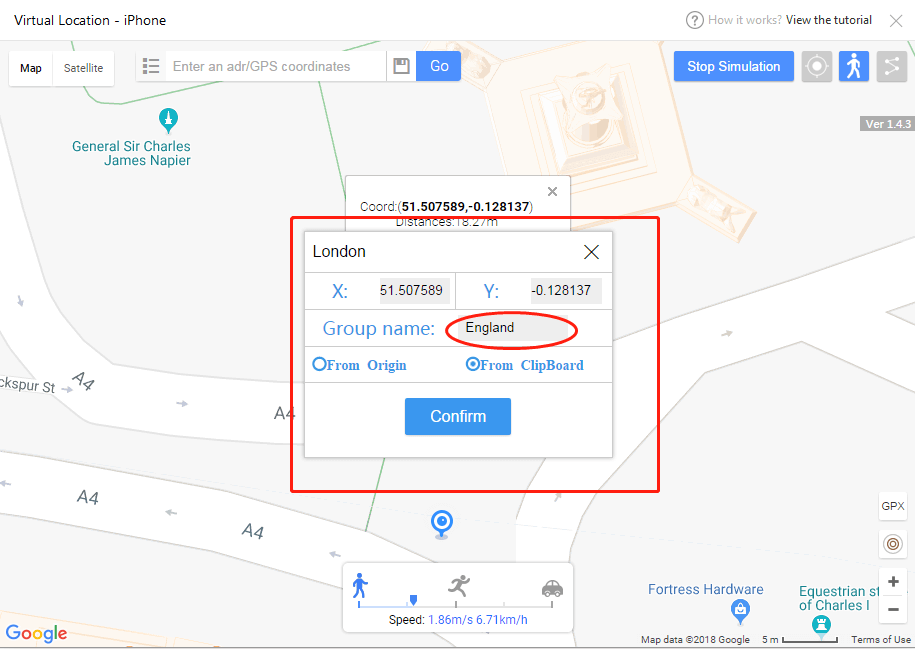
- Lastly, input the coordinates names and group name and then export your favorite location list.
 Easy and Safe Partition Software & Hard Disk Manager

Part 3:Is there any safer tool to spoof Pokemon with iTools file?
You can opt for other safer tools for route creator. Perhaps it is raining and you can’t step out. Or it is already late in the night. What do you do? Just fake it! Dr.Fone comes with advanced features to help you iSpoofer gpx routes and fake your locations in simple steps.
How to export and import gpx to save and share location with Dr.Fone
First, you need to download, install, and launch Dr. Fone – Virtual Location to your computer. Then click the ‘Virtual Location’ option and connect your iPhone to the computer. Next, hit the ‘Get Started’ button. You’ll be redirected to a new window to find the actual location on your map. Please follow these steps to export and import gpx to save and share.
 The Tube Sites Submitter is a fast and efficient tool for anyone who needs to upload videos quickly, easily and automatically to hundreds of tube sites in mere minutes .
Step 1. Save the path as gpx.file
Dr. Fone virtual location supports saving customized routes. Click the ‘Export’ button once it pops-up.
Step 2. Import file
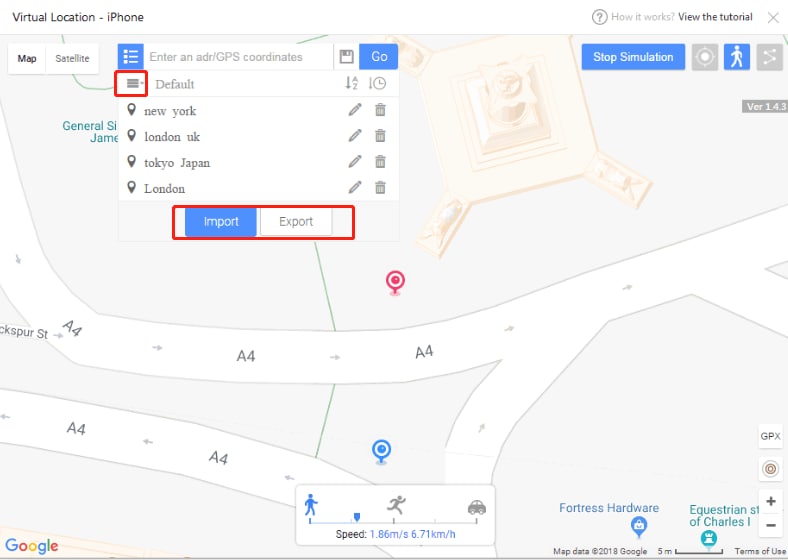
Next, import the shared gpx file into the app. You can download the gpx file from other websites or you can get it from friends. To import the file, go to the main screen of the app and check under the ‘Add-to-favorites’ icon then click the ‘Import’ button. Wait as the file is imported then click the ‘Save’ button after the process is completed.


You can also add your favorite iSpoofer gpx routes. To add any spot into your favorites, check for the five-star icon and click to add the route to favorites. You should see ‘Collection successfully’ after adding your favorites. This gpx route creator makes it easy to walk along your favorite routes. Click the ‘Move’ button and reach any place with a click of a button.

The Bottom Line
Being a first timer, you may find it very complicated to fake your gps location. But Pokemon map creator makes it easy. Dr. Fone virtual location works seamlessly with your iOS device to take you virtually to any place in the world, from the comfort of your living room.
What Pokémon Evolve with A Dawn Stone For Motorola Razr 40?
If you are a diehard Pokémon Go player, you probably know how exciting it is when your Pokémon evolves. Evolutions mean a boost in stats and strength in raids. Plenty of Pokémon users are conversant with the traditional raiding as a way to evolve. However, you can use special items to evolve your Pokémon. One such item is the dawn stone. In this article, we are going to take you through a detailed guide on dawn stone evolutions and how to get it with ease.
Part 1. Dawn Stone Pokémon Evolutions
What is Dawn Stone in Pokémon Sword and Shield?
Like Shiny Stone, dusk stone, Sun Stone, and Moon Stone, Dawn Stone is another peculiar evolution item in Pokémon Sword and Shield. If you combine Dawn Stone with certain Pokémon, they will evolve to another level. This peculiar stone was introduced in Generation IV, and in terms of appearance, Dawn Stone sparkles like a glittering eye.

You can get dawn stone from the Digging Duo found near the Wild Area nursery. You will, however, be required to pay them 500 watts before digging random items for you. Remember, this is a trial and error thing, and you might have to spend a lot of watts before finding a dawn stone. Also, you can get any evolutionary stone, including the Dawn Stone in the Lake of Outrage. Here, you will have to first obtain a Rotom Bike on route 9 to move across the water.

Pokémon that Evolve with Dawn Stone
As aforementioned, dawn stone is an evolution item that is used to evolve certain species of Pokémon. To evolve your Pokémon using Dawn Stone in Pokémon Sword and Shield, enter the bag menu and choose the “Other Items” tab. Hover on the Dawn Stone and select the “Use this item” option. Finally, select the Pokémon to evolve. These Pokémon that can be evolved using dawn stone include:
1. Kirlia
Kirlia is a small humanoid Pokémon whose upper body and arms are white while the waist and legs are light green. This makes it appear as though it is wearing tights. Kirlia’s natural abilities include synchronization and trace. It loves dancing on sunny mornings and becomes more beautiful when they sense e positive emotions of trainers. A vast majority of Kirlia live in the cities, although some are still found in the forest. Kirlia evolved from Ralts and has two possible evolutions, namely Gardevoir and Gallade. If it reaches level 30, it evolves to Gardevoir. However, if it is male and given a dawn stone, it will evolve to Gallade.
 SwifDoo PDF Perpetual (2-PC) Free upgrade. No monthly fees ever.
2. Snorunt
Snorunt is an ice-type Pokémon that was introduced in Generation III. It is also referred to as the “Snow Hat Pokémon.” You can find Snorunt in seafoam café, snow canyon, or even in Mysterious Grotto. Furthermore, you can obtain it by trading or Pokémon Roulette. Snorunt can evolve into Glalie or Froslass. If it reaches level 42, Snorunt evolves to Glalie. For Snorunt to evolve into Froslass, it requires a dawn stone. However, the Snorunt must be a female to evolve to Froslass.
Part 2. Hacks and Tricks to get Dawn Stone Pokémon
It is every player’s wish to avoid the long hunt for a Dawn Stone into their Podex. This issue has given birth to some of the hacks and tricks to help players cross territory and find the intended evolution item or Pokémon. Some of these tricks include:
1. Use iOS spoofing tool- Dr. Fone Virtual Location
Dr. Fone Virtual Location is an amazing iOS spoofer tool that allows users to fake their actual location. This makes it a good tool for location-based games like Pokémon Go. With Dr. Fone Virtual Location, you can teleport to whichever place across the globe by a click of a button. If you want to simulate movements to confuse the game app, you can simulate two or multiple points. Furthermore, you can leverage the joystick to improve the flexibility of GPS control. To teleport to any place in the world with Dr. Fone Virtual Location’s help, follow the steps below.
Step 1. Download Dr. Fone Virtual Location and install it on your computer. Once installed, launch it and then select the “Virtual Location” tab on the primary window. Also, connect your iOS device to the computer.

Step 2. On the next page, click the “Get Started” button to proceed.
Step 3. You should see three icons on the top-right of the subsequent page. Click the third icon to switch to the teleport mode. At the top-left, enter the location of the place you want to teleport to and click “Go.”

Step 4. When the program has found the location, a dialog box will appear in the background. Click “Move Here” to teleport to this location.

2. Use Pokémon Gotcha
Pokémon Go-tcha makes hunting Pokémon and evolution items much easier. With this tool, you can go for a hunt without looking at your smartphone. When you run Go-tcha Evolve on the Pokémon Go application, you can set color animations and vibrations to alert you about Pokémon and pokestops that are in range. Moreover, you can use the auto-catch feature so that you don’t have to respond to alerts. You can also check on time, your stats, and leverage the new pedometer feature to count your steps. This program comes with various exciting colors for you to choose from and a bunch of other great features.
3. Use iTools
iTools location spoofer is another good GPS mocking tool that is suitable for Pokémon Go games. By faking the GPS location, you can easily access territories where rare Pokémon or evolution items are available while seated at home or in the office. This program supports iOS 12 devices or earlier versions. However, there are scores of people who have complained about several crashes. Nevertheless, you can try it if you have got some penny to spare.
iPogo will be the new iSpoofer On Motorola Razr 40?
If you are a sincere Pokemon Go player who sticks by the rules and plays the game, then you probably don’t know how hard it is to eliminate a location spoofer from the picture. The game attains new spheres and seems more interesting with a location spoofer involved. If you are an iOS user or an Android enthusiast who is eager for iSpoofer’s return or worried about iSpoofer Pogo not working, then this might just be the right article for you.
Part 1 - Why am I unable to download iSpoofer for Pogo?
iSpoofer was discontinued two years ago, around 2019 and still remains out of action. This could possibly be because Pokemon Go makers have banned the application. The main target customers for iSpoofer were the PoGo players and having them gone, there is not much the app can offer.


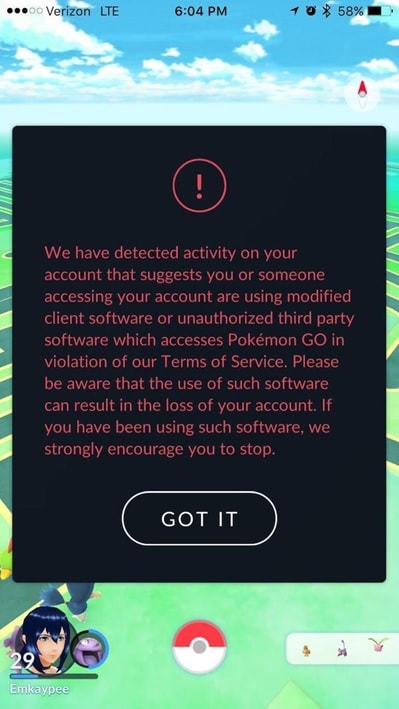
The initial version remains unsupportive and shows ‘Maintenance’ pop up while you cannot download any new versions from their website. It still contains the old links on the site which are of no use to the current players. Tackling with too much will also result in account ban as Pokemon Go has strict rules that no third party applications will be entertained.
Since we haven’t heard from iSpoofer in 2020, we can assume that they won’t be here for long and it would be a wise choice to look for alternatives.
Part 2 - How to Find other alternatives for the iSpoofer
It is hard to handle change especially when you are an iPhone user. There aren’t many apps that you can find on the App Store and you never know their authenticity. Even if you find a good location spoofer, you never know how long that is going to keep your location changed or if it will remain undetected. That being said - your first obvious option for spoofing Pokemon Go would be -
Any App from the Apple App Store
If the iSpoofer for Pogo is not working, then you can make a simple search for some other GPS location changer on the App store and they would help you for a short time. If you are lucky then they might remain undetected for a very long time. However, we won’t suggest this to be the most stable option so we can move ahead to the next best thing for the iOS users.
In-built spoofing with VPNs
Virtual Private Networks are known for masking your IP on the world wide web but what most of you don’t know is that they can also spoof your location. But this is only restricted to a few VPN applications that have the feature. SurfShark and ExpressVPn are two of the most affordable and efficient VPNs that you can consider for your iOS devices.
The spoofer will help you play Pokemon Go for sure though I cannot give you assurance about other games in the market. However, the detection rate is a problem because Pokemon Go is capable of detecting these VPNs and blocking your account if you don’t play your cards well. That is, you need to be careful about where you are ‘changing’ your location to (not too far).
If you are looking for something long lasting and something that won’t pose a detection problem, then I would suggest you to go for WOnder share’s Dr.Fone. It is affordable, has some remarkable features and works great for both Android and iOS devices.
Unlike iSpoofer, this will not require jailbreak access, detects every location on the globe and poses no threat to your Pokemon Go account. Here are the simple steps that you need to follow to work with Dr.Fone for spoofing location
Dr.Fone - Virtual Location
1-Click Location Changer for both iOS and Android
- Teleport from one location to another across the world from the comfort of your home.
- With just a few selections on your computer, you can make members of your circle believe you’re anywhere you want.
- Stimulate and imitate movement and set the speed and stops you take along the way.
- Compatible with both iOS and Android systems.
- Work with location-based apps, like Pokemon Go , Snapchat , Instagram , Facebook , etc.
3981454 people have downloaded it
Step 1- Take the Motorola Razr 40 device you are playing Pokemon Go on and connect it to a computer system. Then open the Dr.Fone and application and the terms and conditions will be displayed. Read them carefully, agree and then click on the ‘Get Started’ option.
Step 2 - You will be led to a page hat will display the entire map of the world and also your location on the globe. You can easily zoom in and out to understand coordinates and location better. On the upper right corner of the page, you’ll find ‘Teleport Mode’ that you should opt for.

Step 3 - Then you can change your location from your current place to anywhere you want to go. This can be quite close or even as far as some other country. However, for Pokemon Go purposes, keep it close. Then click on ‘Move Here’.

WPS Office Premium ( File Recovery, Photo Scanning, Convert PDF)–Yearly
Step 4 - Your location change will happen automatically and within a few minutes, the new location will be registered on every site that you go to. So, you are covered!

Part 3 - Tips to avoid being Banned
- You need to give enough time for the cool down. This means, as soon as you change your location, wait for a few minutes before you can play the game again so that the ‘vigilante’ does not catch this abrupt change.
- Try not to use apps that are too amateur, having fake reviews on Google/App stores because these will be too vulnerable and detectable.
- If you are not sure where to spoof, then there are certain safe co-ordinates that lon term gamers of Pokemon Go suggest so you can opt for them. They are just for starters until you find your way through
- Try not to make abrupt location changes - keep it nearby initially and slowly try to increase your radius. An abrupt change can draw attention.
That being said, there aren’t any well-researched and ground rules as to how your spoofing should be so that you remain undetected. All we can do is pick up tips from someone else’s expertise. Apps like Dr.Fone will help you change your virtual location without getting your account banned as they are designed to do this very job with perfection.
- Title: Can I use iTools gpx file to catch the rare Pokemon On Motorola Razr 40 | Dr.fone
- Author: Lary
- Created at : 2024-07-23 00:16:21
- Updated at : 2024-07-24 00:16:21
- Link: https://android-pokemon-go.techidaily.com/can-i-use-itools-gpx-file-to-catch-the-rare-pokemon-on-motorola-razr-40-drfone-by-drfone-virtual-android/
- License: This work is licensed under CC BY-NC-SA 4.0.