
All You Need To Know About Mega Greninja For Tecno Pop 8 | Dr.fone
All You Need To Know About Mega Greninja For Tecno Pop 8
Are you a fan of Pokemon Go? Then, you will find this article not only useful but also quite interesting. In case you have never played this game before, then you should know that Pokemon Go is a fantastic augmented reality game.
It requires the use of GPS (Global Positioning System) to track your location. Basically, Pokemon Go is a mobile application which you can easily download from Google Play Store or App Store, and it’s absolutely free. In simple words, you can say that Pokemon Go makes use of mapping technology so as to plot your actual location as you roam around in the streets to catch your favourite Pokemon.
When you play the game, your main goal would be to catch as many Pokemon or fictional characters as you can. Your main task will be to battle your opponents to catch the Pokemon and then train them.
It’s worth mentioning here that this AR-game is absolutely convenient to play. Now, one of the most amazing features that have been added to this game is Mega Evolution. But, unfortunately if you were of the opinion that greninja can mega evolve, then you are completely wrong, in fact you should note that no Kalos pokemon can mega evolve.
Through this article, we will discuss all you need to know about Greninja. So, without any further delay, let’s get started.
Part 1: Who is Mega greninja?

Also, called the Ninja Pokemon, Greninja is Dark/ Water-type pokemon. Some people love to call it a frog-like master. One of the most amazing features of Greninja pokemon is that with its swift movements, you will notice that this pokemon succeeds in confusing its opponents.
It makes use of very sharp throwing stars to slice its enemies. It features Torrent ability.
There are various weaknesses of this pokemon which include “Fighting”, “Grass”, “Electric”, “Bug”, and “Fairy”.Its worth mentioning here that Greninja pokemon is the final evolution of Froakie.
Part 2: What are the Strengths of Greninja in Pokemon?

Greninja is resistant to “Water”, “Fire”, “Ice”, “Dark”, “Steel” and finally “Ghost”. Also, this pokemon is immune to “Psychic”. This pokemon’s presence can be very intimidating for its opponents, it would not be wrong if we say that Greninja is quite unpredictable. There is no doubt that the counter attacks of Greniaja prove to be very dangerous for its enemies.
Part 3: How to Catch Greninja?

In order to catch Greninja, you will be required to fulfill specific requirements in the Pokemon Sun and Moon Exclusive demo.
First of all, after launching the Pokemon Sun and Moon Demo, go to the Pokemon Center.
Then, you’ll meet Professor Kukui and when he starts talking to you and asks what you wish to do , choose the option of “bring to full version.After that, you will be required to choose Ash-Greninja. Then, open the full game, finally you have to enter the nearest Pokémon Center.
Catching your favourite Pokemon or to mega evolve a specific pokemon will require you to go to different places or explore different locations, but it’s not always possible to step out of your house, it might be raining, or its night time, in the case, we recommend using software called Dr.Fone(Virtual Location).
With the help of this amazing software, you can teleport to any location or place in the whole without even requiring you to step out of your house.
In order to get started with Dr.Fone, you need to download Dr.Fone(Virtual Location) iOS. Then, you have to install Dr.fone on your smartphone. Finally, you have to launch Dr.Fone (Virtual Location) on your device.
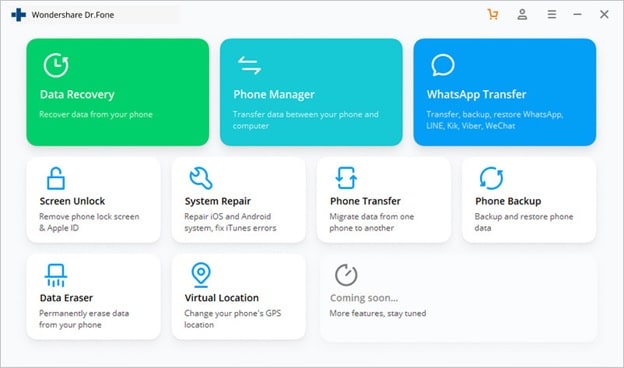
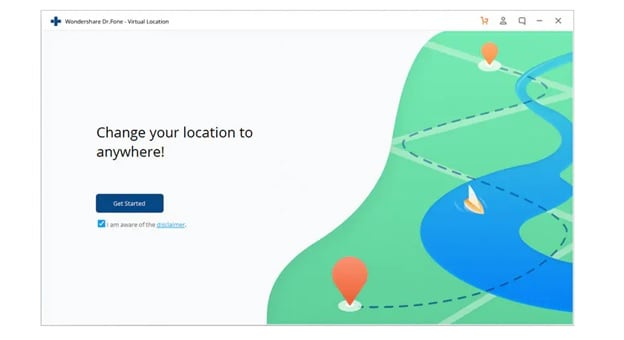
Step 1: You have to tap on “Virtual Location” among the various options that you will notice therein. It’s important to ensure that when you are setting up Dr.Fone on your device, always ensure that your iPhone is connected to the PC. Then, click on “Get Started”.
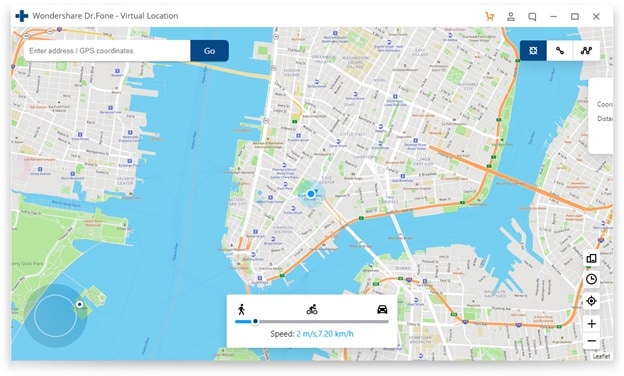
Step 2: If you have executed the prior steps or directions successfully, then you will see a new window that shows your actual location on a map will get displayed on your screen. Now, make sure that your displayed location on moa is accurate, if not, then click on “Center On,” with the help of this, you’ll be able to make your location correct.
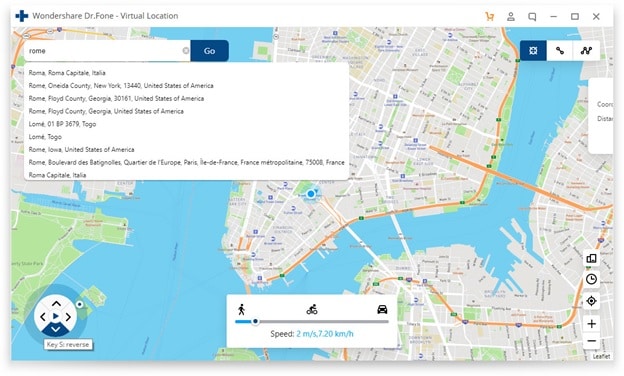
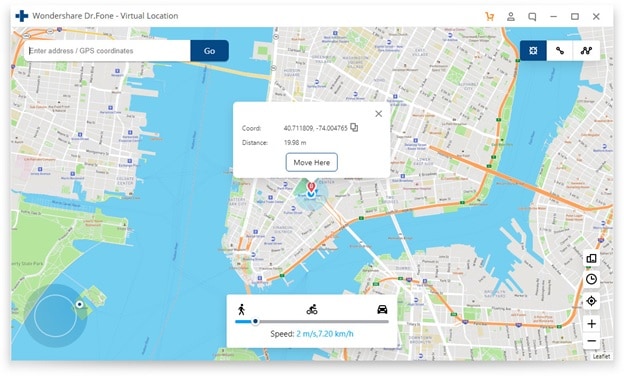
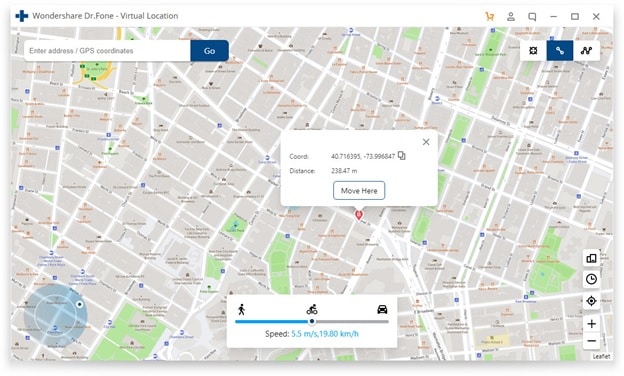
Step 3: After all the previous steps, the next step is to click on the “teleport mode” icon, which will be located in the upper-right part. This will activate the teleport mode. After that, you have to enter the name of the location or place where you wish to teleport to in the upper left field. Finally, tap on “Go”. As an example, we are going to enter “Italy”, Rome in the left field.
Step 4: In this manner, your location will now be understood or set by the system to “Italy”. You’ll see a pop-up box; you have to just click on “Move On”.
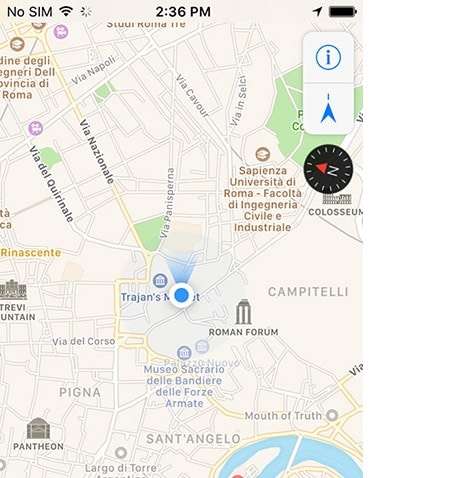
Step 5: If you have followed the directions accurately, your actual location on the map will now be set to “Italy”. You can confirm your location from the Pokemon Go’s map. Finally, below we have provided a screenshot of how the location will be shown.
Step 6: Also, you’ll see that the location on your iPhone would have also changed now to “Italy” or any other place that you have entered earlier.
Conclusion
So, we have reached the end of this article. We hope that you found the article quite useful as well as insightful. We also hope that with the help of the setup guide for Dr.Fone you can now easily catch your favourite pokemon by teleporting to different locations across the world. If you have any doubts or suggestions related to this article, then feel free to write it down in the comment section. So, this was all from our side for now. Stay Tuned
Pokemon Go Error 12 Failed to Detect Location On Tecno Pop 8?
Pokemon Go is a popular game that has taken the world by storm. It is an augmented reality game that allows players to catch Pokemon in the real world using their smartphones. However, many players have reported encountering the “Failed to detect location (12)” error while playing the game. This error can be frustrating as it prevents players from playing the game properly. In this article, we will discuss what causes the “Failed to detect location (12)” error in Pokemon Go and how you can fix it on your Tecno Pop 8.
Pokémon Go has been on the nerves of its players and this is all because of the AR notion that it presents. The failed to detect location 12 is one of the most common errors that are faced by the players while playing this game. You might not believe but the GPS signals and the location settings on iPhone or Android are the two main reasons for this error. It can be resolved with ease and this article has been written to get the work done with ease. Applying the methods explained will ensure that you get the best results overall.
Part 1: Why is Location Important in Pokémon Go?
The best part of this game is that it has been compiled keeping in view the location mechanics. The location analytics of the game has made sure that it becomes the overnight sensation. Three main attributes are associated with the location framework of the game. These attributes also show how important the location is for the game. Understanding these attributes will also make sure that the user can overcome the errors such as failed to detect location 12 GPS joystick 2019.
i. Physical World Attribute
The best part of this attribute is that it is the center of the user experience of the game. The second part is the fact that this map has evolved and there are no shortcuts to its success. Ingress was the previous game that was developed by Niantic and the crowdsourcing of this map started with the evolution of this application. This was developed by the same team that is working on the core of Google Earth.
ii. Real World Gestures
The augmented reality is another important aspect that is related to Pokemon Go and this also means that the location services are relied on when it comes to this application. The android and the iOS location services are continuously used by the game to provide the pinpoint locations as well as the game features that are not found in other applications. The use of location through GPS satellites even becomes more important for such gestures. Especially when the player is outdoors it becomes too important to deal with using GPS location.
iii. Place Attribution
The system within the system that has been designed by the game developers makes sure that the location inaccuracies are accounted for. This also means that the 4-meter accuracy of the GPS is further enhanced to deal with the perfect location identification of each player.
Part 2: Ways to Fix Error 12 on Pokémon Go
Several ways can be used to make sure that the subject error is resolved with ease. This section of the article will deal with all such ways that can be used to get the work done with ease and perfection.
Method 1: Enable Mock Locations
As the name suggests it is to set the fake location using the build-in iPhone feature. It will also make sure that the feature of the game continues to work perfectly.
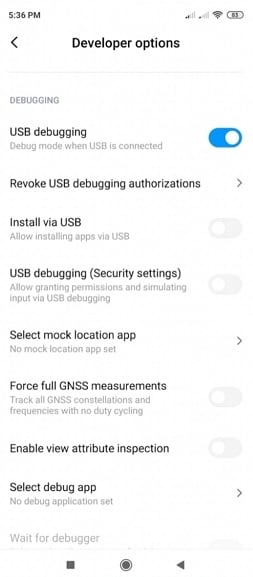
Step 1. Go to the developer options of your device. To get to the developer options simply head over to the settings > About Phone > Software Info > Build number and tap it 7 times to enable the mock locations.
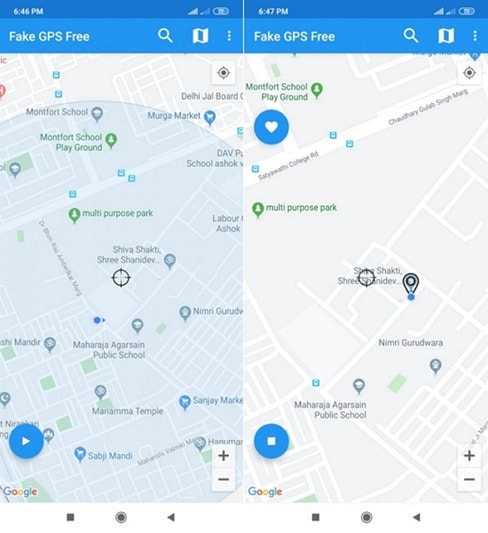
Step 2. Install the Fake GPS that is a free application and can easily be found on the Play Store.
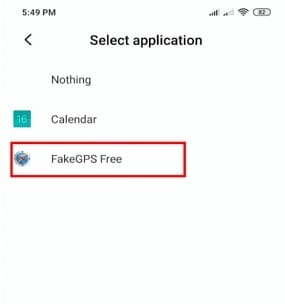
Step 3. Launch the application and you can easily enjoy Pokémon Go without any hassle and trouble and resolve the Pokémon go failed to detect location 12 fake GPS error.
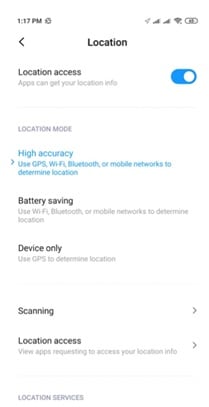
Method 2: Location Activation
This is another important and easy way to make sure that the Pokémon failed to detect location 12 error is resolved with ease and perfection. To execute the process the steps are mentioned as follows:
Step 1. Open the settings on your Phone to start with:
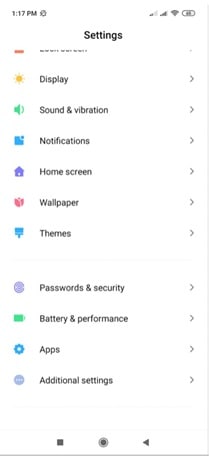
Step 2. Tap on the passwords and security to proceed with the process:
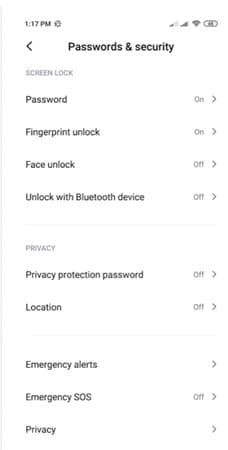
Step 3. Tap to turn on the location to finish the process and eliminate the failed to detect location 12 Pokémon Go errors.
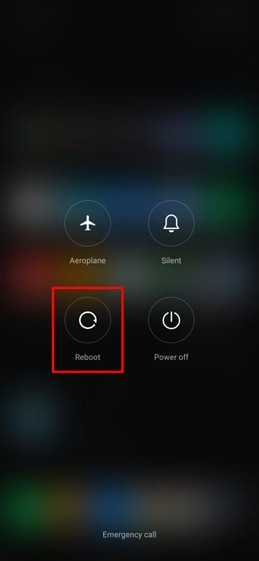
Method 3: Reboot the Tecno Pop 8 device
This might seems weird but this trick has been working to quiet some time now and has been proven to eliminate the failed location 12 Pokémon Go issue. There is a possibility that the server location is not synced with the Tecno Pop 8 device. Restarting the Tecno Pop 8 device will make sure that both the locations are sync and the problem is resolved with ease.
Just long-press the power button and choose the reboot option from the menu that appears to complete the process in full.
Part 3: Best Way to Overcome Location Error 12 on Pokémon Go for iOS Devices
Dr. Fone Virtual location is the best tool to overcome issues such as failure to detect location 12 Pokémon go on iPhone. The program has been designed to make sure that the GPS location is spoofed and you get the perfect outcome in resolving the error under discussion.
The Process
Step 1: Program Installation
To begin the process, download and install the program to get going with the process.

Step 2: Enable Virtual Location
Connect your iPhone and enable virtual location from the options of the program. Hit get started to begin the spoof.

Step 3: Locate yourself
The center on the button on the next screen is to be clicked to get the accurate location.

Step 4: Teleportation
On the upper right corner click the icon on the third to begin teleportation or spoofing to be precise. Enter the name of the place where you want to teleport to.

Step 5: Move to the teleported location
Click on move here and the system will move you to the location that has been entered.

Step 6: Validate and Completion
The location will be locked by the program and your iPhone will also show the same location as on Dr. Fone. This also completes the process in full:

Conclusion
Dr.Fone - Virtual Location is the best and the state-of-the-art program to overcome Pokémon go unable to detect location 12 on iOS devices. It has an intuitive interface and it also allows the users to overcome the issues that traditional spoofing programs present. It is being updated constantly which also means that you will be able to get the best results. There is no program on the internet that can resolve the error that failed to detect location 12 in Pokémon go as easily as this one does.
Which Pokémon can Evolve with a Moon Stone For Tecno Pop 8?
Evolution items play a significant role in evolving certain species in the Pokémon game. Moon Stone is one of these peculiar items that are worth adding to your Pokedex. However, getting Moon Stone Pokémon is a tough assignment and you have to pull your best bells and whistles. However, there are several hacks and tricks that can reduce your hunting pain. In this article, we shall take you through a complete guide on Moon Stone Pokémon and evolutions.
Part 1. Moon Stone Pokémon
What is Moon Stone Pokémon?
Moon Stone is an evolution stone introduced in generation I. This peculiar stone is used to evolve certain species of Pokémon. In terms of appearance, Moon Stone Pokémon is elliptical and black as the night sky.

The simplest way to get a Moon Stone in Pokémon Sword and Shield is to go to Lake of Outrage in the Wild area. You will see a body of water on your left and a watt trader standing near it. To cross this water body, you will have to unlock the Rotom Bike from Route 9. When you manage this, check under the eight stones and you might be lucky that one of them might yield a Moon Stone. Also, you can navigate to the Dusty Bowl in the Wild Area. Here, you will find barren stones between a grassy rock and wheat field.
Pokémon that Evolve with a Moon Stone
Moon Stone makes certain species of Pokémon evolve. To evolve a Pokémon using Moon Stone in Pokémon Sword and Shield, simply open the bag and go to the “Other Items” section. Finally, use Moon Stone in any of the following Pokémon.
1. Nidorina
Nidorina is a poison type Pokémon that was introduced in Generation I. it looks like a rabbit with blue skin and dark spots around the body. Its natural abilities are poison point, rivalry, and hustle. As of level 16, Nidorona evolved from Nidoran. With the use of Moon Stone, Nidorina can evolve into Nidoqueen.
2. Nidorino
Nidorino is a male counterpart of Nidorina. This poison-type Pokémon debuted in Generation I and looks like a rabbit. It has a red-purple color with some dark spots spread across the body. Sharp teeth protrude with large upper jaws and spikes. This Pokémon is quick to anger. Nidorino evolved from Nidoran as of level 16 and can evolve to Nidoking using the Moon Stone.
3. Clefairy
This is a fairy-type Pokémon that was introduced in Generation I. It is a small, round, and star-shaped Pokémon whose abilities include magic guard and cute charm. It is timid and rarely feature near humans. Clefairy evolves from Cleffa when it gets leveled up with high friendship. With the help of Moon Stone, Clefairy evolves into Clefable.
4. Jigglypuff
This is a normal/fairy type of Pokémon that was also introduced in Generation I. Before Generation VI, this Pokémon was entirely a normal-type Pokémon. Jigglypuff itself is an evolution of Igglybuff and can evolve into Wigglytuff with the help of Moon Stone.
5. Skitty
This is a normal type Pokémon that was introduced in Generation II. This Pokémon is pink and looks like a cat with a cute charm ability. Skitty can evolve to Delcatty using the Moon Stone.
6. Munna
Munna is a psychic-type Pokémon that was introduced in Generation V. It is a small Pokémon with a pink round body having purple flower painting on its back. With the use of Moon Stone, Munna evolves into a Musharna.
Part 2. Tricks and Hacks to Get Moon Stone Pokémon
As you have seen above, getting a Moon Stone is not an easy ride. It involves lots of trials and there is no guarantee to get it. But what tricks and hacks can you incorporate to make your hunt seamless? The following are some of the plausible tricks that you can use to easily grab a Moon Stone and add it to your Pokedex.
1. Use Dr. Fone Virtual iOS Location
It goes without question that Dr. Fone Virtual Location is the best location spoofer tool. Remember Pokémon game is location-based and if you can play around with your location then you are at an upper hand of grabbing a rare Pokémon or an evolution item like Moon Stone. Dr. Fone Virtual Location makes it seamless to teleport to any location across the globe while you are seated comfortably at home. Besides, you can simulate movements between two or more points and make GPS control more flexible with the help of a joystick.
How to Teleport with Dr. Fone Virtual Location
Step 1. After installing Dr. Fone Virtual Location, launch it, and select “Virtual Location.” Now connect your iPhone to the computer.
Step 2. Click the “Get Started” on the subsequent page to access the teleport options.
Step 3. The program will display a new page with three icons at the top-right. Click the third icon to take you to the teleport mode. Again enter the place you want to teleport to in the text field at the top-left of this same window and then hit “Go.”
Step 4. Click “Move Here” from the pop-up that follows to teleport to the location you provided.
2. Use Android Spoofing Tool- Pgsharp
Pgsharp is a fake GPS location tool for Android devices and is suitable for playing Pokémon from a fake location with no root. It allows users to teleport in real-time while they are just sited at home. It has a downloadable free version. It has a user-friendly interface, and once you have set the fake GPS location on your Tecno Pop 8, you can catch rare Pokémon and evolution items with ease.
3. Use Go-tcha Evolve
Go-tcha Evolve is an application that allows you to set animations and vibration to alert you in the case of Pokémon or pokestops. You can use its “auto-catch” feature to allow it automatically grab the Pokémon or pokestops without having to respond to alerts.
Also read:
- [New] Transforming Chats with Animated Gifs – A Complete Walkthrough for Snapchat for 2024
- Conquer iPhone's ChatGPT Challenges with These Fixes
- Discover the Top 5 PC Clipping Utilities for Quick Samples for 2024
- Evaluating ChatGPT's Capability to Solve Complex Arithmetic Problems
- In 2024, CatchEmAll Celebrate National Pokémon Day with Virtual Location On Xiaomi 13T Pro | Dr.fone
- In 2024, CatchEmAll Celebrate National Pokémon Day with Virtual Location On ZTE Nubia Z60 Ultra | Dr.fone
- In 2024, Detailed guide of ispoofer for pogo installation On Infinix Smart 8 HD | Dr.fone
- In 2024, Detailed guide of ispoofer for pogo installation On Infinix Smart 8 Plus | Dr.fone
- In 2024, Detailed guide of ispoofer for pogo installation On Infinix Zero 30 5G | Dr.fone
- In 2024, Detailed guide of ispoofer for pogo installation On Itel A60s | Dr.fone
- In 2024, Detailed guide of ispoofer for pogo installation On Itel P55+ | Dr.fone
- In 2024, Detailed guide of ispoofer for pogo installation On Xiaomi 13T | Dr.fone
- LaughOutLoud Maker Get Funny Faces on the Web for 2024
- Maximize Warzone Performance in Windows 11 by Unlocking Your Graphics Card Potential
- OLED Monitors' Trajectory Projected Upwards: Shipping Volume Expected to Hit 1.n Milestone Pre-Next Year
- Quick Format Functionality: Does It Erase Data Permanently?
- Seamless Music Addition for Social Media IPhone/Android for 2024
- Top 5 Car Locator Apps for Infinix GT 10 Pro | Dr.fone
- Unlocking Creativity with GPT-E: A Comprehensive Walkthrough for OpenAI's Interactive Environment
- Title: All You Need To Know About Mega Greninja For Tecno Pop 8 | Dr.fone
- Author: Lary
- Created at : 2025-01-24 16:58:56
- Updated at : 2025-01-26 18:08:49
- Link: https://android-pokemon-go.techidaily.com/all-you-need-to-know-about-mega-greninja-for-tecno-pop-8-drfone-by-drfone-virtual-android/
- License: This work is licensed under CC BY-NC-SA 4.0.