
4 solution to get rid of pokemon fail to detect location On Nokia C12 Plus | Dr.fone
4 solution to get rid of pokemon fail to detect location On Nokia C12 Plus
Pokémon go failed to detect location is an error that is frequently faced by the players and there are several reasons for it. From device to server-based all the reasons amount to the error and therefore the right solution must be applied to get the work done with ease and perfection. The location-based attribute of the game is something that has been one of the best features. It is the sole reason for which the game is not only popular but also one of the most downloaded games of all time. It is therefore important to overcome fail to detect location error in this game.
Part 1: Why does Pokémon fail to detect location?
The two main and frequent errors that are related to the Pokémon are error 11 and error 12. These not only frustrate the users but also hamper the game experience. Failed to detect location Pokémon go is the result. This part of the article will make sure that you get all the information that is needed to overcome the issue. The GPS joystick failed to detect location error will also be overcome and you will also be able to guide others.
Causes of Error 11
- If the game failed to detect location Pokémon go fake GPS then the most common reason is the fact that the GPS has been disabled. The internet and GPS are the two important aspects of this game. If anyone is not available then it is a must that the game will not work at all.
- Once the game has been installed it requires certain permissions that should be granted for proper working. All the permissions must be accepted for the game to work fine. If the GPS access has not been granted then it should be so that the GPS joystick Pokémon go failed to detect location error is resolved and you can enjoy the game.
- To install some applications and to enhance the features of the phone it is at times rooted in the case of android or jailbroken in the case of iPhone. In both cases, you will get the Pokémon to go failed to detect location fake GPS error. It is therefore important that the issue is resolved by getting the Nokia C12 Plus device back to its original shape. It can be done by unrooting the Nokia C12 Plus devices so that the issue is resolved.
Causes of Error 12
- The Mock location on the Nokia C12 Plus device is enabled can lead to failed to detect location GPS joystick or error 12 on the Nokia C12 Plus device. It is therefore advised to make sure that the location in question is disabled to get the gaming experience back on track.
- The other and the most common reason for the error 12 is the fact that the GPS signals are not received by the Nokia C12 Plus device. It also leads to Pokémon failed to detect location error and will make sure that you get all the enjoyment for which the game has been downloaded.

Part 2: 3 solutions to fix Pokémon fails to detect the location

Solution 1: Turn on GPS
This is the most common method that can be applied to make sure that the game works perfectly.
i. Drag the notification panel down on your device.
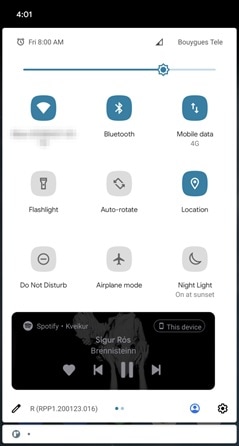
ii. Click on the location to turn it ON.

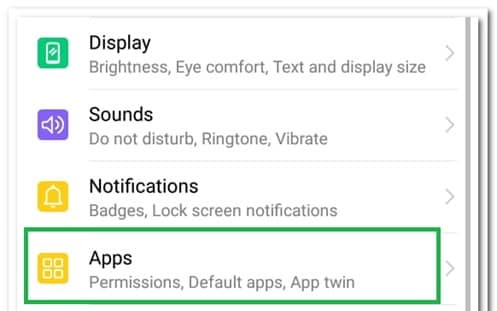
Solution 2: Setting Permissions for the application
If the right permissions are not given to the application then it can also lead to the fake GPS failed to detect location. To make sure that this is overcome you need to follow the steps as under.
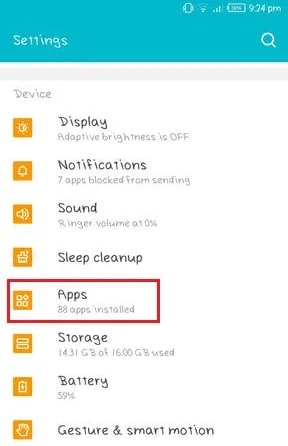
i. Go to Settings > Applications > Apps to access the permissions for the application.
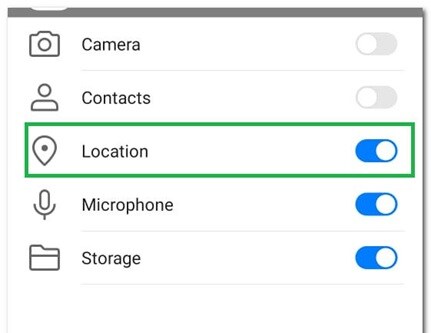
ii. Go to Pokémon Go > Permissions > Turn on location to get the issue resolved.
Solution 3: Clear Cache
i. Go to the Settings of your device
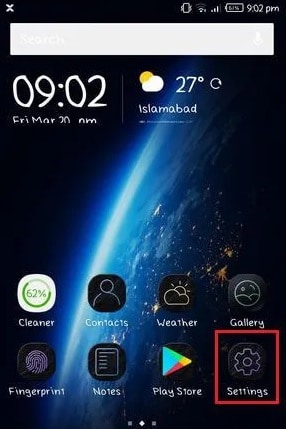
ii. Click on the app’s icon on the next screen
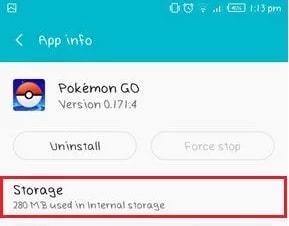
iii. Click on the storage option.
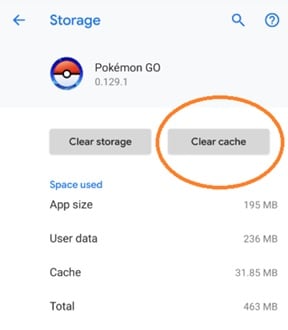
iv. Clear data and cache and restart the Nokia C12 Plus device to get the issue fixed.
Part 3: Dr.Fone Virtual location change your location in one click
To fix the fake GPS Pokémon go failed to detect location Dr. Fone’s virtual location is the best and the state of the art program that can be used. It is not only the best but also allows the users to overcome the issues that are presented by the other similar programs. With this program, it is easy to make sure that the overall game performance improves in terms of location detection. You can teleport with ease using this program. With an intuitive interface and a professional team backing the program, you get the ultimate results. Not only Pokémon but all the location-based and AR games this program is a boon.
How to use Dr. Fone Virtual Location
Step 1: Program Installation
First of all download and install the program to get started.

Step 2: Enable Virtual Location
Click the get started icon once the iPhone has been connected to the system and the virtual location has been enabled.

Step 3: Locate the Nokia C12 Plus device
Click the center on a button to make sure that your location is detected by the program.

Step 4: Change Location
The third icon on the upper right corner is to be pressed to teleport. In the bar type the name of the location you want to teleport to.

Step 5: Move to a teleported location
Click on move here to get to the location that has been selected.

Step 6: Validation
Your iPhone will show the same location as on the program and this finishes the process.

Conclusion
Dr. Fone’s virtual location is the best and the most advanced program that will make sure that you get the best results. It will not only enhance your gaming experience but will also remove the Pokémon go GPS joystick that failed to detect location error with perfection. It is the best program that is easy to use and there are guides online that further foster the process. With this program, it is easy to get a step ahead for all AR and location-based games and to enjoy to your fullest.
 Nero Burning ROM:
The ultimate burning program for all your needs!
Can I use iTools gpx file to catch the rare Pokemon On Nokia C12 Plus
Pokemon continues to be an after-sought mobile gaming app. The iTool gpx completes the game. This tool is dully smart, letting you catch Pokemon without much hassle. iTools is a replacement for iTunes which you can now use to manage your iDevice and computer. Its simplicity makes it a walk-in-the-park as you try to catch Pokemon. It will save your computer battery life and also save you from complex background operations.
It will inform you when a pokestop arrives without the need to even use your phone. More so, simply connect the Nokia C12 Plus device to your phone via Bluetooth technology and move along as you enjoy your game. The device will vibrate or blink, an indication that you need to get ready to catch a Pokemon. So yes, you can use iTool gpx file to catch rare Pokemon.
Part 1:What can the gpx file do?
The gpx file is mainly used in software applications to transfer information about tracks and points from one application to another. These files are saved in ‘XML’ format, which makes it easy to import and read GPS data by several programs.
How to download gpx file on iOS and Android
On iOS
First, open the route that you are interested in, then select the ‘Export gpx’ option > ‘Export’ in the lower line. Next, choose whether to forward the gpx file via a provider or to copy and save it in your data.
On Android
Open the route you are interested in and hit the ‘More’ option. Next, select the ‘Export gps’ option and the file will be downloaded to your smartphone. You can forward the route to various providers by tapping the ‘Share’ button.
Why gpx Pokemon
Many games have thronged our screens but not many matches Pokemon. Once you download gpx to iTools mobile, you get real-life benefits from this hottest virtual game. As gpx files are a list of exact locations that form a route for cycling or walking, they direct the player. A player can, therefore, see their location regarding the route via GPS for surety.
Likewise, players are assured of being on the right trail when they use navigation apps with gpx files. And whey they get off track, they can redirect themselves to the path and continue gaming.
Part 2:Where to find the iTools gpx file
You have to import gpx file before opening it. The easiest way is to upload it to the web version of Google Maps. First, open and sign in to Google Maps then add a gpx file as a new map. Follow these steps.
- First, open the Google Maps menu and select ‘Your places’.
- Select ‘Maps’ > ‘Create map’.
- Select the ‘Import’ button after a new Google Maps window opens.
- Finally, upload your gpx file. You should see the map data in your file on Google Maps.
For you to use gpx file iTools, you first have to enable the virtual location on your device. It is from the virtual location where you can cycle and pin mode with teleport and joystick. More so, you can adjust the speed as desired. You just need to choose your favorite location and get to playing. Import, export, and save the iTools gpx to continue from your last stop point.
Follow these steps to save the iTools gpx file and get gpx files from friends
With ThinkSky, you can add gpx file to iTools and fake your gps location. This app comes with plenty of functionalities to make every fake location appear real to your friends.
- First, determine and click on the point that you wish to fake.
- Next, copy the coordinates by clicking the ‘Copy to clipboard’ button.
 SwifDoo PDF Perpetual (2-PC) Free upgrade. No monthly fees ever.
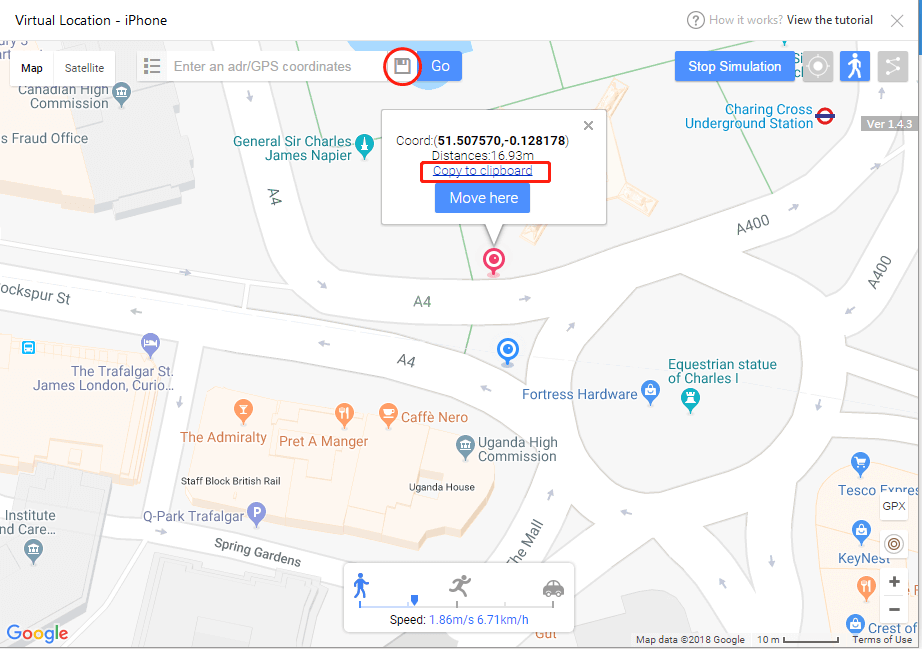
- Then, confirm group name and click on the ‘Save’ icon. You’ll see it located besides the search bar.
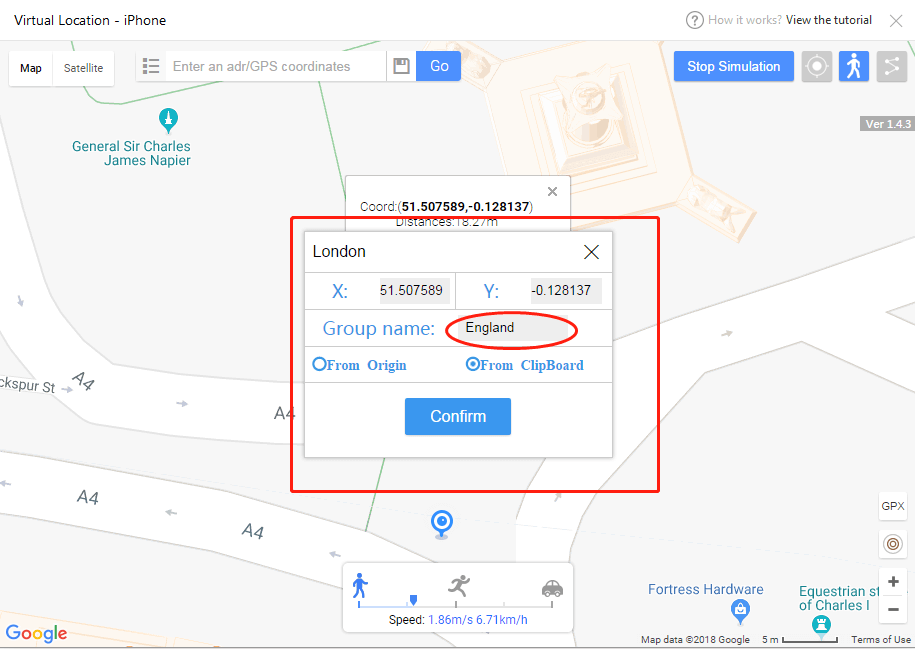
- Lastly, input the coordinates names and group name and then export your favorite location list.
 Video Converter Factory Pro
Part 3:Is there any safer tool to spoof Pokemon with iTools file?
You can opt for other safer tools for route creator. Perhaps it is raining and you can’t step out. Or it is already late in the night. What do you do? Just fake it! Dr.Fone comes with advanced features to help you iSpoofer gpx routes and fake your locations in simple steps.
How to export and import gpx to save and share location with Dr.Fone
First, you need to download, install, and launch Dr. Fone – Virtual Location to your computer. Then click the ‘Virtual Location’ option and connect your iPhone to the computer. Next, hit the ‘Get Started’ button. You’ll be redirected to a new window to find the actual location on your map. Please follow these steps to export and import gpx to save and share.
 Project Manager - Asset Browser for 3Ds Max
Step 1. Save the path as gpx.file
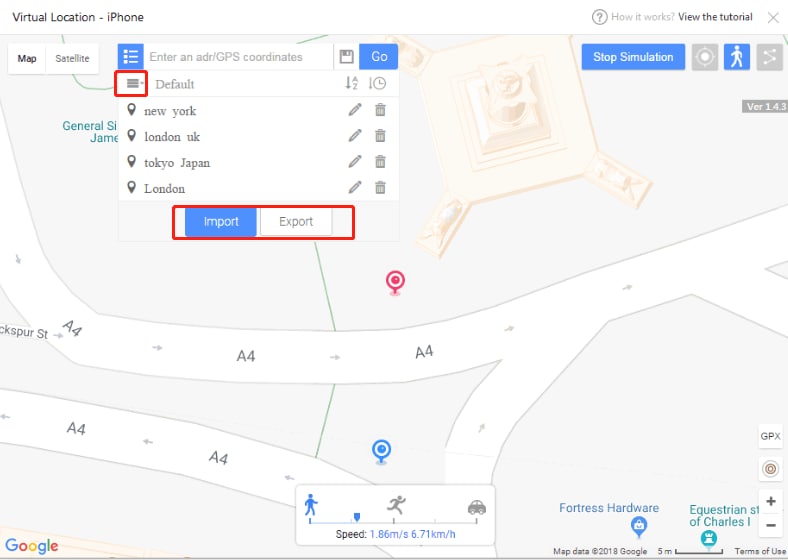
Dr. Fone virtual location supports saving customized routes. Click the ‘Export’ button once it pops-up.
Step 2. Import file
Next, import the shared gpx file into the app. You can download the gpx file from other websites or you can get it from friends. To import the file, go to the main screen of the app and check under the ‘Add-to-favorites’ icon then click the ‘Import’ button. Wait as the file is imported then click the ‘Save’ button after the process is completed.

You can also add your favorite iSpoofer gpx routes. To add any spot into your favorites, check for the five-star icon and click to add the route to favorites. You should see ‘Collection successfully’ after adding your favorites. This gpx route creator makes it easy to walk along your favorite routes. Click the ‘Move’ button and reach any place with a click of a button.

The Bottom Line
Being a first timer, you may find it very complicated to fake your gps location. But Pokemon map creator makes it easy. Dr. Fone virtual location works seamlessly with your iOS device to take you virtually to any place in the world, from the comfort of your living room.
How to Get and Use Pokemon Go Promo Codes On Nokia C12 Plus
The steady increase in the number of Pokemon Go users has simultaneously led to the expansion of the software. And such is the use of Pokemon Go promo codes and Pokemon promo cards. Pokemon Go promo codes are short-time alphanumeric codes that allow you to receive free in-game items, as Pokemon prize cards are awards that are gifted to the players who can intensely beat the Pokemon and knock it out.
Pokemon promo codes or promo cards elevate your game to a whole new level since you will be able to possess the Poke balls, berries, lucky eggs, incense, and other various loots. They will make your game an absolute breeze, and you necessarily won’t move around as you play. Besides, Pokemon promo codes are short-lasting; you, therefore, need to claim them quickly.
This article gives an insight on how to get and use Pokemon Go promo codes and promo cards.
Part 1: How to Get Pokemon Go Promo Codes
Pokemon Go often offers promo codes on special events or after successful partnerships.
The availability of Pokemon promo codes is not constant – They do come and go.
Pokemon promo codes are unpredictable, and so are their rewards. Some promo codes will offer exceptional gifts such as cosmetics, while others may be in-game supplies such as Pokeballs and berries.
Niantic shares some free Pokemon Go promo codes on their official Twitter account. Their official statement on the website says, “Niantic offers a limited supply of one-time use codes in conjunction with special events or sponsored partnerships.”
Pokemon Go also has daily free boxes, the ones you attain at no additional cost.
To check if you have received your daily free boxes, you need to glimpse at your store on a day-to-day basis.
With your free boxes, you can obtain different items.
Part 2: The Latest Active Pokemon GO Promo Codes (January 2024)
The latest active Pokemon Go promo codes are less in number and are not readily available. However, here is the list of functional and usable Pokemon Go promo codes.
- FENDIxFRGMTxPOKEMON - FENDIxFRGMTxPOKEMON avatar hoodie
Part 3: How to Redeem Pokemon Go Promo Codes
With your Pokemon Go promo code, you can redeem it to get insightful items such as lucky eggs, poke balls, and lure modules, among others. The Android and iOS mobile phones all have different ways of redeeming the promo codes. Android device is through the app itself, while the iOS device is through the Pokemon Go Niantic official website.
Android devices –

Step 1. Get to the shop bar
Firstly, in the map view, click on the menu icon. It displays various options. Click on the shop button.
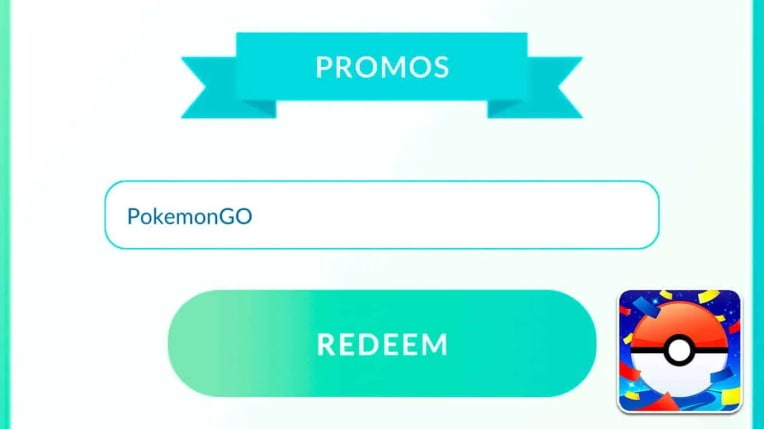
Step 2. Enter your promo code
A text bar is usually at the bottom of your screen—type in your Pokemon promo code.
Step 3. Redeem your promo code
Click on the ‘Redeem’ icon.
iOS devices –

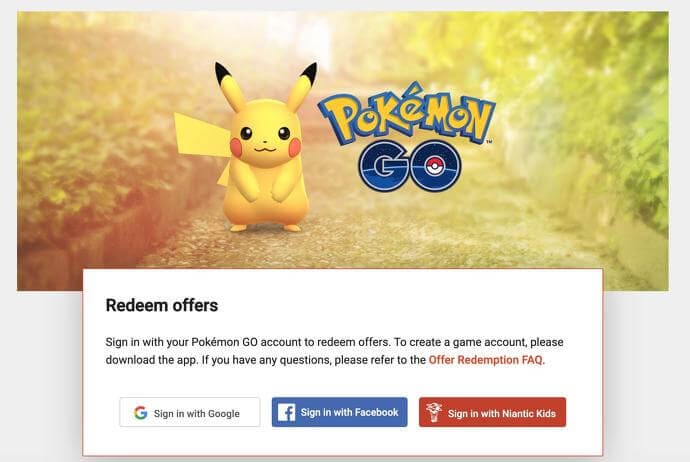
Step 1. Log in to the Pokemon Go official website
Here, you first visit the Pokemon Go Niantic official website. Log in with the same credential you access your Pokemon Go account with
Step 2. Enter your promo code
Enter your promo code to the key bar displayed.
Step 3. Redeem your promo code
Hit the ‘Redeem’ icon. A confirmation notification will pop up. It will show all the items you added to your inventory.

Part 4: How to Cheat at Pokemon Go
The Pokemon Go promo code is not usually available at all times. However, this should not limit your play. You don’t necessarily have to move around for you to catch the Pokemon. You can still enjoy playing Pokemon Go in your comfort. You, therefore, have to involve a third-party tool. And the best software tool to use is Dr.Fone - Virtual Location. This tool is an award-winning professional tool that allows you to teleport effortlessly. The key features of Dr.Fone - Virtual Location are:
- It has instant teleportation. It helps in concealing your GPS location
- It has a full-screen HD map view
- It has a joystick tool that comfortably allows you to spoof your location
- It will enable you to spoof your GRS location with a single click
Faking GPS location in iPhone devices differs from Android devices.
iPhone devices –
Here are the simple steps of using Dr. Fone - Virtual Location in faking your location on Pokemon Go on the iPhone.
Step 1. Launch Dr. Fone Virtual Location to your computer.
First, download Dr.Fone - Virtual location from their official website. Install and allow it to run on your computer device. Click on the ‘Virtual Location’ option to initiate the process of faking your GPS.
Step 2. Link your iPhone to your computer
Using a USB cable, connect your iPhone to your computer system. Hit the ‘Get started’ button to continue.
Step 3. Search for a location
Here, you need to search for a suitable location that you would like to teleport to. Hit the ‘teleport’ option from the toolbar at the top-right corner of the interface.
Step 4. Teleport to your desired location
Various options of places you would like to teleport to will be there on display. You can search for it using the search bar or select one from the displayed list and hit the ‘Go’ icon.
Step 5. Teleport to your chosen location
For you to teleport to your chosen location, you need to drop a pin on your preferred place and hit the ‘Move Here’ icon. Now, you will be able to catch more Pokemon since you have already altered your location.
Android Phones –
Faking location on Android phones is undoubtedly more straightforward than on iPhones. In Android phones, hacking the GPS location does not necessarily involve using a computer device.
Here are the simple steps of how to fake your GPS location on Android devices.
Step 1. Enable the developer options
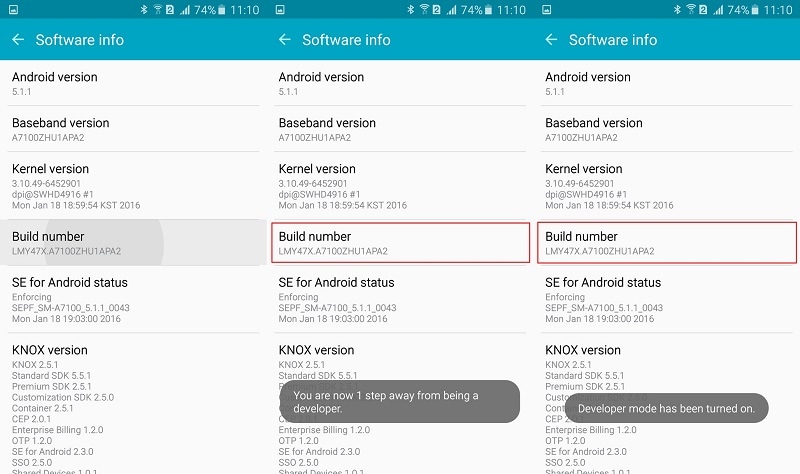
When you want to fake your location to allow you to play Pokemon Go freely, the first thing to do is unlock your developer options settings.
Go to the ‘Setting’ menu, which is usually at the top right corner of your interface. Scroll down and click on the ‘About Phone.’ Search for the ‘Build number’ option and click on it. Tap the build number about five times until a pop-up notification ‘You are now a developer’ appears.
Step 2. Download the Fake GPS Location app to your Nokia C12 Plus
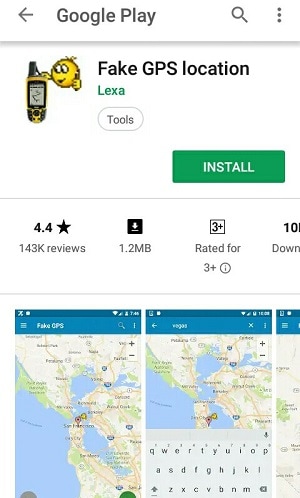
Go to the Google Play Store and download Fake GPS Location to your Nokia C12 Plus. Install it and allow it to run on your Nokia C12 Plus.
Step 3. Allow mock location
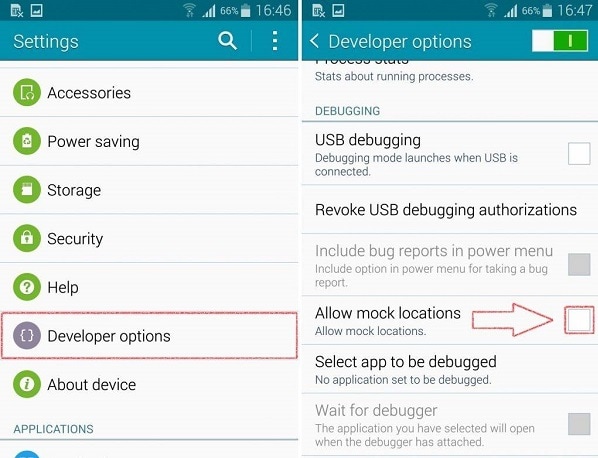
To get the Mock Location option, you go back to the ‘Settings’ menu. Scroll down search for ‘Allow Mock Locations’ and turn it on when you find it. Allow mocking of the Fake GPS app.
Step 4. Search for your desired location to fake
Go to your Fake GPS application and search for a preferred location. To initiate the process, hit the ‘Search’ bar.
Step 5. Confirm your new location
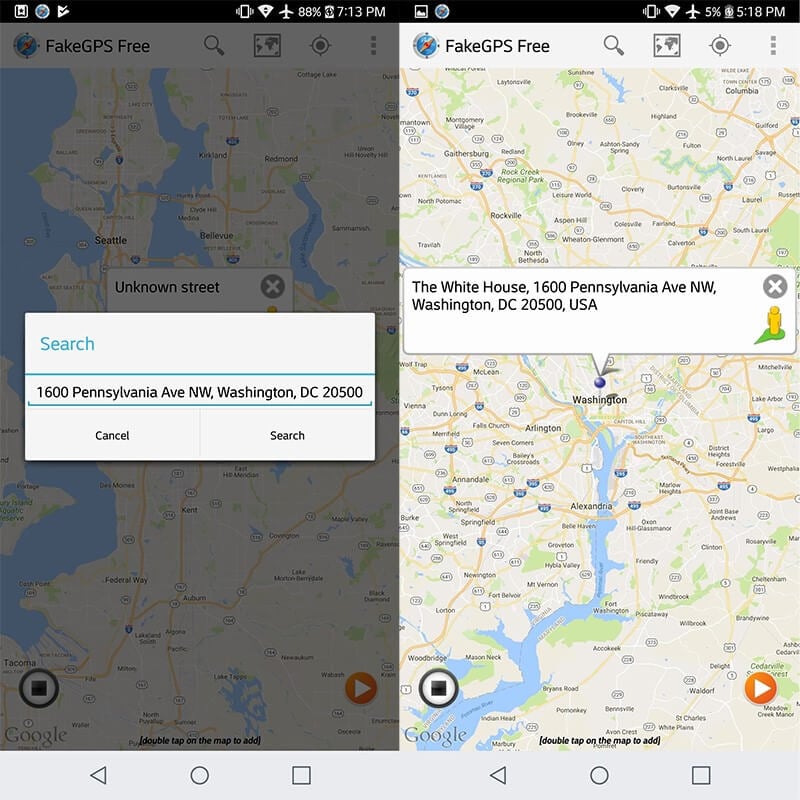
Lastly, head back to your Pokemon Go app. There, you can see your new location cast.
Conclusion
All Pokemon promo codes have an expiry time frame. And the time frames are usually shorter. Therefore, you need to use them before their due time elapses. Currently, there are no Pokemon promo codes. And for you to continue playing Pokemon Go, you need to involve a third-party tool, and the best tool to use is Dr. Fone Virtual Location.
- Title: 4 solution to get rid of pokemon fail to detect location On Nokia C12 Plus | Dr.fone
- Author: Lary
- Created at : 2024-07-23 01:01:34
- Updated at : 2024-07-24 01:01:34
- Link: https://android-pokemon-go.techidaily.com/4-solution-to-get-rid-of-pokemon-fail-to-detect-location-on-nokia-c12-plus-drfone-by-drfone-virtual-android/
- License: This work is licensed under CC BY-NC-SA 4.0.